Stubborn Damaged Screws

Page may contain affiliate links. Please see terms for details.

SteveX

Active Member
Joined
Oct 13, 2013
Messages
166
Car
CLK 55
Hi Guys,

Does anyone have any ideas how to tackle stubborn phillips screws?

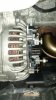
I am trying to get the Voltage Reg off of the Alternator in situ. The connectors and cover is off, and one of the three phillips screws is out, but one is stuck fast and rounded a bit.

The one on the bottom I have cut off and will extract, but I don't want to get that far with the other one that is more difficult to get to.

Because of limited room I have considered JB welding a screw driver head on it and then using a combination spanner.

Any ideas?
 
Hmm, that's a tough one, as the screw is recessed in the case of the reg, probably not without cutting the reg although if it's coming out anyway?
 
as long as your only cutting into the reg pack then your not making things worse, power cables all disconnected of course
 
Too tight for an impact driver? Even a bit of shock often helps. Or plusgas. Or grinding paste on the screwdriver for extra grip.
 
True, cutting into the reg pack I guess is no big deal as it's got to come off anyway. The neg was removed before playing with anything down there ;)

I cut the corner off the reg pack so the screw is exposed, and I have carved a nice deep flat head into it.

Grinding paste is a nice idea, never thought of that, on normal screws I use a rubber band but not on the car. I have a bit of room but not enough to get a hammer on the impact driver.

The alternator could come off, to get it out I will need to get the fan out and remove the lower engine mounts and jack the engine up a bit, so I would rather for the sake of a couple of screws try to remove them, popping the new one on will be easy, it's just extracting the damn stubborn screws.


Cheers!
 
If you removed the alternator from its mountings could you re-orientate it a bit to get better access to the screw? - maybe that's not easy either? I appreciate you can't remove it completely without major work.
 
Have some of that Mr Alternator!

Appreciate responses.

Extracted the old one with JB welding a head on to it and cut the corner off of the other one and cut a flat head into it.

Job done :thumb:
 

Attachments

  • IMG_20150127_221217950.jpg
    IMG_20150127_221217950.jpg
    234.1 KB · Views: 71
  • IMG_20150127_221237872.jpg
    IMG_20150127_221237872.jpg
    227.2 KB · Views: 76
  • IMG_20150127_221241955.jpg
    IMG_20150127_221241955.jpg
    229.5 KB · Views: 64
Seems one spring on the brush is weak, probably accounts for the slight uneven wear on the poles in the alternator. Going to replace and see if the voltage stabilizes.

Cheers,
 
The grinding paste/lapping compound thing that was mentioned is an old trick that often works well. There have even been a few products developed specifically for removing screws that work on the same principle, Liqui Moly screw grip and E-Z screw grip for example... both are basically tiny, hard ceramic grains suspended in a liquid
 
The grinding paste/lapping compound thing that was mentioned is an old trick that often works well. There have even been a few products developed specifically for removing screws that work on the same principle, Liqui Moly screw grip and E-Z screw grip for example... both are basically tiny, hard ceramic grains suspended in a liquid

I'm going to get myself some stock of something like that for future use :)


Thanks,
 
The grinding paste/lapping compound thing that was mentioned is an old trick that often works well.

A trick I only lately came to know of courtesy of an off-road motorcycle forum. It worked for me on very small screws which otherwise weren't budging. I swear by it now!
In the same piece I read about it, they also mentioned why Phillips screws are such a pain. Apparently, they are designed to force the driver out of the slots to prevent being over torqued on assembly. Also, for anyone who works on Japanese kit, the reason the problem is worse there is because Japanese cross-heads are cut to a different profile - requiring a different driver. If you've ever noticed a punched in 'dot' on such a screw - that is to denote it is formed to the Japanese profile.
 
Bellow said:
A trick I only lately came to know of courtesy of an off-road motorcycle forum. It worked for me on very small screws which otherwise weren't budging. I swear by it now! In the same piece I read about it, they also mentioned why Phillips screws are such a pain. Apparently, they are designed to force the driver out of the slots to prevent being over torqued on assembly. Also, for anyone who works on Japanese kit, the reason the problem is worse there is because Japanese cross-heads are cut to a different profile - requiring a different driver. If you've ever noticed a punched in 'dot' on such a screw - that is to denote it is formed to the Japanese profile.

This true. I have a Pajero import. Some of the weather exposed screw have had to be drilled out and replaced, for this very reason.

Sent from my iPhone using MBClub UK
 
With Japanese motors it's probably worth keeping the cross-head driver from the supplied tool kit. It will be the most grotesque tool in your box, but if it better fits the screws!
 
I've got quite a large selection of phillips heads in varying profiles, I always find that one width or depth / profile fits better in some screws than others. Some are difficult to get good torque on, especially those that are deeper but have a very narrow profile, I always find it's so easy to chew bits off of the center of the screw.

In general I like phillips when assembling things, I find its easier to keep the driver from slipping and in position. It seems much easier to slip sideways with a flat head when screwing things in or not keep it flat and then resulting in breaking the corners of the screw head off. But when trying to undo it's the opposite for me, a deep flat head seems to have so much more torque and leverage on seized screws as apposed to just trying to twist the middle of a screw.

I think when I get time I am going to put together a small toolbox especially for stubborn bolts and screws. Small selection of different size hacksaws, some JB weld, grinding paste, rubber bands, reverse threaded extractors, hardened drill bits etc. I have lost so many hours and days on jobs where that 'one bolt' won't shift, or you slip and it chews the head. Previously with bolts I have been an advocate of heating and whacking an old socket on, but that destroys the socket.

Having the right tool for the job of course will minimize this, but we've all had those times where we are trying to hold a ratchet straight on a bolt or similar and we slip or twist while applying pressure and oops, there goes the head! Those bloody Torx bolts are the worst. I had to remove one the other week on the rear from a support bar, they were so solid. I soaked them in penetrating fluid then gave them another go, taking care to press hard and keep the head of the ratchet as straight as I could with my other hand. A bit of torque and there goes the head. Bits of bolt flaked off and I was left with a round hole in the middle of the sodding bolt - had to be drilled out.

I've got extractors with reverse threads but most of the time the bolt or screw you want to get out is in a place you can not get a drill, and even when I have bought carbide drill bits I have still burnt them out or blunted them on solid bolts.

I'm quite please with the JB weld on a screwdriver head job I did last night though, I didn't think it would hold enough, I allowed it to set for about 1hr 30 and it did the trick ruined the bit I used though.

We should have a thread dedicated to techniques of removing those stubborn bolts and screws that ruin our life and a log of the techniques used lol!

It happens to everyone though. I took the wifes Abarth to the dealer last year to have the water pump replaced. They had to remove the front bumper and turbo / manifold to replace it and the pipes. It took them three days as they called me to say that a manifold bolt had sheered off. I have always shuddered when I think of touching any manifold studs. It brings back flashbacks of trying to replace my CBR manifold that gave me some serious issues!
 
Didn't know about the Japanese cross head screws being different. Doesn't suprise me... JIS standards use different hex sizes for some bolts so grab a 13mm for what looks like an M8 bolt and find the hex head is 12mm. Actually that's a semi lie as they often don't use an M8 when an M7 (preferably with an oddball fine pitch) will do the job :doh:

Don't me started on screw extractors... as a welder and fabricator i usually see things after they've been properly FUBARed! Mechanic mate of mine brought over an old air cooled motrrbike head late last year, he had the bike in for a blowing exhaust and discovered bodges ontop of bodges. He'd removed some bent and broken studs to drill and tap for inserts only to destroy several drill bits on an ally head! I dug out more bits of deeply buried stud, the remains of one drill and an "easy out" before welding the carnage so some new holes could be drilled and tapped in the right place- turned out some of the studs were bent on purpose because some muppet had just drilled new holes in the wrong place after making a mess

Worst one i've done is a VW type 4 cylinder head. The exhaust ports are deeply buried with the studs sitting in small bosses amoungst a sea of fins. Rare head that had lots spent on porting etc and someone had tried helicoiling the exhaust studs in situ (so working upside down). I found helicoils in helicoils and there wasn't enough material left for another (decent!) thread insert so had to machine what was left of the bosses off and rebuild em with a pad of weld. Won't be saying yes if i'm ever asked to that again!

The problem that usually happens when trying to drill out a knackered fastener is too many rpm and feeds that are too low. Both are often kinda unavoidable with a handheld drill, especially a variable speed one as slowing it down also kills the torque... a 10mm HSS drill into mild steel wants about 900rpm whereas the same size into a quenched and tempered med carbon steel (class 8.8 or harder bolt) wants around 350rpm and a positive feed i.e. the harder material doesn't cut as easily so not enough pressure and/or too many rpm = the drill rubs instead of cutting which generates heat and leads to blunt drills and a hole that's even harder to finish drilling
Stainless is kinda similar but for slightly different reasons... the common non magnetic flavours aren't particularly hard to begin with but they 'work harden' incredibly easily so too fast/not enough pressure and they can work harden to the point where finishing the hole is next to impossible

Some excellent engineeering insights there.:thumb:
 
Indeed, decreasing the point angle & increasing the clearance angle of the drill bit can help to make it bite rather than rub, but you tend to loose a little bit of strength...

Are you using a Miller for that Aluminium welding by any chance?
 
Last edited:

Users who are viewing this thread

Back
Top Bottom