• The Forums are now open to new registrations, adverts are also being de-tuned.

123 Restoration - A How to?

jaymanek

Authorised Forum Sponsor
SUPPORTER
Joined
Nov 29, 2002
Messages
16,854
Location
Nuneaton Warwickshire
Car
Lots of Mercedes!
Well this is long overdue. I decided to have a few minor things seen to on my 123 in March 01. (I only just thought of scanning the pics). It started with a few rust bubbles here and there:
1.jpg


So after some ridiculous quotes I found a man called 'chris' at this place who promised me to do a first class job at silly money (well compared to the other quotes anyway)

2.jpg


So far so good

3.jpg

4.jpg


Then i start thinking, i wish i had never started this, it was fine as it was!

5.jpg


The sill and the floor were worst hit!

6.jpg


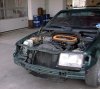
After this, my pics got scarce as I got busy with work. But Chris spent hundreds of hours on cutting out, welding etc. This was hard work but v well done in the end. The Front & Back panel were replaced. The wings and 3 doors were replaced.

7.jpg


After this, all glass was removed, all remaining trims were removed. The whole car sanded down to metal where needed.
There was the undercoat, and 5 top coats. The whole underside was undersealed again, quite thick.
All trims were replaced, with mostly new rubbers all around.

This was the result:

8.jpg


And a recent Pic after a few minor details adressed:

9.jpg


This summer, i plan to waxoyl the underside again as it has now been 3 years.

As for the cost of all this - dont ask.

Hope this helps people.


Cheers

Jay
 
<constructive critisism>

dont liek the white indicators with the yellow car.

yank spec lights look slightly beemer-y

badge in grille looks 'wrong' - i see the idea, but without removing the strips behind looks complicted / messy /. confusing

black line - under door above sill / bodykit - cant this be painted?

</cc>

nice job dude. makes it look easy - bet it wasnt.

pic without black stipe, plain headlights, lightbrows and yellow indicators. - 30 second job - not good (at all...LOL - but gives a rough idea.)

123%20yellow.jpg
 
Last edited:
Some major work done there!

The grill, colour, bodykit, wheels don't work for me. One of the most interesting cars I have ever seen though.
 
This grille was bought by my dad in the 80's, but there is a proper one available with the star inset a little better, however havent got round to it yet.

The lights are the standard uk ones. They changed them in 1981.

Without the black strip, a huge gap would be left - something v creative would have to be done to the doors to fill it up - nice idea though!

I know the colour isnt to everyones taster, and to be fair i wouldnt have gone out and bought something like this, but its been in my family since 1983. The kit was originally put on by my dad. I quite like it now because its so different..

Graham - the wheels have been changed, see last pic - but still will be putting some 17's on when i find some nice ones.

Cheers

Jay
 
Jay - credit to ya for some serious commitment:rock:


Yellow's not my ideal colour also - but then I did have an Aztec Yellow MGBGT:crazy: - but I didn't choose it and that's my excuse and it's sticking!!

I also agree with the other suggestions about the grille - the star doesn't go with the star on the bonnet let alone with the grille - but if you've already got another one - fab:D

It is clearly an enthusiasts car - good luck to you with it - I bet it does turn heads:D
 
Very nice project :bannana: , sod the color just appreciate the amount of work that has gone into the restore. I know from past experience that the pics dont do justice to the shere graft that has gone into the job. Many hours of blood sweat and tears have been put in there. All credit dude.
 
:cool: needed . . . but wow !!

Blinking mirrors ? Avantgarde Grille ?

just kidding ;)

S.
 
Actually was wondering whether any blinking mirrors would fit. It has never had wing indicators so would work nicely...
 
Nice job, Jay.

But one problem. It seems to me that the car was not prepared in a low-humidity workshop, or the paint/primer applied in such an environment.

At this time of year it means that air moisture will have been trapped between the primer and the shell.

This time next year the paint will probably start to bubble.

Would love to be told that I am wrong. Sorry.
 
This was done 3 yrs ago mate! And the painting was done in an oven. Has stood the test of time v well so far.

Jay
 
I'm glad I'm not the only nutter to have gone and got a complete back to metal respray done.

Here's a couple of pictures of mine nearing the end of the work.. unfortunately the photographer (my brother in law) hasn't got a clue how to take photo's as you can see.
 

Attachments

  • DSCF0015.jpg
    DSCF0015.jpg
    79.7 KB · Views: 39
  • DSCF0016.jpg
    DSCF0016.jpg
    84.9 KB · Views: 35
Last edited:
Cheers dieselman,

Hmm does look a bit more tricky than i thought!

Maybe i will give them a ring later in the summer

Jay
 

Users who are viewing this thread

Back
Top Bottom