C200 estate rear shock absorber

Page may contain affiliate links. Please see terms for details.

Mloclam

New Member
Joined
Oct 24, 2017
Messages
27
Location
Bedfordshire
Car
2002 C220 Avant Garde Estate
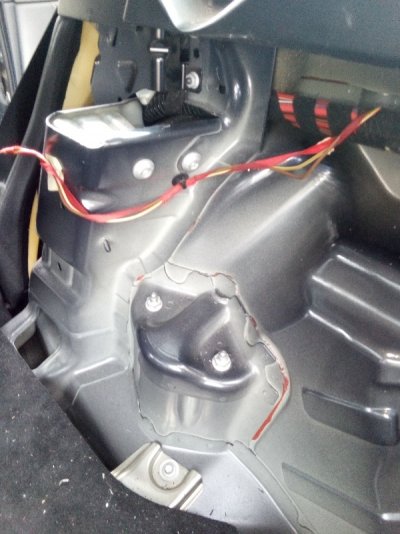
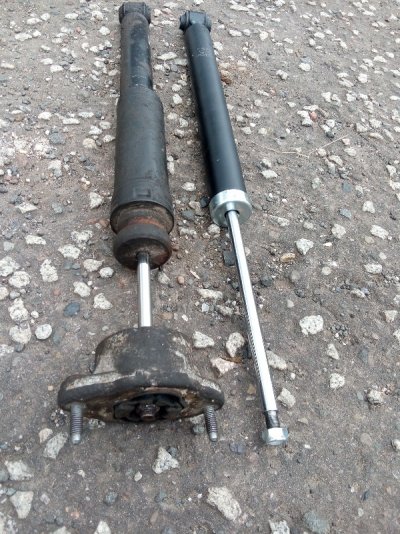
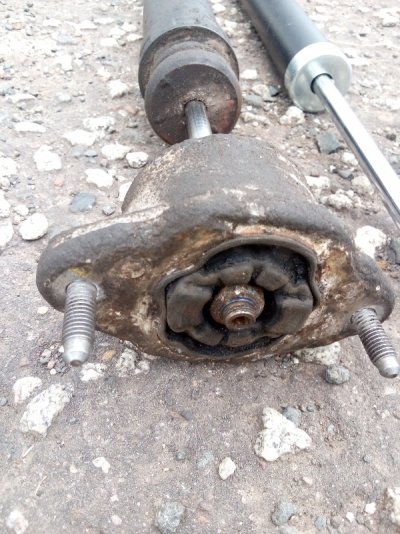
I have a failed rear offside (right) shock absorber and am in the process of trying to remove it to fit the replacement. I can't find the upper mounting but. I'm completely mystified. Please take a look at the attached piccy, any and all advice welcome.
 
Picture now attached
 

Attachments

  • IMG_20210530_155400.jpg
    IMG_20210530_155400.jpg
    194.2 KB · Views: 11
There seem to be two threaded components protruding through the bodywork, im looking for a single threaded end to the shock absorber retained with a nut and washer, per every online resource I can find in the subject
 
There seem to be two threaded components protruding through the bodywork, im looking for a single threaded end to the shock absorber retained with a nut and washer, per every online resource I can find in the subject
Further research shows that the shocker mount does have two 13 mm nuts. My replacement shocker has a single 17 mm but. I don't want to remove the old one if I don't have the correct replacement, how does the shock absorber attach to the shock absorber mount please?
 
I don't know the answer to your question, but have you considered the possibility that you've bought the wrong damper? What make and model of the replacement damper?

You should also consider the possibility that the bit with the single 17 nut fits into some sort of bracket that connects to the chassis using two 13mm nuts?
Thanks for the reply. It's the following part. I'm hoping the thing somehow connects to the mount, just neither of the W204 videos on the subject mention it and I'm wondering if the correct shock absorber includes an integrated mount
635223601Anschler Shock Absorber (Rear)
 
I removed the old unit, it does indeed have the mount attached, but it doesn't look like it's for disassembly? The two units are a similar length and old one looks fatter at the top, this is just a slide-on rubber sleeve. Should I try to dismantle the shock/mount or do I need an integral shock/mount unit?
 

Attachments

  • IMG_20210530_184051.jpg
    IMG_20210530_184051.jpg
    302.2 KB · Views: 7
  • IMG_20210530_184100.jpg
    IMG_20210530_184100.jpg
    249.3 KB · Views: 7
I don't think you have much choice, but to try and remove the mount from the old damper.

That said, it looks like a rubber mount, so best check that it's in good condition before refitting it...

And, are you replacing both dampers on both sides?
 
As for the 'boot', the original damper does seem to be better built, with better protection, but this is not to say that the replacement damper won't work.
 
The boot I'll be able to reuse. I was planning to do this one first, on the basis that a non failed shock paired with a new one will be a better pairing than a non failed one and one with no oil left in it.
 
I thought that dampers were generally only sold in pairs?
 
Just an update, may be useful to anyone coming this way in the future. Job done, a bit like putting a baby back in I imagine. The nut holding the mount to the shock absorber was properly on, a big bench vice to hold the mount would have been useful but not available. I cut a mount shaped hole in an offcut of 18mm ply and used that to hold the mount while I undid the nut. Swapped the boot and mount over to the new shocker. It's a nylock nut so you have to grip the shocker hard. I used water pump pliers with several wraps of protective cardboard. When the nut started to move the mount I put it back in my ply jig and gave it a handful of Nm. A good shocker is a lot more of a workout than a knackered one. It took a wrestling match to get it back in. I got the bottom in first then the top, guiding the mount to the hole in the insulation lining the arch. Gentle guiding taps with a small hammer and punch aligned it and once in the right spot the force of the shocker expanding popped the two studs through the mounting holes. Returning to the bottom, it was nowhere near the right place to refit the mounting bolt. There's a slot in the metalwork below the shocker. I scissor jacked a tool up below the shocker to raise it. ( I used the locking wheelnut key). A long bladed screwdriver allowed me to jiggle the shocker left and right and small adjustments of the jack up and down allowed me to line the holes up (those
 

Users who are viewing this thread

Back
Top Bottom