The Smudger
Member
- Joined
- Aug 12, 2016
- Messages
- 42
- Location
- WILTSHIRE
- Car
- W211 E320CDI, W208 CLK 320, 260E W124, W219 CLS320
OK, so i guess many of us have seen this, centre vent flap/slat has become unattached from the thumb control, usually as a result of someone trying to force an air freshener or a mobile phone holder in there, very delicate clips means they are off in a jiffy..
2 of mine, on the centre vent left hand outlet were off, not very noticeable but i knew it was wrong so had to fix it. So, removing the vent outlet and a whole is the only way to do this, but with lots of wood and delicate trim around it, you need to be very careful..
Here is a step by step guide to removing the vent and fixing the flap/flaps back into place.
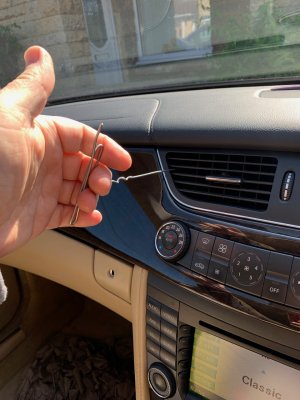
I think there must be a MB special tool to remove the vent, but i improvised with a wire coat-hanger. On reflection, and if you are 'really' fussy, when you have shaped the hook at the end of the wire you could wrap insulating tape around it to ensure it will not scratch anything.
Pic 1. The tool. Easily fashioned, as i said a wire coat hanger shaped into a smallish hook at one end and a handle at the other.
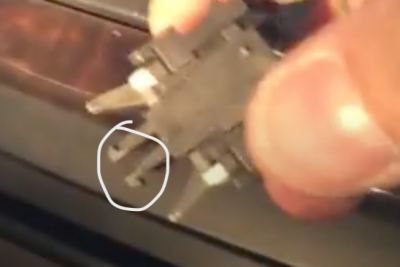
Pic 2. The Method. If you look closely with a torch, there are 2 visible holes, about 10mm in diameter, at either side of the vent housing just inside the vent. What you are looking to do is put the hook end of the tool into the hole, and gently pull using a steady force (do not 'jerk' it) on the tool. The vent will 'pop' out about 40mm when the sprung steel clip has released (pic 5 shows the sprung steel clip in the bottom of the photo). Once you have released one side, move to the other side (exact opposite side of the vent), and repeat (see pic 2A). The next part is very important. To fully remove the vent housing, you will need to unclip the thumb wheel Illumination light. This is quite tricky, i could not really get a photo that explains this very well. The light assembly is held in place by a sprung plastic fork (see pic 7), that springs outwards when it is pushed in. So, to release it you need to 'spread' the vent housing very slightly, whilst pulling the light unit. It will pop out, be very careful though. The vent flap repair could be done by leaving the light in, but its very difficult to manoeuvre the vent into a position whereby you can fix it with the light still in..
Pic 3. Shows the hole.
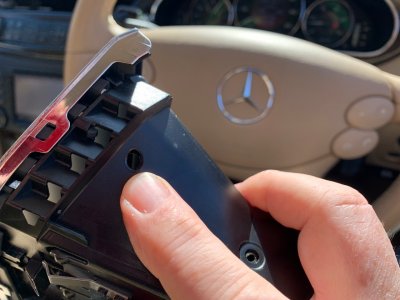
Pic 4. The 'offending' item. The link bar. This is the link bar that holds the flaps together. Its worth a mention that from left to right, only flaps 1, 3 & 5 are 'clipped' into the link bar. flaps 2&4 are just moved by the bar as there is only a fork on the bar at these points, definitely worth remembering as when you fix the flaps back on the bar, you may think, like i did initially, that the link bar is broken at flap connection points 2&4 as there is no 'click' sound when you clip them back onto the bar.
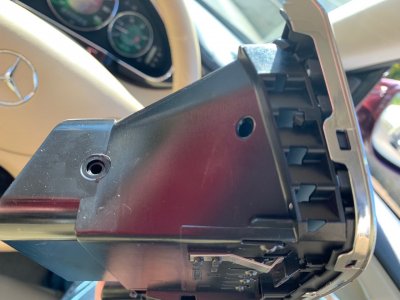
Pic 5. The bottom of the picture shows the sprung steel clip that holds the vent housing into the dash.
Pic 6. Here is the hole you are putting the tool into to remove the housing, from the back.
Pic 7. The light unit. The 'fork' is in the white circle. The plastic 'hooks' at the outer edge of the fork spring outwards, holding the light unit into the vent housing. BE VERY CAREFUL WITH THIS!
OK, hope this helps. I did mine in around 20 minutes, happy to say it worked fine and NO breakages or scratches to the panel or wood to report!
Steve.
2 of mine, on the centre vent left hand outlet were off, not very noticeable but i knew it was wrong so had to fix it. So, removing the vent outlet and a whole is the only way to do this, but with lots of wood and delicate trim around it, you need to be very careful..
Here is a step by step guide to removing the vent and fixing the flap/flaps back into place.
I think there must be a MB special tool to remove the vent, but i improvised with a wire coat-hanger. On reflection, and if you are 'really' fussy, when you have shaped the hook at the end of the wire you could wrap insulating tape around it to ensure it will not scratch anything.
Pic 1. The tool. Easily fashioned, as i said a wire coat hanger shaped into a smallish hook at one end and a handle at the other.
Pic 2. The Method. If you look closely with a torch, there are 2 visible holes, about 10mm in diameter, at either side of the vent housing just inside the vent. What you are looking to do is put the hook end of the tool into the hole, and gently pull using a steady force (do not 'jerk' it) on the tool. The vent will 'pop' out about 40mm when the sprung steel clip has released (pic 5 shows the sprung steel clip in the bottom of the photo). Once you have released one side, move to the other side (exact opposite side of the vent), and repeat (see pic 2A). The next part is very important. To fully remove the vent housing, you will need to unclip the thumb wheel Illumination light. This is quite tricky, i could not really get a photo that explains this very well. The light assembly is held in place by a sprung plastic fork (see pic 7), that springs outwards when it is pushed in. So, to release it you need to 'spread' the vent housing very slightly, whilst pulling the light unit. It will pop out, be very careful though. The vent flap repair could be done by leaving the light in, but its very difficult to manoeuvre the vent into a position whereby you can fix it with the light still in..
Pic 3. Shows the hole.
Pic 4. The 'offending' item. The link bar. This is the link bar that holds the flaps together. Its worth a mention that from left to right, only flaps 1, 3 & 5 are 'clipped' into the link bar. flaps 2&4 are just moved by the bar as there is only a fork on the bar at these points, definitely worth remembering as when you fix the flaps back on the bar, you may think, like i did initially, that the link bar is broken at flap connection points 2&4 as there is no 'click' sound when you clip them back onto the bar.
Pic 5. The bottom of the picture shows the sprung steel clip that holds the vent housing into the dash.
Pic 6. Here is the hole you are putting the tool into to remove the housing, from the back.
Pic 7. The light unit. The 'fork' is in the white circle. The plastic 'hooks' at the outer edge of the fork spring outwards, holding the light unit into the vent housing. BE VERY CAREFUL WITH THIS!
OK, hope this helps. I did mine in around 20 minutes, happy to say it worked fine and NO breakages or scratches to the panel or wood to report!
Steve.