CLK350 M272 cranks but won’t start

Page may contain affiliate links. Please see terms for details.
So…. I’m not very patient.

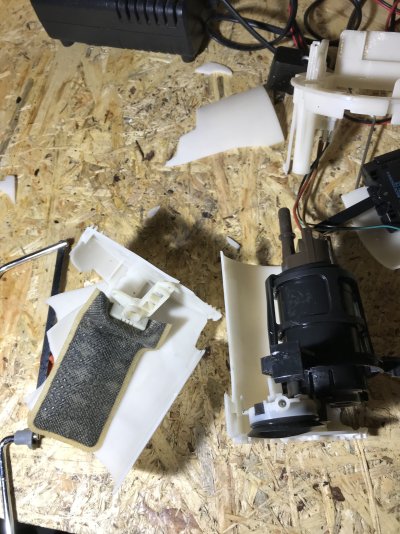
C249C9A9-EE57-4B32-8C0C-E90078C57277.jpeg

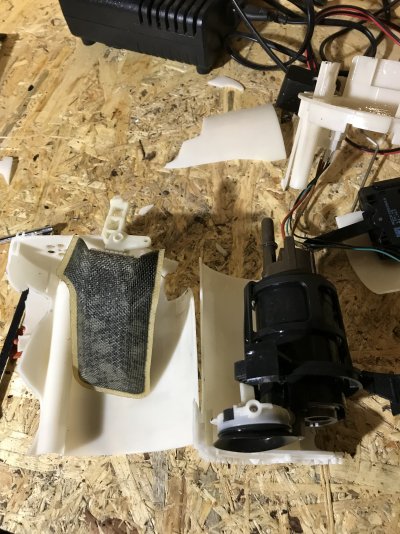
9C1B54EA-1206-42FE-BDD8-22E2A9476AC1.jpeg

Is this the only filter in the system? If the dark sections are from dirt then I can imagine this was causing a lot of additional load.

I gave the pump 12V before I smashed it to bits. It was dead, so I’ll order a new one now.

Can anyone confirm that this is also the only filter, and a new unit here should be the end of it?! Thanks as always!
 
I think the main fuel filter is attached to the body near the fuel tank; it's somewhere that seemed unreasonably inaccessible given it's the first line of defence against contaminated fuel.
 
I’ve looked all over and can’t find one…. back to conflicting reports on if/where fuel filters live on this model year.

Am not sure whether I will drain the tank and clean/empty it or just put the new pump in. Looks a bit murky so I might siphon it out and get a towel into the bottom to mop up any small debris and remaining fuel/water etc.
 
I’ve looked all over and can’t find one…. back to conflicting reports on if/where fuel filters live on this model year.
I think the main fuel filter is attached to the body near the fuel tank;
I bought the filter that was listed for a W209 model. It's a typical metal cylinder, slightly larger than a baked bean tin. It's not fitted anywhere to my 2005 vehicle, and definitely not fitted to the underside of the body by the rear suspension as shown on the on-line versions of WIS/EPC. IIRC, it wasn't shown on the copy of WIS/EPC that I later installed (which allows you to enter the chassis number), so I'm pretty sure that a change in fuel system design took place around 2003/4 that replaced the external petrol filter with a non-serviceable internal one.
So…. I’m not very patient.
I was going to ask if it's possible to dismantle, clean out the filter and re-assemble, but I guess I'll have to find out for myself!

Ian.
 
Internal filter on these models as I'm sure it's part of the service schedule to change as you have come this far I order one from mb and that way you have the 2yr parts warranty behind it.
 
Thanks guys,

Ian, I’ve had the same metal filter on my parts shelf for years as ECP listed it, but I could never find a resource or physically see where to fit it!

I think you probably could replace the internal sock or the pump without this carnage, but not easily and I personally wouldn't try it. The black tripod piece that holds the pump and sock in place is stuck in so solid that the brittle white plastic outer unit gave way first when I tried to dismantle it.

So I think we have pretty much confirmed no external, traditional filter is fitted. Am sure I’m being thick, but when you say ‘internal filter’ do you mean internal to the pump (as in the filthy sock I’ve removed) or is there another one in the sender unit, tank etc. I should be finding and replacing?

I don’t want to immediately put the new pump under similar strain if there is a restriction still in the system? Merc parts desk man didn’t sound convinced but said he couldn’t see a filter to sell me…
 
Yes, I do mean the filthy sock. I've no idea if there is anything else in the tank, in terms of filter (almost certainly nothing). I didn't strip mine down - gave up when I couldn't shift the big black locking ring.
A check of Auto-doc only shows the white pump+sock filter+sender assembly, no separate filter is listed, so it looks like preventative maintenance by replacing the filter is out of the question. I'll wait until mine shows signs of distress and then replace it.
Thinking of which, do I understand that once the fuel pipe & electrical connector were removed, it was just a matter of gently tapping the black locking ring anti-clockwise, then lifting the pump+sock+sender out of the tank? No hidden brackets or other difficulties?

Ian.
 
Hi Ian. My procedure was:

Disconnect battery (and leave bonnet ajar!)
Open both doors wide
Lift up small rear base seat section behind driver / on offside
Remove 8mm bolts and lift up the circular black cover
Paint/marker pen an alignment mark for the pump to tank orientation so things go back clocked correctly
Tap the black lockring anti-clockwise… it takes a while!
Lift the pump up and remove the black and clear open-ended hoses from their retaining grooves
Unplug the four-wire white electrical connection block
Depress the tab and pull out the black fuel hose from the top of the pump
Lift out the pump assembly, taking care with the float

To fit the new one:
Attach the black fuel line and white electrical connector
Put the two hoses back into their grooves
Place the rubber seal inside the inner tank lip FIRST then press the pump (clocked correctly) down into the rubber, to create a seal.
Hand tighten then tap around the lockring clockwise
Clear up any fuel / blood / tears
Replace battery negative terminal
Turn key to position two and listen for the pump priming
Assuming it did, put the 8mm bolts back into the cover, drop the seat and start it up / test-drive.

I chose not to empty the tank, which was 3/4 full. Lazy and more risky I know. If you ran it low or emptied it, I’d manually fill the pump reservoir on installation or at least prime it a few times before starting the car to avoid stressing it by running it dry.

The electrical connection tricked me which is why I started on the passenger / nearside first. The power goes to the sender unit, the n runs internally across to the pump, so it’s the cover without a hose or cables going to it that you need, strangely.

Hope this helps!
 
Thanks for that - it certainly does help, especially the bit about the pump being on the driver's side - I took the covers off both, then ignored the one without the wires & pipes.
The tank was recently filled, and I'm doing even less mileage than usual, so it'll be a while before I'm in a position to do anything. The pump's managed 200K miles, so hopefully it'll do another 100 before conking out.

Thanks,
Ian.
 

Users who are viewing this thread

Back
Top Bottom