Electric mirror switchhow do I removed Mercedes Benz sl350

Page may contain affiliate links. Please see terms for details.

Steve1976

Member
Joined
Aug 18, 2018
Messages
47
Location
Telford Shrops
Car
Mercedes sl350
Mercedes SL 350 2005 mirror switch remove HOW?
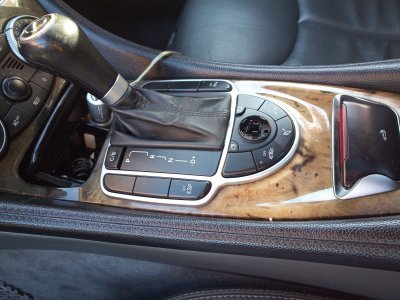
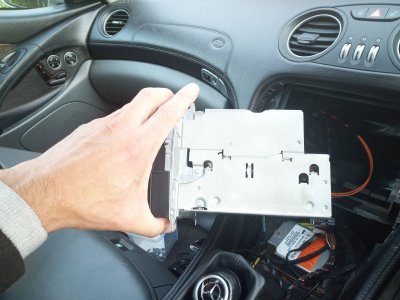
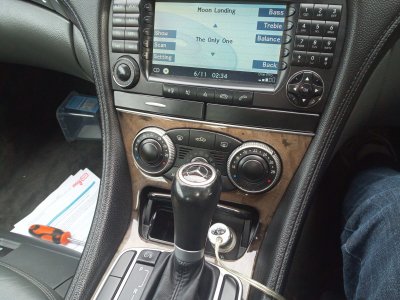
Hi people... i need some help I own sl 350 late 2004 , I need to remove the electric mirror switch and roof opening Handel as mine is broken how do I do this . I've added a pic of the mirror switch i need to pull off what trim is hiding the screws any special tools required? Thank you kind regards Steve
 

Attachments

  • IMG_20181001_093504_5.jpg
    IMG_20181001_093504_5.jpg
    1,002.7 KB · Views: 19
Hi Steve,

Move both seats as far back as they will go. Remove the trim both sides, it's the "banana" shaped grey part you see in the bottom of your pic that runs along the tunnel just below the outer edges of the dash, these just unclip, pull outwards, from the seat end first, to remove, it's a bit tight for space at the seat end. Once these are removed you'll see numerous black torx head screws, some of them hold the dash, the rest hold on the lower control panel that you want to remove, you just need to remove the screws for the panel on both sides. If my memory is correct, there are two torx screws located inside the front edge of the glove box, they are sunk inside holes in the velour material. Gently squeeze the edges of the selector lever gator and pull upwards, you might also need to select N to assist lifting the panel off. Once all these screws are removed you should be ably to gently prize the LCP upwards and backwards. Hope this is of some help.
Ohthank you so much on this, as it looks complex with no sign of screws at all your info helps me miles kind regards Steve ...
 
Also, not sure if your model has the early or later comand with the larger screen, you may need to remove the cup holder, the driver side of this (side without the cup holder) has a plastic pop off cover which you need to remove this allows access to the screw, one each side, then pull out the complete cup holder, I can't remember if there are two fixing screws or just two lugs on the control panel behind the cup holder, but it won't come off before removing the cup holder on the later comand head units.
 
You'll also need to remove the ashtray, a small spring loaded slider inside the ashtray, slide this to one side and the ashtray pops up and out. All of the electrical connector plugs are unique, so they only fit where they come off, but you should mange to disconnect the electrical connections and remove the retaining screws for the switches you need to replace, leaving the rest still attached.
 
Hi it has the later nav unit command nav I think but god no's how I use command nav . I've found this on eBay that fits the sl models and other dies any one no if this will give me the aux option on the nav unit ? The plug end for this lead do you no off chance if it will plug into a slot on the head unit...? Thanks Steve see pic I've added
 

Attachments

  • Screenshot_20181001-115329.png
    Screenshot_20181001-115329.png
    283.4 KB · Views: 2
The later comand has the sat nav disc unit located on the left inside the boot, the earlier one you place the sat nav disc directly into the single slot at the top of the head unit. Some of the early ones have an auxiliary jack socket located inside the glove box under the dash, but I believe this was an optional extra. I'm not sure about the aux. socket on the later one. I have an 03 (D2b sytem) with the socket in the glove box, and a 55 plate with the later comand (Most system) but I haven't looked into how to attach any auxiliary equipment to this one yet, I've had it 4 years, so I might get around to that one day ;-) If you find out maybe you can let me know.
 
Ok that's brilliant , I will I have to pull apart the electric mirror switch so will pull out the nav @ the same time to see when I do I'll post some pics on this but in my unit there is no AUX port in glove box so I'm hoping that the adapter I've seen on ebay will plug directly into the head unit so I'll see and let u no thanks again Steve...
 

Attachments

  • Screenshot_20181001-115329.png
    Screenshot_20181001-115329.png
    283.4 KB · Views: 1
The later comand has the sat nav disc unit located on the left inside the boot, the earlier one you place the sat nav disc directly into the single slot at the top of the head unit. Some of the early ones have an auxiliary jack socket located inside the glove box under the dash, but I believe this was an optional extra. I'm not sure about the aux. socket on the later one. I have an 03 (D2b sytem) with the socket in the glove box, and a 55 plate with the later comand (Most system) but I haven't looked into how to attach any auxiliary equipment to this one yet, I've had it 4 years, so I might get around to that one day ;-) If you find out maybe you can let me know.
Hi thanks for all your info in removing the center parts yes all done as for the nav unit sadly no see pics it has one interface and nine for a aux port. I have the NTG1 SCREEN kind regards steve
 

Attachments

  • IMG_20181007_084938_6.jpg
    IMG_20181007_084938_6.jpg
    1,020.9 KB · Views: 2
Pic 2
 

Attachments

  • IMG_20181007_084901_1.jpg
    IMG_20181007_084901_1.jpg
    985.2 KB · Views: 4
It's says about using comand when i start up how do I do this there is no button to say command strange any ideas ? Thanks steve
 

Users who are viewing this thread

Back
Top Bottom