SpiceWeasel
New Member
Hi, I have done something stupid and now car won't start, no central locking, no radio and rear lights error messages on dash.
I have a 2013 C200 and had the main battery swapped recently + coded to the car at Halfords. My stop start still wasn't working so I ordered a new Varta AUX14 battery. I have already had the aux battery out before I ordered a new one to check for ID marking etc and put it back with no issues. When I had a recent service we checked the battery capacity and it was only showing as 30%, original Merc batteries so 9 years old.
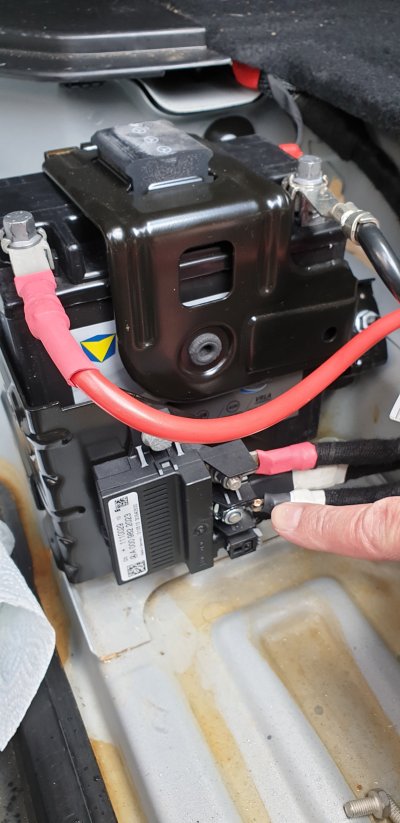
I removed old aux battery and was cleaning some gunk up around the battery tray and sprayed with some rust proofer, while I was doing this the ground lead that connects to the aux battery shorted out to the positive terminal on the small box (charge relay?) briefly. I removed the ground from touching and then fitted the new AUX battery. I went to start my car to test it and the car turned over but would not start. So I thought maybe it needed locking/unlocking again. So I shut the boot and doors and went to lock from the key fob and the car wouldn't lock/unlock, I had to get back into the boot with the emergency key.
I have checked all the fuses under the bonnet, one next to aux battery and the fuse box in the boot and everything is fine. I have rear right side marker lamp, rear left side marker lamp warning message on the dash, no radio and I can't lock/unlock the car with the fob or if I use the emergency key in the door/boot. Engine turns over and keeps turning over but won't fire up, I turned the key off when this happened for more than a few seconds.
I should of disconnected the main battery when changing the aux then I wouldn't of had this happen. I already had the aux battery out before without disconnecting the main battery and car was fine after putting AUX back in about a week ago.
Does anyone have any ideas or anything I can check? My Dad found something out about the pre fuse block (near main battery but is supposed to be non servicable) which has big fuses ( you can buy replacements for these). Feeling like a bit of an idiot at the moment. I have attached a photo so you can see where I shorted to. Is there another fuse box inside the car? Manual says it's on side of dash behind a cover but nothing either side.
Thanks
I have a 2013 C200 and had the main battery swapped recently + coded to the car at Halfords. My stop start still wasn't working so I ordered a new Varta AUX14 battery. I have already had the aux battery out before I ordered a new one to check for ID marking etc and put it back with no issues. When I had a recent service we checked the battery capacity and it was only showing as 30%, original Merc batteries so 9 years old.
I removed old aux battery and was cleaning some gunk up around the battery tray and sprayed with some rust proofer, while I was doing this the ground lead that connects to the aux battery shorted out to the positive terminal on the small box (charge relay?) briefly. I removed the ground from touching and then fitted the new AUX battery. I went to start my car to test it and the car turned over but would not start. So I thought maybe it needed locking/unlocking again. So I shut the boot and doors and went to lock from the key fob and the car wouldn't lock/unlock, I had to get back into the boot with the emergency key.
I have checked all the fuses under the bonnet, one next to aux battery and the fuse box in the boot and everything is fine. I have rear right side marker lamp, rear left side marker lamp warning message on the dash, no radio and I can't lock/unlock the car with the fob or if I use the emergency key in the door/boot. Engine turns over and keeps turning over but won't fire up, I turned the key off when this happened for more than a few seconds.
I should of disconnected the main battery when changing the aux then I wouldn't of had this happen. I already had the aux battery out before without disconnecting the main battery and car was fine after putting AUX back in about a week ago.
Does anyone have any ideas or anything I can check? My Dad found something out about the pre fuse block (near main battery but is supposed to be non servicable) which has big fuses ( you can buy replacements for these). Feeling like a bit of an idiot at the moment. I have attached a photo so you can see where I shorted to. Is there another fuse box inside the car? Manual says it's on side of dash behind a cover but nothing either side.
Thanks


 . You can leave the rear battery in just remove the ground.

