How to lock a crankshaft.

Page may contain affiliate links. Please see terms for details.
Thanks ToeKnee. My thoughts exactly. Maybe though, I can still use the set screw with a nut if there's enough of a hold in the crank.
Sump off today - nothing untoward that I've seen - all quite clean but then it's only done 40,000 miles. Going to have a better look tomorrow. Once the gasket arrives (couple of days probably), and I seal the engine up again, the balancer and the rest is almost incidental.

Where do you source spares? I've been using US Automotive in Bedford - the only UK supplier I've found so far. I know Rock Auto are good but no idea of how the shipping charges are. For now, pressing on with US Automotive is fine.
 
I use several places depending on how desperate I am for time. For immediate stuff I go to stateside autos, only 15 mins drive but expensive, in my opinion. For standard uk stuff I use real steel Real Steel
Prices are ok, know their stuff, usually good stock levels and mail order. But generally I order from summit racing for big orders, have them delivered to an American friend who then ships them via sea (summit ship via air as standard which gets expensive on heavy items).
Real steel have downloadable catalogues but if I know what I want I'll phone them.
 
I've tried various different ways to get the balancer on and the correct tool is the way to go although I have known of people having good success with threaded bar, large washers and winding it on with nuts as we've previously discussed. Personally I wouldn't use the crank threads to wind on because if they get damaged then you might not be able to get the crank bolt in and although it seems superfluous it is important to have that bolt there.
Thanks (for edit).
 
Bellow hope you used a thread lock on the bolt to secure the crank pully ? And that you torqued it back up to the right specs .Did you find a key in the crank ?
 
Bellow hope you used a thread lock on the bolt to secure the crank pully ? And that you torqued it back up to the right specs .Did you find a key in the crank ?

Steady on - it's still in bits!
 
Still?? :D
 
Waiting for gaskets (sump and water pump) but got some prep done today - including enlarging ever so slightly the 12 small holes on the balancer hub compatible with my holding tool (aka 'legs') so when it comes refit time, I can restrain the crank while tightening the centre bolt - which may or may not be Loctited in (crank rotation chases it in so not seeing an obvious need).

Some questions for ToeKnee though.
Removing the sump gasket was awkward due to having to lower it past the dipstick tube. I intend (with grease) locating the new gasket on the sump before offering it up to the block and the dipstick tube scuppers that. Is it OK to just cut away that part of the gasket that loops around the dipstick tube or should I remove the dipstick tube - if so how?

To drain the coolant I removed the drain plug and temp sensor on the block. Both are tapered threads. Really don't want to refit them dry. What's best eg grease, sealant, etc? Thread tape is what I'm thinking of using, any reason not to?

Everything went well and got a better look at the engine internals - hone marks still showing on the lower parts of the bores. Mighty relieved to see the rear seal wasn't damaged in the episode that ruptured the timing cover - completely dry on the TC side. Compared to working on the smart, this is a dream. Sump removal without having to raise the car and that is with one front wheel sunk in a rut some 2'' lower than it should sit.
 
Waiting for gaskets (sump and water pump) but got some prep done today - including enlarging ever so slightly the 12 small holes on the balancer hub compatible with my holding tool (aka 'legs') so when it comes refit time, I can restrain the crank while tightening the centre bolt - which may or may not be Loctited in (crank rotation chases it in so not seeing an obvious need).

Some questions for ToeKnee though.
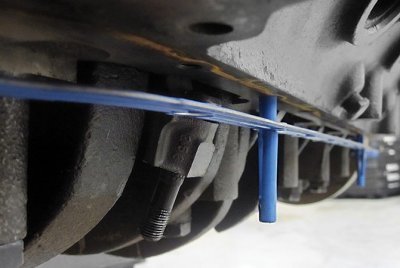
Removing the sump gasket was awkward due to having to lower it past the dipstick tube. I intend (with grease) locating the new gasket on the sump before offering it up to the block and the dipstick tube scuppers that. Is it OK to just cut away that part of the gasket that loops around the dipstick tube or should I remove the dipstick tube - if so how? No, don't cut away the gasket I use special plastic dowels which screw into the corners to hold the gasket in place but to be honest I normally build that part of the engine upside down on a stand the simplest way is to glue/seal the gasket to the sump. I'll try and finds a picture of the dowels but they come with some sump gaskets.

To drain the coolant I removed the drain plug and temp sensor on the block. Both are tapered threads. Really don't want to refit them dry. What's best eg grease, sealant, etc? Thread tape is what I'm thinking of using, any reason not to? I refit dry but the sensors I use need to earth through the block, I assume your sensors are twin wire so use thread tape if you want to.

Everything went well and got a better look at the engine internals - hone marks still showing on the lower parts of the bores. Mighty relieved to see the rear seal wasn't damaged in the episode that ruptured the timing cover - completely dry on the TC side. Compared to working on the smart, this is a dream. Sump removal without having to raise the car and that is with one front wheel sunk in a rut some 2'' lower than it should sit.
 
Fel-Pro-SnapUps-1569507750690.jpg
 
Thanks ToeKnee.
Good point re earthing - I'll check single or twin wire. Thread tape for the other side though.
I've seen the dowels but don't know if my gasket will be supplied with them. It's threading the gasket above the baffle plate and below and then around the tube that is awkward and absolutely requires the gasket be fitted to the block first (Haynes says stick it with sealant on the four corners) and I'd prefer it be held with grease to the sump then offered up. A notch out of the gasket would do it and still leave a continuous seal around the outside of the dipstick tube. (Sounding like I've decided this already - unless the dipstick tube is easily removed).
 
The tube is just a press fit, it should pull out maybe with the help of some grips, I always make sure my engines have the tube in place but I have seen engines without them.
 
Wrong reply, sorry
 
Today's lack of progress report.
Sump gasket arrived later but sooner than expected - it has the dowels. Which, after I figured it out, only fit in the corners where there are studs not bolts. So they are fitted but as daylight was fading I quit as I'm still not certain how the timing cover and sump refit regarding using RTV which, once I apply, means I have to work quickly before it sets.

The instructions for fitting the sump gasket say if engine is 'non skirted' (where side rails and end seal surfaces are not on the same plane) which sounds like mine where the ends curve around main bearings - apply a small amount of RTV to each corner. Why? Can't see the reason (but can see a reason not to) but the old gasket has 4 x blobs at the corners. So I guess I should do the same. (Not going to use grease now or cut gasket).
With that gasket are two rubber rings (one square section, the other round) circa 90mm diameter - oil filter seals? And two fibrous gaskets, each with two holes for bolts (presumably) and an ID of 40mm for one and the other 55mm ID but the two holed encroach on the 'hole'. Haven't a clue what they are for. They aren't water pump gaskets as I ordered them separately and they are different.

The timing cover instructions say a 5mm x 25mm bead has to be applied 'along the engine block to timing cover to oil pan junction' as apparently there is a 3mm gap that has to be filled. The accompanying diagram appears to show it should be applied to the block's horizontal face and curve upward over the main bearing such that it is above the timing cover (when the engine is right way up) on each side. I'm confused - and will scour the 'net for a vid of this.

If you can offer any advice on this ToeKnee - it'd be much appreciated.
 
I can only assume that your engine design is different to the gen1 that I use as the timing cover fits into the cutout in the sump, Tyne only time I've used rtv in that section is fitting a one piece rear seal gasket on a two piece rear seal sump. No idea about the gaskets either. Have you got the gasket make and part number, I'll have a look and see if I recognise? Sorry I'm not much help today
 
That sounds like what I have - the one piece. It's made by Felpro and the product code on the invoice is FELOS34500R. It is exactly the same colour as the one you posted the photo of and the dowels look the same.

I could just slather RTV everywhere but what bothers me with that is if I want to remove the sump again (and I might - given what happened earlier) I'll struggle to without breaking the gasket.
Also, refitting is going to be slightly trickier as I didn't disconnect oil cooler pipes. Removing it was possible but refitting will inevitably take longer - and may involve removal of said pipes. The time delay and RTV setting.....
 
Looked at that gasket, it is slightly different to the ones I use. Could the fibre gaskets be for the oil pump perhaps?
 
I think you are probably right re the additional two gaskets - oil pump and its strainer.
Off to scour YouTube for a video to see if I can get clearer in my head what I'm doing tomorrow.
 
YouTube scoured and found this >>
To view this content we will need your consent to set third party cookies.
For more detailed information, see our cookies page.

He does the timing cover without removing or lowering the sump - contrary to Haynes.
At 12.00mins he applies the RTV. I'm just going to do what he did.
 
Good video to show rtv usage. Maybe refit the sump before you refit the timing cover, no time constraint on rtv then?
That cover is quite a bit different to the metal ones I use.
 

Users who are viewing this thread

Back
Top Bottom