How to Remove rear license plate panel

Page may contain affiliate links. Please see terms for details.

Mohnish

Active Member
Joined
Jan 5, 2009
Messages
103
Location
MUMBAI
Car
W211 E270CDI '04
Hello,

MY 2004 W211 E270 CDI.

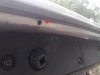
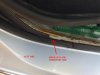
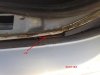
Found a leak into the spare area in the boot/trunk and the source is the creased joint marked in the pic below.

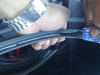
I tried to remove this panel but was unable to do so as I feared I may snap something (it seems to be made of plastic fibre). Meanwhile I have as a temp measure sealed the joint with clear siicone sealant.

Can someone please tell me the procedure of removing the entire rear panel (the one the license plate is fitted on) so that I can access the area that is leaking and seal it from inside.

Thanks in advance.
 

Attachments

  • LEAK IN TRUNK SOURCE 1.jpg
    LEAK IN TRUNK SOURCE 1.jpg
    54.3 KB · Views: 174
I cant see a leak coming from there, as that is just a plastic panel which sits on top of the actual metal bootlid

removal is fairly easy

1. remove the warning triangle and its holder.
2. remove the plastic panel from the bottom of the bootlid (torq screws)
3. remove all the lugs which hold the inside bootlid lining, remove lining

The above will give you access to the back of the bootlid where you should be able to see where the leak is coming from.

to remove the plastic panel in your pic

4. remove the 2 nuts on the inside outer edge of the bootlid
5.remove the license plate and holder
6. remove the nut\bot from the inside located in the area behind the license plate

the panel will just pull off now, the top is held on by clips that just pull off.

good luck
 
Thank you Alps,

A few queries and observations below:

I cant see a leak coming from there, as that is just a plastic panel which sits on top of the actual metal bootlid...

I tested it by pouring water over the joint with the boot lid open and the lower part of the inner lining off. Sure enough, water found its way to the metal behind.

...removal is fairly easy

1. remove the warning triangle and its holder.

3. remove all the lugs which hold the inside bootlid lining, remove lining...

Your point 1 above is where I got stuck. How do I remove the holder? It seems to be locked in place?

Your point 3 above : Is it necessary to remove the entire boot lid lining?

...
4. remove the 2 nuts on the inside outer edge of the bootlid...

Your point 4 above: Another area I got stuck. The bolt keeps turning without coming off. What am I doing wrong?

Thanks again.
 
Last edited:
Thank you Alps,

A few queries and observations below:


I tested it by pouring water over the joint with the boot lid open and the lower part of the inner lining off. Sure enough, water found its way to the metal behind.


Your point 1 above is where I got stuck. How do I remove the holder? It seems to be locked in place?

Your point 3 above : Is it necessary to remove the entire boot lid lining?


Your point 4 above: Another area I got stuck. The bolt keeps turning without coming off. What am I doing wrong?

Thanks again.

Your point 1 above is where I got stuck. How do I remove the holder? It seems to be locked in place?

there is a torq screw there, but you can get away with not removing it.

Your point 3 above : Is it necessary to remove the entire boot lid lining?

you can get away with just removing the lugs and reaching in to remove the inner nut (behind the licence plate)


Your point 4 above: Another area I got stuck. The bolt keeps turning without coming off. What am I doing wrong?

lol, nothing, i had the same problem! if you pull the plastic panel outwards (quite firmly) whilst undo-ing the nut, it should apply enough pressure to hold the thread in place.

cant think of where it may be leakiing from, maybe the foam seal near the top is leaking? but it doesnt seem to be a water tight seal anyway!
 
Your point 1 above is where I got stuck. How do I remove the holder? It seems to be locked in place?

there is a torq screw there, but you can get away with not removing it....

Actually I did remove the torx screw you refer to and still found it to be stuck. Is there some kind of lock / clip etc. that is holding it in place?

...Your point 3 above : Is it necessary to remove the entire boot lid lining?

you can get away with just removing the lugs and reaching in to remove the inner nut (behind the licence plate)...

Ok thanks.


...Your point 4 above: Another area I got stuck. The bolt keeps turning without coming off. What am I doing wrong?

lol, nothing, i had the same problem! if you pull the plastic panel outwards (quite firmly) whilst undo-ing the nut, it should apply enough pressure to hold the thread in place...

No fear of breaking the plastic panel? I did lift the panel away form the metal body while turning the bolt, but it went a few turns without undoing, so thought I am on the wrong method. Will try again.

...cant think of where it may be leakiing from, maybe the foam seal near the top is leaking? but it doesnt seem to be a water tight seal anyway!

I figure the water somehow finds its way into the lock release lever area (just above the license plate) and then via the links into the lock catch on the bottom sil and then from there into and under the boot floor soaking the carpet from the underside.

Interestingly, I figure if I were to remove the carpet (spare wheel cover) the water would probabaly not get soaked into it and would possibly flow out the bottom of the lock...maybe!

Any how, will give the panel removal another attempt, meanwhile the silicone sealant hopefully will do its job and also positively identify the source.

Thanks again.
 
Last edited:
UPDATE: I think I found the source...

With a lot of help from Konigstiger who pointed me in the correct direction, hopefully, I will not have to remove the above refferred panel after all.

There is supposed to be a drain hole at the bottom (refer pic below) and I found it had been sealed with a round vinyl sheet and figured MB would have sealed using a rubber locking seal rather than something simply stuck on.

Have peeled the vinyl off...and now to see if its successfull.

Can't help wondering why this was sealed in the first place :confused:
 

Attachments

  • LEAK IN TRUNK SOURCE 5A.JPG
    LEAK IN TRUNK SOURCE 5A.JPG
    36.9 KB · Views: 124
I was wrong...

The leak still persists even after clearing/removing the suspect drain seal. So, currently at a complete loss as to what to do...Will probably have remoe the boot lining and check.
 
Update:

UPDATE:

Under the rear bumper (fender) I found a metal part (probably the fender mount) bolted onto the bodythat has been bolted only on the left side (looking for the rear). The right side has a hole but the bolt is missing. I figure water could find its way into this hole and into the spare wheel.

Will look into it and post pics etc. accordingly.
 
the hole in my car is covered also, check your seals around the lights, these leak.
 
the hole in my car is covered also, check your seals around the lights, these leak.

Thank you Alps. Will do and post...
 
Hopefully this time...

Seems you have a point Alps...

Looking around the area mentioned in post above led me to remove the trunk rubber seal and I found that the right side collar onto which the seal sits (where the leak was more pronounced) was about half an inch inset ie. it seems to have been rear ended and the collar had gone into the trunk. All this hidden on account of the rubber seal. The bumper must have been replaced and this very minor re alignment probably over looked as there is absoulutely no sign of damage to the inner metal box struts etc.

Proceeded to re align by comparing to the left side with a malet and wood. Managed to to all this without damaging the paint :).
Pics below are self explanatory.
 

Attachments

  • LEAK IN TRUNK SOURCE 7A.JPG
    LEAK IN TRUNK SOURCE 7A.JPG
    51.6 KB · Views: 96
  • LEAK IN TRUNK SOURCE 6A.JPG
    LEAK IN TRUNK SOURCE 6A.JPG
    52.8 KB · Views: 90
  • LEAK IN TRUNK SOURCE 8A.JPG
    LEAK IN TRUNK SOURCE 8A.JPG
    52.1 KB · Views: 91
id also get that rust treated asap

:)
 
good job!

Thank you, but not so soon...finger's crossed!!!

id also get that rust treated asap

:)

Thanks you Alps, however its not rust. That brown stuff is the glue solution that the bodywork chaps probably put on to hold the rubber seal in place when they "apparently" sorted out the rear end and replaced the bumper. On the other hand however, since you mention it and looking at the pics above, I will have another look at it. Those brownish swirls on the vertical plate behind do look odd. Thanks.

Will post on success or other wise.
 
Last edited:
Another try...

The process of the last post (No. 11) was unsuccessful. So a bit further investigation by pouring water (in buckets) over the boot reveals that water is trickling from under the boot seal (between the seal and body), possibly finding its way in along the seal. Removing the seal reveals that the factory sealant between the boot seal and body is ragged or non existent. (Possibly a result of the rear end repair by PO)

Proceeded to remove the entire boot seal and "fill" with silicone sealant and press it back in (as in pic below).

Oh yeah, the suspect rust is actually muck which was wiped clean.

Finger's crossed...
 

Attachments

  • LEAK IN TRUNK SOURCE 9.JPG
    LEAK IN TRUNK SOURCE 9.JPG
    60.1 KB · Views: 65
Success !!!

Success finally :bannana:

It seems it was a combination of three things that possibly resulted from possibly being rear ended and a poor repair job (during POship). Fortunately all sorted now.

A brief recap for any one who finds themselves in a similar situation.

Refer Post # 6 : The drain had been plugged shut with a piece of vinyl. Removal resulted in the trunk lining behind the number plate remaining dry.

Refer Post # 11 : The right side trunk rubber seal collar had been pushed about a half inch inwards. Realignment resulted in the area above the platic trim (the lock seat) remaining dry.

Refer Post # 14 : Sealing the rubber trunk seal with silicone sealant and refitting resulted in the area under the plastic trim (the lock seat) remaining dry.

Thanks to Alps and Rossyl.

Hope this helps someone in future. :)
 
Last edited:
Just been having exactly the same issue with my W211. At times, the very bottom liner in the boot has had close on an inch of water sloshing around - not great with the electrics in there.
Anyhow, I have been through much the same journey - stripping linings, pulling things apart, scratching my head, resealing around the rear lights, and so on!
Ultimately, after thinking that I'd solved the problem with the sealant around the lights, only to find yet more water ingress, I poured some water down the gullies and watched what happened.
Sure enough, water was finding its way in at the bottom right corner of the boot seal. It initially looked as though perhaps it was getting in where the bottom expansion fixing is, but no, it was getting in via the boot seal rubber.
As described above, I too filled it with some Loctite non-setting sealant, the grey one designed for contact with water, and have then refitted it. I also took the opportunity to use the black Loctite to re-seat the plastic gutters, ensuring good coverage around fixings' holes.
The sealant has really helped to ensure any little holes should be filled and not a potential entry point for the H2O.
Tomorrow, I will test my handiwork to see if I have finally solved the problem after months of trying to figure it out. If successful, I can finally put it all back together once more! :D

Incidentally, just picking up on a point in an earlier post, just how the heck do you remove the warning g triangle holder from the boot lid liner. I also undid the visible Torx screw, but still couldn't get the damn thing off! Come on guys, somebody out there must have the secret.
Also, has anyone found a way to stop those really annoying drips of water that fall from the boot lid when you open it? They drive me mad, but as yet, I've not managed to figure out how to stop them. ; (
Many thanks everybody.
 
once you remove that panel ,clean all the back end down to remove dust n dirt then silicone around every hole , remove the 3rd brake light and silicone that area ,and when you put it back on run a bead of silicone along that line of arrows. remove the rubber grommet in the boot , job done, water shouldnt get in anymore.

your drips should stop once you seal the number plate holder, its the actual number plate holder that fills up with water and when you open the boot the water runs back and out , usually the right corner , makes a mess of your interior carpets/shelf too , mine were turning white with mould. its worth getting some new popper clips off ebay or a dealer so you get a tighter fix when you putting it back together .
 
Last edited:
.
 

Users who are viewing this thread

Back
Top Bottom