ptruman
Active Member
Hi all
Did this today in a delayed lunch hour.
Car MY
2010 W212 E350
What did I do?
Swapped the rear bench seat in my E350 from a normal bench seat to one with IKS (Integrated Kinder Sitze) - Integrated Child Seats. This is fitting Mercedes option code 248 to your car.
How long did it take?
30 minutes
What do you need?
You will need:
You will need to search for either A2129201450 or A2129200350 which is technically the "cushion" but you'll probably find it that way. You'll also need to get one in the right colour - I couldn't find actual black anthracite leather, so had to pick black anthracite "artico" leather - but it works.
Alternately, try searching for the seat material cover - as some people sell on the first part number they see...so A2129209633/A2129207737 (both Artico Leather) or A2129209733/A2129207837 (both Leather) or A2129209633/A2129207737 (both "Sport fabric").
Full seat part numbers can be found here...
How do you do it?
1) Remove the original bench seat
Imagine if you were sitting in the left or right seats. Put your hands in between your legs and reach down to the bottom of the seat cushion by your knees. There is a clip here, on both left & right sides. Get off the seat, and pull up sharply at these points, with both hands. The seat will unclip.
You MAY need to lift the front of the seat up a little, then push the seat back off two metal clips at the rear of the seat, but I didn't - those clips are used for the replacement.
2) Fit the rivet bolts
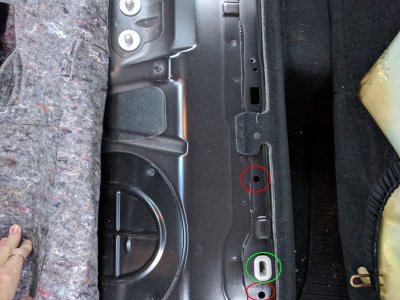
Either side of the clip receiver which is mounted into the metal bodywork, are two holes, which are exactly the right diameter to drop in your M6x14.5mm rivet bolts. Screw a rivet bolt into your setting tool, and put it in the hole and squeeze until fitted. Repeat until all four holes are filled with the bolts.
3) Fit the new seat
If not already removed, remove the plastic foot base from each child seat (this just needs two pressure clips to be pressed in, then the rest can be pulled forward and up to remove).
Look under the new bench seat and you'll see two metal catches that will latch onto the metal clips that protrude from the bodywork under the bench seat.
Keeping the front of the new bench seat slightly raised, put the rear new seat toward/under the ISOFIX bar, and push in *hard*. Lower the front of the bench seat and you should find your rivet bolts visible through two of the four holes under each child seat. If not, you need to keep pushing backward!
Put a washer on one of the M6x20mm bolts and loosely screw it in to a rivet bolt. Repeat with 3 more M6x20mm bolts so each rivet nut has a bolt in - and you know the seat is centered.
Tighten your bolts!
Then replace the plastic footrests but lowering them into place, and sliding them backward, keeping the back of the footrest pressed down to ensure the slide catches go into place. You'll hear the pressure clips "ping" when they locate.
You are done!
Basically the steps shown in (3) above are documented in this PDF - 2nd page, simply reverse the instructions to fit!
How do they work?
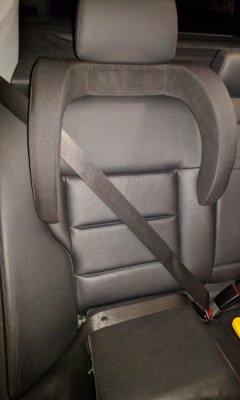
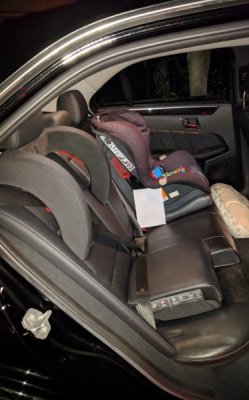
Each seat has a handle on the front. You pull it to release the seat. Each seat is spring loaded so will rise up and backward - you just need to push it back into place and it will lock.
To put it back, you pull the handle again, and pull it forward, then give a firm shove down at the front and back of the child seat, and it will lock into place.
What does it look like?
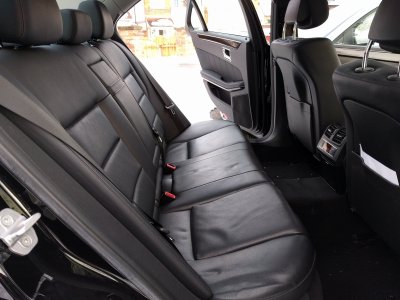
Seats down...(invisible child seats)
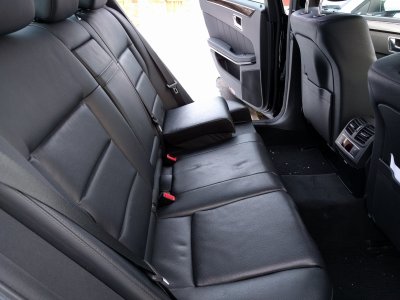
1 seat up!
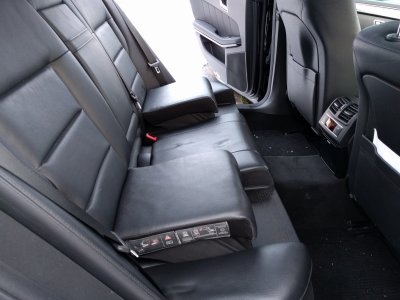
Both seats up!
How much did that cost?!
I've also got the corresponding headrest/bolster coming tomorrow - which was £9, but then an additional £20 in postage....
Why not buy a child seat?!
This is cheaper than a "top range" child seat - and looks better. It also won't leave pressure indent marks all over the seat like a normal ISOFIX child seat would - and can be sold with the car to improve value!
Hope you liked it!
Did this today in a delayed lunch hour.
Car MY
2010 W212 E350
What did I do?
Swapped the rear bench seat in my E350 from a normal bench seat to one with IKS (Integrated Kinder Sitze) - Integrated Child Seats. This is fitting Mercedes option code 248 to your car.
How long did it take?
30 minutes
What do you need?
You will need:
- 4 x M6x14.5mm Rivet Bolts - I acquired some of these...
- 4 x M6x20mm bolts - I used some of these...
- 1 x Rear Base unit with IKS
- 1 x Rivet Bolt Setting Tool - I used this one from RS Components
You will need to search for either A2129201450 or A2129200350 which is technically the "cushion" but you'll probably find it that way. You'll also need to get one in the right colour - I couldn't find actual black anthracite leather, so had to pick black anthracite "artico" leather - but it works.
Alternately, try searching for the seat material cover - as some people sell on the first part number they see...so A2129209633/A2129207737 (both Artico Leather) or A2129209733/A2129207837 (both Leather) or A2129209633/A2129207737 (both "Sport fabric").
Full seat part numbers can be found here...
How do you do it?
1) Remove the original bench seat
Imagine if you were sitting in the left or right seats. Put your hands in between your legs and reach down to the bottom of the seat cushion by your knees. There is a clip here, on both left & right sides. Get off the seat, and pull up sharply at these points, with both hands. The seat will unclip.
You MAY need to lift the front of the seat up a little, then push the seat back off two metal clips at the rear of the seat, but I didn't - those clips are used for the replacement.
2) Fit the rivet bolts
Either side of the clip receiver which is mounted into the metal bodywork, are two holes, which are exactly the right diameter to drop in your M6x14.5mm rivet bolts. Screw a rivet bolt into your setting tool, and put it in the hole and squeeze until fitted. Repeat until all four holes are filled with the bolts.
3) Fit the new seat
If not already removed, remove the plastic foot base from each child seat (this just needs two pressure clips to be pressed in, then the rest can be pulled forward and up to remove).
Look under the new bench seat and you'll see two metal catches that will latch onto the metal clips that protrude from the bodywork under the bench seat.
Keeping the front of the new bench seat slightly raised, put the rear new seat toward/under the ISOFIX bar, and push in *hard*. Lower the front of the bench seat and you should find your rivet bolts visible through two of the four holes under each child seat. If not, you need to keep pushing backward!
Put a washer on one of the M6x20mm bolts and loosely screw it in to a rivet bolt. Repeat with 3 more M6x20mm bolts so each rivet nut has a bolt in - and you know the seat is centered.
Tighten your bolts!
Then replace the plastic footrests but lowering them into place, and sliding them backward, keeping the back of the footrest pressed down to ensure the slide catches go into place. You'll hear the pressure clips "ping" when they locate.
You are done!
Basically the steps shown in (3) above are documented in this PDF - 2nd page, simply reverse the instructions to fit!
How do they work?
Each seat has a handle on the front. You pull it to release the seat. Each seat is spring loaded so will rise up and backward - you just need to push it back into place and it will lock.
To put it back, you pull the handle again, and pull it forward, then give a firm shove down at the front and back of the child seat, and it will lock into place.
What does it look like?
Seats down...(invisible child seats)

1 seat up!

Both seats up!

How much did that cost?!
- £67.23 - IKS Rear Bench
- £46.62 - Postage of the IKS from Germany
- £ 2.30 - 10 x M6x14.5mm Rivet nuts
- £ 2.18 - 10 x M6x20mm bolts
- £25.57 - Rivet nut setting tool
I've also got the corresponding headrest/bolster coming tomorrow - which was £9, but then an additional £20 in postage....
Why not buy a child seat?!
This is cheaper than a "top range" child seat - and looks better. It also won't leave pressure indent marks all over the seat like a normal ISOFIX child seat would - and can be sold with the car to improve value!
Hope you liked it!

