M113 engine support failure

Page may contain affiliate links. Please see terms for details.

DRBC43AMG

MB Enthusiast
Joined
Mar 15, 2010
Messages
1,118
Location
Switzerland, Locarno (TI)
Car
2013 C63 AMG coupe "T-Rex", 1999 C43 AMG saloon "Grandma" (sold), Ultima Sports Can-Am (sold)
Over the last months, I had a rumbling sound which plagued my 99' W202 C43AMG when accelerating with a medium and more throttle position. I changed the central bearing and support together with flex discs on both ends of the drive shaft. The bearing and flex discs were showing some wear, but I guess that's normal for a 19 year old vehicle with close to 300'000km on the clock. Despite the new parts, the rumbling continued and become louder as time went by. I didn't drive the 43 much and when I did, I drove with gentleness somewhat like "Miss Daisy and her Chauffeur" :p

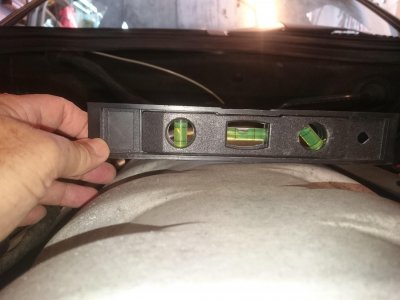
The other day with the bonnet open, I noticed that the engine was tilted to the right on the passenger side (LHD) which was confirmed when I placed a spirit level on the top of the intake manifold. I then lifted and placed the vehicle on axle stands to get a view from underneath. Before doing that I placed a floor jack with a block of protecting wood under the engine sump and lifted the engine 1-2 cms on the right side. It lifted very easily, too easily.

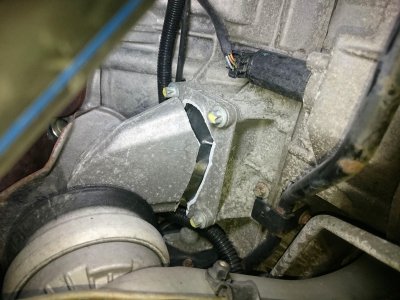
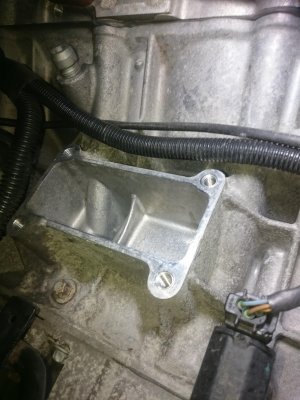
Looking under and upwards, I found that the engine support had totally broken off :eek: and one of the top fixing bolts had sheared.

Using a right angle pneumatic drill and a short 4mm drill bit, I managed in situ to drill into the broken part and using a bolt extractor managed to remove the broken bolt. A quick pass with a M8 threader to clean out and ensure the threads were not damaged and I'm ready to reassemble a new alloy engine support and at the same time will upgrade to E55K engine rubber mounts on both sides for more stiffness.

I'm looking to find out the torque settings for the 4 bolts holding the alloy engine bracket and those for the upper and lower fixing bolts on the rubber engine mounts.

Thanks in advance :)
 

Attachments

  • DSC_0248_light.jpg
    DSC_0248_light.jpg
    572.7 KB · Views: 36
  • DSC_0254_light.jpg
    DSC_0254_light.jpg
    931.8 KB · Views: 36
  • DSC_0296_light.jpg
    DSC_0296_light.jpg
    723.5 KB · Views: 36
how much did the new engine support cost ya?
 
how much did the new engine support cost ya?

Just picked up the parts:
Engine mount CHF 174.- with 10% reduction
Engine rubber support CHF 161.- each
 
Many thanks for that.

Just a further query... The bolt quoted for front engine mount to engine support at 55Nm, is this for both top and bottom bolts? The bottom bolt is easy, but getting the top one torqued down will be impossible with the engine in the vehicle. Can't see how that can be done without removing the exhaust manifold or engine out...
 
You will be lucky to get a tool onto the top bolt with the engine manifold in place.
Mercedes have an offset tool especially for the job, but trying to find one in UK is tricky without going to the main dealer.
Or, you could do as I did, make your own.
As long as you can weld, its not difficult.
Get a 16mm socket as cheap as you can because you are going to wreck it, or use an old one if you have spares.
You need a piece of 4mm steel bar about an inch wide, and about 5 inches long.
You will also need a 17mm bolt and two nuts.
Get the socket in a vice, and with an angle grinder, cut it just above the hex.
You would be best with a 12 point socket as a 6 point may not give to the correct positioning on the bolt.
This is about a 1/2 inch drive socket, if you use 3/8 drive, you may not have to cut it.
Try and cut it at a bit of an angle, its not vital, but the bolt is angled so it just lets the tool sit better.
Now, you have to weld the socket to the bar, if you cut it at an angle, put the taller bit to the end.
When you have done that to your satisfaction, drill a hole in the other end big enough for the bolt to pass through.
Put the two nuts onto the bolt, screw them up all the way, and tack weld them together.
Drop the bolt into the hole in the bar, opposite side to the socket, and weld the two nuts to the bar.
Line the bolt head as good as you can with the top nut, it just gives an extra bite when you are using the tool.
turn it all upside down, cut the bolt so there is about a quarter of an inch sticking proud of the bar, and weld it all together.
Thats it! all you have to do now is put the tool onto the top bolt, use a 17mm socket on long extension bars to clear everything under the bonnet, I have sports manifolds on my car, and the bolt would not come out of the metal mounting, bear this in mind when you are building the mount back up, if you screw the matal part up without putting the bolt in the hole first, you may not be able to get it in, meaning you will have to take the metal mount out again, and that looks lake a bit of a beast of a job with the manifold in place.
Your engine should now be sat on the mount, dont forget to remove the 13mm bolt underneath.
Next, jack the engine up, it needs to go up a fair old way, I used a bottle jack to do this.
That leaves the mount free to move.
Next problem is how to get it out, I was lucky in that my radiator fan and cowl were not on the car, so the mount slid out under the alternator and up the front, but you may have to find an alternative route.
As far as the torque settings are concerned, you are not going to be able to torque that bolt properly with the exhaust manifold in place, so you can either torque up the bolt with a lower setting to take into consideration the extra length of the leverage on the bolt, or you can do what most people would do, which is just tighten it to where you know it isnt going to come out, it only has forces in one direction on it, doesnt have any fluids to keep in place, and has no rotation to deal with, so the torque setting isnt as vital as a lot of other parts in the car.
 
Many thanks for the detailed explanation :cool:

I managed to remove the engine rubber mounts without too much of a hassle, the only difficult part was loosening the top bolt from the side the engine mount was not broken. With a angled ring spanner and a breaker bar I managed to do the job. On the broken engine mount I just removed the lower bolt and slid everything out in one go, after having jacked up the engine to free up some space.
Getting everything back in was relatively simple and I tightened the top bolt as best as I could with some liberal use of blue loctite. Hopefully the two upper bolts are not going anywhere soon.
As an upgrade, I installed new rubber mounts used for a W210 E55K. The old ones were really compressed and the rubber seriously cracked. The new ones make a great difference on the road, the front end giving a much more planted feeling than before.

_20180912_121027.jpg
 

Users who are viewing this thread

Back
Top Bottom