Mid day clean .. thank goodness

Page may contain affiliate links. Please see terms for details.

chrisk2010

MB Enthusiast
Joined
Oct 1, 2014
Messages
1,202
Location
Essex
Car
C230 w203
I haven't had much time to do the car with our new addition to family who arrived 29th January my poor car has suffered a bit as I have been doing much of the running around and the school runs.

I did manage to get some Bilt Hamber DSW in a detail about three or four weeks ago but that has been about it until today when my better half chucked me out so she could catch up with her soaps and find some respite from me moaning about how dirty the car is. :rolleyes:

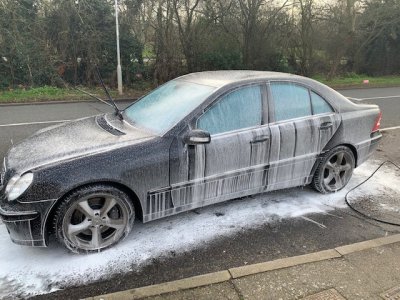
Here is the result of all the damp nasty weather we've been having.

6.jpg 7.jpg
18.jpg

It's a bit grim I know I have never let the car get as dirty as that since the day I bought it but alas there we go.

So first up is to get set up. I mixed up a stronger solution of BH snow foam than I usually would due to the car being as caked in crap as it was.

I also had a little AG shampoo left so mixed up a solution in the shampoo bottle to rinse the cars panel with as I went, I hate letting the car dry as I go around so keeping it super soapy and lubricated when clan makes me feel much better.

Also a bit of Halfords shampoo in the bucket i use for cleaning the wheels.

11.jpg

Three buckets ready to go:

First up was getting BH snow foam in all the nooks and crannies to let it dwell for 10 minutes or so..

9.jpg

I know there's a never ending thread on whether snow foam is worth it but for me the result speaks for itself when I look to the bottom of the rinse bucket at the end.

However it is hard to takes pic of the black paint work to show how well it works:

15.jpg

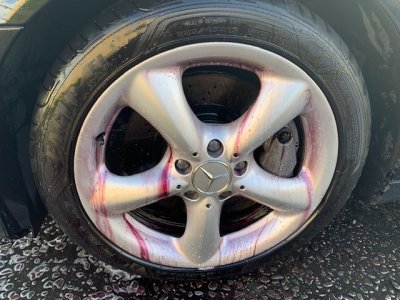
You can sort of see in the bottom right there a corner I deliberately left prior to jetting off the SF so here is a pic of the wheel only treated with BH snow foam no wheel cleaner at all.

16.jpg

Once stage one was complete it was onto the wheels, I do have a separate bucket for this and later you'll see why. I treated the wheel with BH Korrosol this time as they were pretty mucky and let that dwell for 5-10 minutes.

Here's my bucket green brush for tyres, long one for wheels and a cloth for the outside.
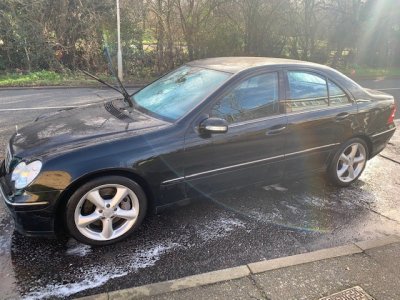
21.jpg
19.jpg 20.jpg

After cleaning:

23.jpg
 

Attachments

  • 10.jpg
    10.jpg
    135.6 KB · Views: 6
  • 17.jpg
    17.jpg
    126 KB · Views: 6
  • 22.jpg
    22.jpg
    108.5 KB · Views: 5
Ok school run completed baby in left arm I can add a bit more.

I have seen a few people are quite sceptical about using a third bucket for the wheels. It's really down to individual choice but let me show you I do.

You saw the clean yellow water before here is after:
24.jpg
35.jpg

Not nice at all right!? all those metal filings and grime blah blah blah but it's ok it just needs a rinse and good to go?

42.jpg

Look at all that in there nasty right? I thought I'd spray a bit of iron fall out remover in there as well which is something I like to do before putting the buckets away.

43.jpg

Look at side not just the bottom I would not use that for my body work.

Right moving on to the body and paint work, I like to start with a good rinse down with the AG mix in the soap bottle to lubricate everything prior to touching the paintwork.

26.jpg

Time to whip the two buckets out, grit guards a must.
28.jpg

So first time around I only clean the top half of the car never going below the plastic trim on the doors/ bumpers always rinsing my mit onto the floor (not back into the bucket) and using the AG mix to rinse each panel after touching it.

Doing this keeps my mit clean reducing fine scratches ..

29.jpg

Buckets after doing the top half ..
31.jpg
33.jpg

Look how lovely and clean that is against the rinse bucket ..

30.jpg
 
Last edited:
Next up the bottom half of the car ... I like to empty the rinse bucket at this stage I like to empty the rinse bucket filling with clean water as the water level gets a bit close to the grit guard and also I have a separate mit for doing the bottom half as it get much dirtier and all this is always to reduce the fine scratches.

34.jpg

With the bottom half done again rinsing as I go it was nice to see the BH double speed wax I topped up with a few weeks ago still holding up.

36.jpg 37.jpg

With it being so cold and windy I had already made the call to use AG polar seal which this time of year is a god send. I was very sceptical at first but I used it in the summer on a black car and it dried far to fast but this time of year it's great stuff I'm converted and it's nice to have an extra layer on there if it does layer ... (not opening that can of worms).

So here's a few pics after applying AG polar seal.

38.jpg 39.jpg 40.jpg 41.jpg

Lovey bit of beading there ....

The gas man turned up and chewed my ear for a bit as he's thinking of getting a Ceramic coating for under £400 with a three year guarantee which to be fair I told him to go for unless he wanted to do a complete detail himself or wait for me in the spring time.

Polar seal applied and rinsed off I finished up drying with two waffle drying towels and treating the tyres to Megs Tyre Gel.

44.jpg 45.jpg 46.jpg

The whole thing only took a couple of hours to complete in freezing cold wind including chatting to the gas engineer for a bit about cars and my boiler which got a clean bill of health for the year.

Things I didn't do was the wheel arches and roll the car back and forth to get the bits you can't because of the size of the front callipers but I was a bit short on time so didn't mind.

Sorry for such a long write but hoped some enjoyed it.
 
My S204 is on our front driveway any time you fancy a bit more practise - and it's Carneol Red which is a bit easier than black! Coffee and biscuits as required!!:D:D:D

Like you I have 2 wash mitts - sheepskin for the top part of the car, microfibre for the bottom - the sheepskin has to be hand washed whereas the microfibre can go in the washing machine at 30C with no fabric conditioner.
 
Hi Chris
very impressed with your regime and the results (in the freezing cold:confused:)

kc
 
Thanks both!

i may take you up on that chris lol.

Across threads I always promise to take pictures but never do so today i tried to get a few done.

I had already clayed the car, glazed, waxed and sealed after Christmas so it wasn’t necessary to go the full detail today but it was a good opportunity to show an interim clean especially being pushed for time.

i managed to squeeze a coffee in after head over to nursery to pick up george, return home then head out again to pick up the kids from two other schools then home only to head out again to pick the teenager up from after school lessons.
 
I also use a third bucket for wheels

Mine are ceramic coated yet you’d still be surprised how grimey the water in the bucket is when you’ve finished. Also use a scrubbing brush for the tyres, again surprising how mucky they are until you give them a good scrub. I also use a detailing brush for the callipers and wheel nuts/anywhere I can’t get my wheel cleaning brush
 
nice little right up bud.
here's another tip for you.. have you tried BH Atom Mac??? its a rust preventative spray for exposed metal and brakes. Just spray on the discs and caliper before you start your wash, then again when finished, the product will completely stop the discs rusting up. then you don't have to move the car, even if left till the following weekend, its nice to get into the car with the discs free of rust that ends up all over the wheels.
 
Thanks :) Good tip lee!

I was looking at atom mac but took it out the basket at the last minute lol.

I’ll pick one up next time I’m having a mooch.
 
nice little right up bud.
here's another tip for you.. have you tried BH Atom Mac??? its a rust preventative spray for exposed metal and brakes. Just spray on the discs and caliper before you start your wash, then again when finished, the product will completely stop the discs rusting up. then you don't have to move the car, even if left till the following weekend, its nice to get into the car with the discs free of rust that ends up all over the wheels.

I will try some of this. I'd never heard of it. Sometimes my car doesn't move for 2 to 3 weeks. Great tip, thanks
 
Thanks everyone :)

I did miss one picture out after going through my phone and that was the rinse bucket after cleaning the bottom half.

1.jpg

As expected worse than the bucket from doing the top half of the car. This is why separate mits and a fresh bucket of water are used for the two different areas so as not to undo all that pain staking polishing.

I should add though this is the dirtiest I have ever let my car get and neither rinse bucket really gets as dirty as shown but it's was a good opportunity to take the pics to help highlight the reasons behind my madness.
 

Users who are viewing this thread

Back
Top Bottom