tumbleweed1975
New Member
Fitting Mud Flaps to a E Class W212 2013 (Facelift) with AMG Body Kit.
I live and drive predominantly in a rural environment and in winter, with mud and grit on the roads, keeping a car clean and free from gravel rash is a nightmare.
I know that mud flaps can be a contentious issue for the purists among us but needs must etc when you need to protect the lower bodywork and sills.
As many have already posted on various forums, MB don't make mud flaps for the E class 2013 (Facelift) model that has the AMG body kit so the only way is a third party supplier.
I could find no UK supplier for suitable mud flaps and eventually found what I was looking for in China. For anyone interested the link to the web site is - For Mercedes Benz E Class Sport W212 2014 2015 Molded Splash Guards Mud Flaps | eBay
The supplier was very helpful and, when provided with a tracing of the wheel arch profiles, he confirmed that the mud flaps fitted my vehicle. Despatch was prompt and the quality was good.
The mud flaps are supplied with additional self tapping screws and clips but no fitting instructions although fitting is self evident when the mud flaps are held in place. The wheels will need to be removed to provide decent access for fitting and the usual caveats of adequate vehicle support apply.
Before fitting each mud flap I applied clear vinyl wrap to the area of the wheel arch flare that was covered by the mud flap. This was to prevent the mud flap scuffing the paint. If for any reason in the future the mud flaps are removed, the vinyl wrap can be taken off and the paint should be undamaged.
Now for the fitting :-
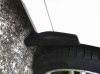
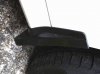
Pictures: Front Mud Flap 1 and Front Mud Flap 2. Each front mud flap is fitted using the two existing push fit plastic rivets that secure the end of the side skirt. The rivets are removed using a flat blade to prise out the centre expansion pin and the main rivet body is then pulled out. With the mud flap held in place the push fit rivets are reinserted through the holes already in the mud flap and into the holes in the end of the side skirt. The expansion pin is then refitted (hammer required).
I felt that the top and the inner edge of the mud flaps needed a little extra support so I fitted two additional self tapping screws. The supplied screws were black varnish finish so I changed these for 4.8mm dia x 20mm long stainless steel screws and washers for long term corrosion resistance. The mud flaps were drilled 5mm dia for clearance and the wheel arch liner was drilled 3mm dia to receive the screws.
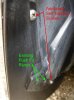
Picture: Rear Mud Flap 1. The rear mud flaps each use three existing fittings. The push fit plastic rivet and a hex head screw (used to secure the wheel arch liner) need to be removed together with the self tapping screw that secures the lower edge of the rear bumper adjacent to the wheel arch liner. Hold the mud flap in position and it will be obvious where these fixings are located. Remove the fixings, hold the mud flap in position and replace the fixings through the holes already in the mud flaps.
On the inside edge of the mud flap is a vertical tab which requires a self tapping screw to fix it to the wheel arch liner. Drill the wheel arch liner 3mm dia to receive the screw.
Clear up and go and have a cup of tea.")
I hope that this may be of interest to someone.
I live and drive predominantly in a rural environment and in winter, with mud and grit on the roads, keeping a car clean and free from gravel rash is a nightmare.
I know that mud flaps can be a contentious issue for the purists among us but needs must etc when you need to protect the lower bodywork and sills.
As many have already posted on various forums, MB don't make mud flaps for the E class 2013 (Facelift) model that has the AMG body kit so the only way is a third party supplier.
I could find no UK supplier for suitable mud flaps and eventually found what I was looking for in China. For anyone interested the link to the web site is - For Mercedes Benz E Class Sport W212 2014 2015 Molded Splash Guards Mud Flaps | eBay
The supplier was very helpful and, when provided with a tracing of the wheel arch profiles, he confirmed that the mud flaps fitted my vehicle. Despatch was prompt and the quality was good.
The mud flaps are supplied with additional self tapping screws and clips but no fitting instructions although fitting is self evident when the mud flaps are held in place. The wheels will need to be removed to provide decent access for fitting and the usual caveats of adequate vehicle support apply.
Before fitting each mud flap I applied clear vinyl wrap to the area of the wheel arch flare that was covered by the mud flap. This was to prevent the mud flap scuffing the paint. If for any reason in the future the mud flaps are removed, the vinyl wrap can be taken off and the paint should be undamaged.
Now for the fitting :-
Pictures: Front Mud Flap 1 and Front Mud Flap 2. Each front mud flap is fitted using the two existing push fit plastic rivets that secure the end of the side skirt. The rivets are removed using a flat blade to prise out the centre expansion pin and the main rivet body is then pulled out. With the mud flap held in place the push fit rivets are reinserted through the holes already in the mud flap and into the holes in the end of the side skirt. The expansion pin is then refitted (hammer required).
I felt that the top and the inner edge of the mud flaps needed a little extra support so I fitted two additional self tapping screws. The supplied screws were black varnish finish so I changed these for 4.8mm dia x 20mm long stainless steel screws and washers for long term corrosion resistance. The mud flaps were drilled 5mm dia for clearance and the wheel arch liner was drilled 3mm dia to receive the screws.
Picture: Rear Mud Flap 1. The rear mud flaps each use three existing fittings. The push fit plastic rivet and a hex head screw (used to secure the wheel arch liner) need to be removed together with the self tapping screw that secures the lower edge of the rear bumper adjacent to the wheel arch liner. Hold the mud flap in position and it will be obvious where these fixings are located. Remove the fixings, hold the mud flap in position and replace the fixings through the holes already in the mud flaps.
On the inside edge of the mud flap is a vertical tab which requires a self tapping screw to fix it to the wheel arch liner. Drill the wheel arch liner 3mm dia to receive the screw.
Clear up and go and have a cup of tea.
I hope that this may be of interest to someone.