Navigation
Install the app
How to install the app on iOS
Follow along with the video below to see how to install our site as a web app on your home screen.
Note: This feature may not be available in some browsers.
More options
You are using an out of date browser. It may not display this or other websites correctly.
You should upgrade or use an alternative browser.
You should upgrade or use an alternative browser.
Page may contain affiliate links. Please see terms for details.
Those "behind headlamp"/ inner wing water traps are as bad on the W124 ---I assume water gets in from the front / underside and settles there out of the engine compartment airflow [ which might otherwise dry it off] to do its worst.
It does seem a poor design to be honest Graeme, having said that it's gone nearly 30 years and it's still only surface rust, which has now come off with a good bit of rubbing down, albeit with a strip and clean pad on a little orbital air sander because I'm lazy.
I have a bit of paint left from when the rear wings were done and was going to blow these bits in with an air brush but, unfortunately, mine seems to have died after being dropped one time too many so I brushed it on. Not too bothered about the finish really as it's in an area which won't get seen.
Coat of polish under there and it will look very fresh!!
It will get cleaned up before the bumper goes back on Gavin, though not convinced about a coat of polish...
It's taking me an age to remove the double sided tape from the number plate and plinth and I've still not finished. Whoever put it on did not want it coming off, there must be nearly a metre of the stuff.
Thought it was about time I updated this thread as I've been getting through a few jobs on this little car of late. After sorting the front end out and making it as rust proof as I can get it, I turned my attention to the back end of the car and started the same regime though this turned out to want a little bit more.
It turned out that the rust on the rear wings which I had sorted out was coming from the drilled holes in the wings which hold the body skirts in place. This was noticed when I took the inner liners out. I've now stripped, cleaned and painted the inside of the wings as well, to hopefully stop it happening again.
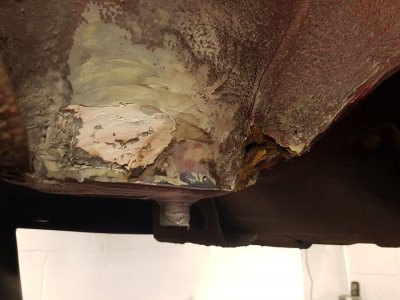
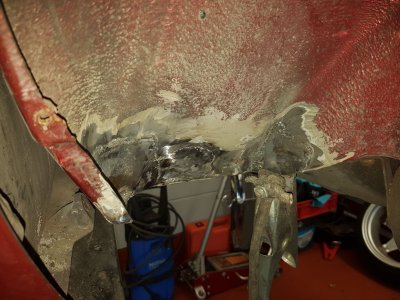
I was then poking about in any little cracks in the underseal which, under a bit of pressure, opened up to reveal a couple of poor repairs in the wheel wells, namely that zinc mesh stuff and filler which everyone seemed to use a few decades ago. This was chopped out to reveal a couple of holes which were consequently trimmed and new metal was welded in. Both the bottoms of the rear arches were treated in the same way as they too had succumbed to a bit of rot, probably due to the little mud flaps which were fitted though will not be going back on.
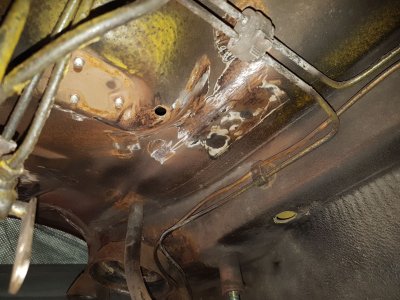
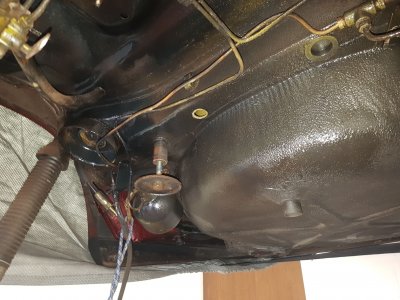
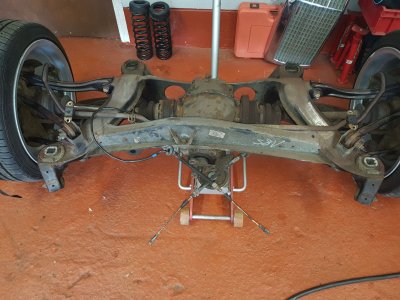
I then removed the rear springs as they were quite rusty. A quick shot blast and some black paint soon had them looking good again and I took this opportunity to clean and paint the lower control arms whilst I had access. Once this was sorted out I started to look around under the subframe and decided to try to get to any rust spots I could, again using strip and clean pads, with the addition of a small finger sander. Everything came up well but there were so many bits I couldn't get to I decided that ultimately I had no option but to drop the subframe for access. I will admit that I was pleasantly surprised with the condition it was in and all it really needed was a good clean up and a light coat of paint for protection. Under the frame on the floor area and spring mounts needed a bit of attention but again, mainly cosmetic, just rubbing the surface rust off down to bare metal, treating and then plenty of paint. Once the paint had dried off it got a couple of light coats of Bilt Hamber Dynax-UC, a bit like Waxoil but actually spray-able when cold and, allegedly, with self healing properties. Inside the chassis was also treated with another Bilt Hamber product, this time S50 which is very liquid and manages to get absolutely everywhere.
The subframe then went back on with new bushes and bolts, though all the suspension links are good (some new) so they can stay to fight another day.A couple of new brake hoses to the callipers completed the rear end so hopefully we should be good for a few more years now.
This is the OSR wheel arch after I'd peeled the underseal away: -
Same arch after welding lots of small pieces of metal in to make it solid again: -
Springs before and after: -
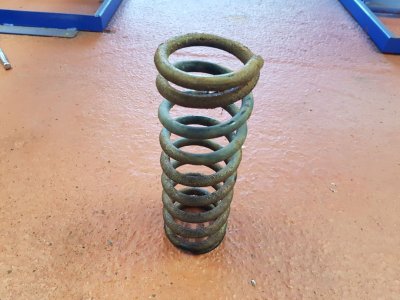
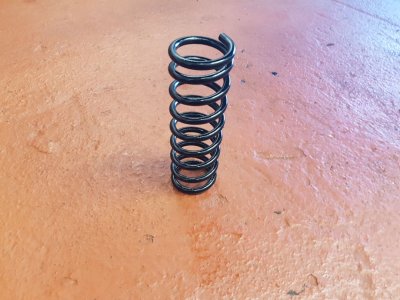
Same area before and after, though different angles: -
Subframe (Taken before the rear bushes arrived): -
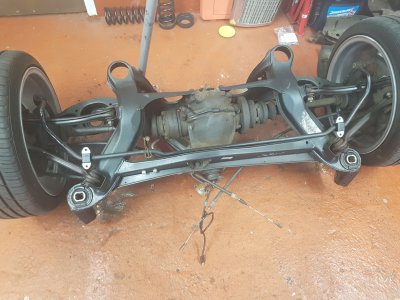
That's enough for today. Going to tax it tomorrow and hopefully have a play around in it at the weekend.
It turned out that the rust on the rear wings which I had sorted out was coming from the drilled holes in the wings which hold the body skirts in place. This was noticed when I took the inner liners out. I've now stripped, cleaned and painted the inside of the wings as well, to hopefully stop it happening again.
I was then poking about in any little cracks in the underseal which, under a bit of pressure, opened up to reveal a couple of poor repairs in the wheel wells, namely that zinc mesh stuff and filler which everyone seemed to use a few decades ago. This was chopped out to reveal a couple of holes which were consequently trimmed and new metal was welded in. Both the bottoms of the rear arches were treated in the same way as they too had succumbed to a bit of rot, probably due to the little mud flaps which were fitted though will not be going back on.
I then removed the rear springs as they were quite rusty. A quick shot blast and some black paint soon had them looking good again and I took this opportunity to clean and paint the lower control arms whilst I had access. Once this was sorted out I started to look around under the subframe and decided to try to get to any rust spots I could, again using strip and clean pads, with the addition of a small finger sander. Everything came up well but there were so many bits I couldn't get to I decided that ultimately I had no option but to drop the subframe for access. I will admit that I was pleasantly surprised with the condition it was in and all it really needed was a good clean up and a light coat of paint for protection. Under the frame on the floor area and spring mounts needed a bit of attention but again, mainly cosmetic, just rubbing the surface rust off down to bare metal, treating and then plenty of paint. Once the paint had dried off it got a couple of light coats of Bilt Hamber Dynax-UC, a bit like Waxoil but actually spray-able when cold and, allegedly, with self healing properties. Inside the chassis was also treated with another Bilt Hamber product, this time S50 which is very liquid and manages to get absolutely everywhere.
The subframe then went back on with new bushes and bolts, though all the suspension links are good (some new) so they can stay to fight another day.A couple of new brake hoses to the callipers completed the rear end so hopefully we should be good for a few more years now.
This is the OSR wheel arch after I'd peeled the underseal away: -

Same arch after welding lots of small pieces of metal in to make it solid again: -

Springs before and after: -


Same area before and after, though different angles: -


Subframe (Taken before the rear bushes arrived): -


That's enough for today. Going to tax it tomorrow and hopefully have a play around in it at the weekend.
Flyinspanner
MB Enthusiast
It looks great, really lovely colour. And loving your attention to detail on the underside and suspension. Top notch!
grober
MB Master
Looking back at your original post its perhaps a salutory lesson to us all that even relatively well looked after cars of that era are now bound to be showing signs of their age. Keep up the good work and keep us posted!
Looking back at your original post its perhaps a salutory lesson to us all that even relatively well looked after cars of that era are now bound to be showing signs of their age. Keep up the good work and keep us posted!
Absolutely true Graeme. The underseal they used on these cars was incredibly good stuff but, once it gets a few cracks in it, it needs taking back to metal and starting again. The rusty scabs in the transmission tunnel surprised me but they're usually hidden by the prop shaft of course. Just amazing how they got there in the first place...
As I mentioned in my initial post I spent hours looking at cars before buying this one, and this was the best I could find at the time. To be fair though, most people wouldn't be constantly looking for faults as I've been doing, they'd just be using it and probably getting as much if not more enjoyment out of it than I've had, at least so far. Having said that, I've been happy doing what I've been doing and now reckon that the car will last a lot longer than it would have done without my messing.
I still have lots more to do but the bulk has been sorted and the rest can safely wait till next Winter.
I've just looked at the weather forecast and we now have an "Amber Warning" of snow, upgraded from a yellow one. 
The car will not now be taxed until the end of the month as there's no way I'm taking it out with snow/salt on the roads after spending weeks cleaning the underside up...
The car will not now be taxed until the end of the month as there's no way I'm taking it out with snow/salt on the roads after spending weeks cleaning the underside up...
- Joined
- Apr 15, 2005
- Messages
- 7,506
- Location
- Weybridge. U.K
- Car
- 500L ( W221 ), 2014 AMG CL 5.5 Biturbo ( W216 ) Sold, 2014 Brabus Smart ( 451 Coupe ) Mapped 130bhp
Great attention to detail Dave , as usual 
D
Deleted member 126969
Guest
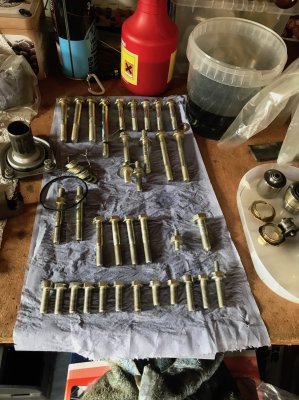
Nice work. Probably a bit late to the party now....but recently(ish) I've been cleaning up some old parts for a project and have been using a combination of methods to get a finish. If badly rusted, I start with electrolysis cleaning in a washing soda solution, then glass bead blasting in a small cabinet I got from Machine Mart many moons ago, then for finish, either DIY zinc plating or rattle cans, often smoothrite as it seems to last well. Also had success with Simonize Satin finish chassis paints too.
Some parts I zinc plated. Mostly gearbox bolts but a few other bits in this shot as well.
Some parts I zinc plated. Mostly gearbox bolts but a few other bits in this shot as well.

Users who are viewing this thread
Total: 2 (members: 0, guests: 2)
Similar threads
- Replies
- 31
- Views
- 2K
- Replies
- 7
- Views
- 693
Share:
