OM605 in bits

Page may contain affiliate links. Please see terms for details.

Wackeldackel

Member
Joined
Jul 2, 2014
Messages
50
Location
Potsdam, former DDR / Kent, UK
Car
1999 Mitsubishi L200, 1989 W124 300E manual LHD, 1993 W124 250D auto, 1980 508D
My W124 E250d died at the end of February, no warning, I noticed a slight ticking from the engine as I left the motorway, pulled in to investigate and the car died as I rolled into the layby. Cue recovery truck home.


Did a few checks (timing chain, cracked injector lines, checked camshafts) then sent car for comoression test. No compression in cylinders 1 to 4, only cylinder 5 held pressure, this led me to suspect cylinder head gasket or at worst a warped head.

So then I strip everything down to remove the cylinder head.

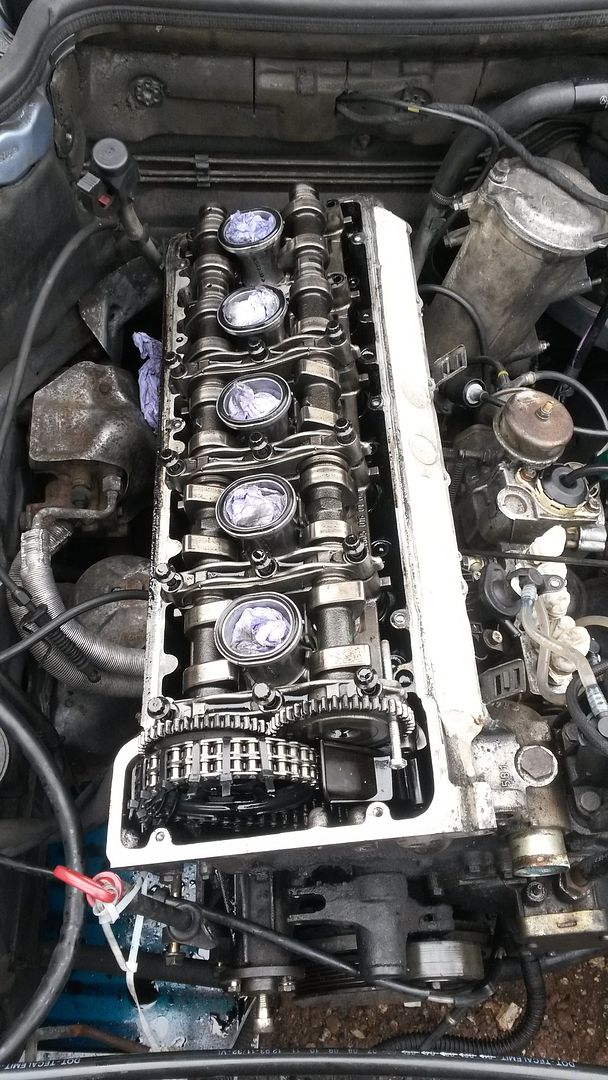
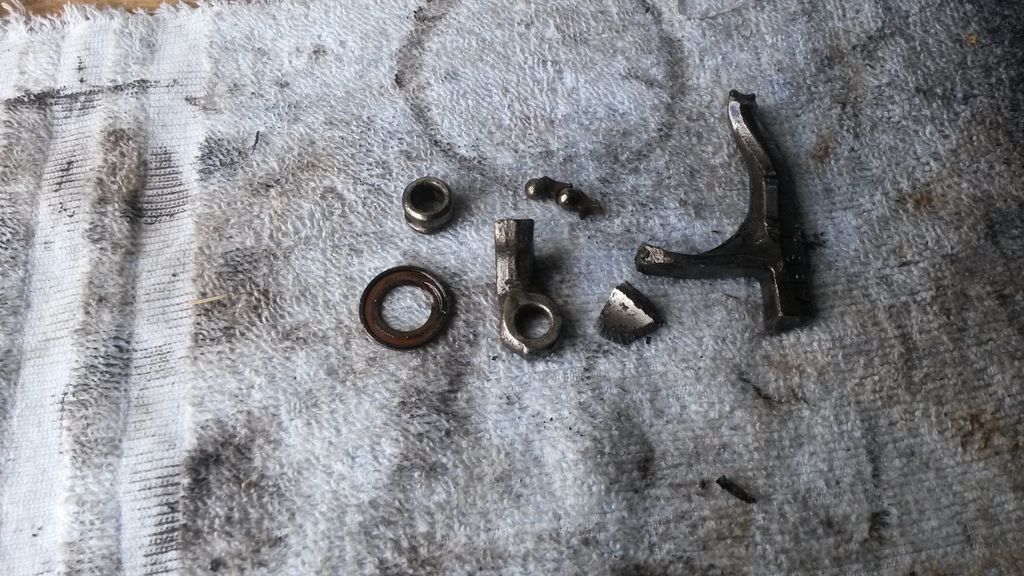
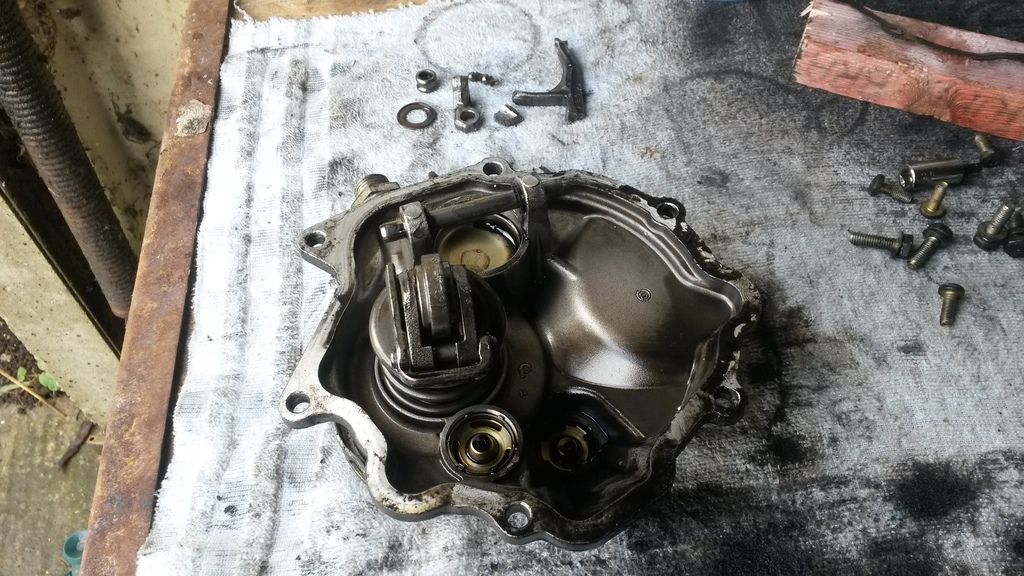
As I'm draining the oil I notice a couple of ball bearings and bits of metal in the oil catch pan. Fantastic :doh:

Turns out that the vacuum pump has dumped its bearings and bits of tge arm on the back into the sump, apparently a common problem on the OM60- engines.


Helpfully enough this vacuum pump debris has taken some nice big chunks out of the IP sprocket


Once it was all apart and the worst of the metal fished out from the front of the engine and around the lower timing chain I consulted my Haynes book of lies and found out that there should be a nifty little cage betwen the vacuum pump idler arm and the outside of the IP sprocket to prevent the aforementioned bearings getting crapped out into the engine in case the vacuum pump fails. In my case there was no cage :doh: The car is early facelift model from December 1993, engine code OM605.911, a bit of googling has left me none the wiser about why my engine has no cage. My plan of action is as follows;

Sort the cylinder head, new gasket, new glowpugs etc etc
Reinstall cylinder head
Reinstall camshafts
Reinstall chain tensioner
Turn engine to check camshaft timing

Once that's sorted I'll get a new vacuum pump, then start with replacing the sprocket and hopefully get the retaining cage fitted too.
Then I plan to remove the sump (will give me chance to do engine mounts too) and check the bottom end and oil pump and oil pump chain. I have the special locking tool for the IP, if anyone has any tips or hints they wish to volunteer regarding removing the sump (I'm not looking forward to it, given the car is on my parents driveway :doh:) then I'd be very grateful. Will update with more pics as I get things done.
 
The cylinder head is going for a pressure test this week, getting it out at least gave me the chance to get the 3 stuck glow plugs out. I checked the head with a straightedge and it was pretty flat, best I could do with the feeler gauge was 0.05mm in one or two places so I'm fairly confident the head hasn't warped.


Fingers crossed!
 
Eek- I feel for you mate . Fortunately you look as though you are more than capable of sorting this out yourself. Would have cost me an arm and a leg to sort!
 
Would have cost me an arm and a leg to sort!

Yup thats exactly what I thought, I got a couple of quotes both well over £1000, given I only paid £850 for the car I figured it would be worth a try to fix it myself.

Today I have mostly been degreasing things....


I also ordered the head gasket, bolts, new vacuum pump plus lots of other little bits that all need doing, aux belt and tensioner shock, engine mounts etc etc. Plan for next Saturday is to get to the breakers and see if the IP sprocket and retaining cage are present on a 300d thats sat in their yard, should be the same for both the 606 and 605 engine. The injectors are going away as well this week to be tested, and I'll also get roubd to visiting the stealership for a few bits I can't get elsewhere...more pics later in the week.
 
A little update....

This week I have bought lots of parts both from ECP and Vikings, my local dealership. I wasn't sure on the make of the new vacuum pump, would have preferred a Pierburg but after a bit of digging this manufacturer seems OK and of decent OE quality


I've bought plenty of Elring gaskets, oil seals etc when I lived in Germany, so I'm happy that they are of decent quality, never had any problem with them yet. Also bought myself the all important locking tool for the IP, only a tenner so well worth it.


I also dropped the injectors off at the local diesel injector chap, to test they are opening at the correct pressure and spray pattern is ok, while I was there I picked up a few dust caps (one short :doh:) to cover the delivery valves. The cylinder head was nice and flat still, I had a local engineering company put in one helicoil for a glow plug where I'd managed to cut the thread badly, causing the plug to just spin and not seat properly. I also ordered a brass bottle brush on a long handle to clean the carbon crud out of the glow plug holes.

Spent an hour or so scraping off the old gasket and cleaning up the engine block, blew all the oiland water out of the bolt holes and was left with this


Then I gave the cylinder head a once over with degreaser and a wire brush in my drill


Finally wiped everything over with a bit of acetone free brake cleaner and then with a hand from my brother holding the camshaft sprocket we got the head on the block


Then came a new set of cylinder head bolts and my very old torque wrench, a bit of quality german engineering from Solingen :thumb:


The head gasket set came with various O rings and seals so these were replaced, I oiled up all the camshaft journals, bearing caps and tops of the valves then re-set the camshafts onto the head.


And this is where I left things today. Re- sealed and replaced the top chain guide pins, new O rings on the injector shrouds and a new rocker cover gasket, the rocker cover is not yet bolted down in this pic. I turned the engine over, everything times up OK.


And I thought I had a busy weekend messing around with 28 year old brake hoses:)

Great job you are doing, and great write up, thanks, will continue to follow this.
 
A couple of little niggles encountered....

According to the reading on the crankshaft pulley my timing chain has about between 1 and 5 degrees of stretch in it. Given the mileage of the car (160, 000) and the fact I know it's service history has been good, I'd doubt this very much to be correct. Turning the engine by hand shows the chain looking fine all along its length, no chunks out of the links, no sharp edges or burrs, there was no scoring or wear on the plastic upper chain guide either, my guess is that the pointer is just a bit inaccurate or has been nudged at some point in the past, probably me just being fussy.

I decided to have a go with the IP locking tool, once the camshafts were re-installed and I was satisfied that everything timed up roughly OK, I turned the engine to 14 degrees ATDC on cylinder 1 and opened the IP bung to look for the locking pip inside it. I removed the little vacuum gizmo that adjusts the hardness of the autobox shifts and cable tied the fuel lines out the way but there was still not enough space to get my fat head and a torch in there to see. I was also very very disquieted by the fact that when I undid the bung on the side of the IP there was black sump oil inside it....this does not bode well for the IP, I have a feeling that I'll need to remove the IP from the block (not a big deal, the IP sprocket and timing device need replacing) but even so getting it all back and timed up correctly will be interesting.

My plan for next weekend ;
I'll enquire about the flywheel locking tool to get the crankshaft bolt off, this will mean I can do the front timing cover and crankshaft oil seal, plus get any vacuum pump debris out of the front of the engine and check the oil pump and drive chain.

I have ordered a good used IP sprocket from a guy on ebay who was breaking a 605 engine, £65 delivered is a lot more reasonable than £230 plus VAT for the new part, even after my 10% MB club discount. First job will be to replace the sprocket and depending on how that goes I might get the IP out onto the bench for a clean up and a bit of further investigation.

Then if all goes well I'll drop the sump and give it a good clean out (new sump gasket has been ordered). Then bolt a few bits back to the engine, and after that I'll probably chuck 6 litres of diesel in the engine block and spin the engine on the starter to flush out the oilways and oil pump of swarf and other bits of crud. Do that a couple of times, drop the sump again for a final clean.

Also got a new pair of engine mounts ordered up so these will be fitted whilst messing about with the hoist to get at the sump....fingers crossed :rock:
 
Great write up!

It's worth checking the tiny oil hole in the center of the IP sprocket, we had one blocked which caused an engine knock.
 
Couple of things.

The center bolt on the IP is left/hand/thread.

The cage you talk about in early post is likely the (workshop tool) holding cage used by Merc to support the timing wheel when the pump is withdrawn. It's not a fixed item when the engine is re-built. It's not on the 6cyl 606.

Remove the pump and turn shaft to locate the timing peg. Then with engine on 14 ATDC insert pump and bolt up...remove peg. It's purpose is not to check timing when engine/pump are complete unit.

Good work.
 
Last edited:
Thanks for the input chaps. On second thoughts I am also going to replace the timing chain (the state of the IP sprocket, to get that munched up it must have stretched the chain a little) and yes Druk, from what I've read online it was only the earlier SOHC engines that had this cage fitted, these have to be removed to fit the updated vacuum pump gasket with the pocket at the bottom.

The injectors are all having new nozzles fitted, in for a penny in for about two hundred pounds....

Another visit to the dealers tonight to order a new O ring for when I remove the pump and my local indy (MBZ autos in Canterbury )has managed to find me a flywheel locking tool at a very reasonable hire rate....more pictures after the weekend.
 
Another update....

Last weekend was a bit of a frustrating one, I planned to remove the sump and flush the engine through with diesel but didn't quite get round to it. I had the sump gasket ready, cardboard template marked up for the 34 bolts and I sadly couldn't get the drag link off with my balljoint splitter.

Instead I carried on with cleaning and degreasing bits and pieces that were easy to get to. Firstly the starter motor came off

I cleaned off a lot of gunky oil, being as the starter sits directly under the oil filter it gets fairly messy unless you are very careful when removing the oil filter.

Next the water pump and associated gubbins

Which was also pretty greasy. I checked the pump over, the impeller looked good and there was no play in the bearing so I was happy enough to reuse the old one. I made up a couple of new gaskets for it and reassembled it.

Made a new gasket for the oil filter can...


And fitted a new set of brushes to the alternator, the old ones were worn to about 5mm from the end, probably the original 23 year old ones!


The old one was a Bosch made in GB, the new one was a Hella, bought from a Merc parts specialist when I was in Berlin last year and is made in China! Wonder if I'll get 23 years service from it.....
 
This week saw a parcel from Germany....a new timing chain and master link plus a set of ceramic front brake pads and other bits and bobs


Then I set about getting the old munched up IP sprocket out and replacing it with a decent second hand one I bought on ebay


The LH threaded bolt loosened easily enough, then I used a strip of tin pinched from work to get the chain out of the way and allow me to get the sprocket off the IP shaft


This is why I'm replacing the timing chain....


I also ordered a 17mm allen socket to remove the auxiliary belt pivot, it was pretty well caked in oil but it cleaned up alright.

A bit of loctite on the bolt and then reassembled

One other thing that needed sorting was the wiring harness for the glowplugs and coolant temperature sensor. As it was easy to get to and the glow plugs were all replaced when I did the cylinder head I figured it would be wise to sort the wiring too.

I've patched it up before but it's just a bit too crispy for me to put back. I'll ring around for a few prices for a repair this week or maybe teach myself to solder....
 
Today I thought I'd have another bash at the sump. I jacked the car up but yet again despite much bashing with a BFH and a puller from the top and then a proper screw type balljoint splitter I still couldn't get the drag link out!!!

As I had the car raised I thought I might as well do some other bits to it so I set up my engine hoist and did the engine mounts


The chain hoist is a Lidl special, the bandstands and scaffold pole etc are all borrowed from work....


The old mounts were pretty squashed and rattly, I wouldn't like to think when they spat out the last of their hydraulic fluid!

I also cleaned up the engine legs that fix to the mounts, they were both pretty grotty and filthy


Then the last job I did today was tuck all the wiring (not a lot thankfully) out of the way, taped up the fuel thermostat, intake side of the cylinder head and covered a few hoses then sprayed the engine with degreaser followed by a good blast with the jet wash. I did the undertrays and inlet manifold too, and went over a few stubborn bits with a wire brush.

Looks a lot cleaner but has showed up a bit more rust :doh:
 
So the plan for this week is....

Get a slightly bigger balljoint splitter (maybe just a much bigger hammer!)

Look into hire of the chain crimping tool from my local independent mercedes specialist

Order the temporary joining link for the timing chain to thread the new chain onto the old (hopefully will only be peanuts)

Order new rubber gaiters for the drag link as they are a bit mashed up after my hamfisted attempts to remove the drag link

Sort the glowplug wiring loom....if the prices aren't too offensive I'll get it done by a professional. Anybody on here recommend a good auto electrician in Kent?

Then....timing chain
IP off to be cleaned up
Finally get the drag link off
Sump off
Flush engine....

Fingers crossed I'll be back on the road by the bank holiday....if (a very big IF) all goes to plan.....
 
Another vote for Sileck, although that loom doesn't look too difficult to sort yourself. :)
 
Are you aware of the trick of using a VERY BFH on one side of the female balljoint receptor as an anvil and giving the opposite side a sharp whack with a SFH. This shocks the taper and the ball comes free.......if you're lucky;)
 
What a great write-up, thanks.

Very detailed and informative. Keep it up.
 
This weeks update...

First job was replace the timing chain. I couldn't find anyone in the UK willing to sell me just a timing chain so I purchased a new one from Germany plus other bits and pieces. I got everything ready, cable tied the chain to the camshaft sprocket, chain tensioner out, towel over the engine to catch any metal filings and ground off the ends of one pin in the old chain.


I threaded the new chain onto the canshaft sprocket, securing everything with cable ties each time I turned the crankshaft further, moving the cable ties to hold everything in place.


New chain fitted, new master link pin and end piece, with a 7lb hammer behind the camshaft sprocket I burred the ends of the pins over using a punch and smaller hammer. Unfortunately despite being careful and going very slowly I did manage to jump a couple of teeth on the camshaft sprocket, this was after one turn of the crankshaft so the timing marks should have been 180 degrees out...


I turned the engine by hand but stopped when I felt pistons meeting valves....off with the camshaft sprocket and out with both camshafts. When I was reassembling everything after the head gasket replacement I checked that the pointer on the crankshaft pulley was correct, it was to within half a degree so once the camshafts were out I turned the engine to TDC on cylinder one (took me a couple of tries and I needed a rubber glove in the injector hole to find which was the compression stroke but I got there) and then reinstalled the camshafts. After turning the engine by hand again through 720 degrees everything lined up perfectly. In hindsight i wish I had measured the length of the new chain before installing it to compare with the old one and to see how much, if at all, it had stretched. The timing marks line up bang on at TDC, after the frustration of jumping the timing I was very pleased to see this!


Next job was the IP. I turned the engine to 14 degrees ATDC, loosened all the bolts (I didn't tighten up the IP sprocket centre bolt fully when I installed the new sprocket) and after 5 minutes the IP was out.


Handily enough, I used the timing device from the old chewed up sprocket on the IP shaft to turn it to install the locking pin. I also fitted new crush washers and rubber seals to the delivery valves. The old seals were very brittle and square looking.


Next up I cleaned the pump up with degreaser and acetone free brake cleaner, not perfect but a lot cleaner and more presentable.


Made a new gasket for the lift pump


I have also been sorting the wiring loom. It was pretty crusty...


After an hour or so with the soldering iron and lots of patience undoing the plug connectors and unbending various crimpy fittings I had all the connector pins free


And then I resoldered the pins for the coolant temperature sensor to the pins with some new wire and reassembled the plug. A bit of loom tape and it looked good as new. I am in the middle of doing the rest of the glowplug wires, should be done tomorrow hopefully.


More pictures to come after the weekend!
 
Last edited:

Users who are viewing this thread

Back
Top Bottom