Navigation
Install the app
How to install the app on iOS
Follow along with the video below to see how to install our site as a web app on your home screen.
Note: This feature may not be available in some browsers.
More options
You are using an out of date browser. It may not display this or other websites correctly.
You should upgrade or use an alternative browser.
You should upgrade or use an alternative browser.
R230 issue
- Thread starter PhantomF4
- Start date
Page may contain affiliate links. Please see terms for details.
NJSS
Active Member
- Joined
- Aug 7, 2008
- Messages
- 825
- Location
- Near Petersfield, Hampshire.
- Car
- 2011 SL 350 Fire Opal Red|||2016 Land Rover Discovery|||1973 MGB GT V8|||1959 MGA Roadster
They can be replaced; I believe that the part numbers are are A 230 792 03 30 and A 230 792 04 30 cost over £130 if you can find any, and I can't.
The alternative is to remove them and have them sprayed or even wrapped, at a much lower cost.
Good luck.
NJSS
The alternative is to remove them and have them sprayed or even wrapped, at a much lower cost.
Open the roof so the side roof C pillars are roughly vertical, there is a small locating pin about 1/2 way down the edge of the plastic cover on the window side, just wedge the cover up slightly, then with a hammer and wood wedge tap down on the plastic cover top edge about 1" and the cover releases from the locating lugs and comes off. Install is reverse of the removal process except you tap from the bottom with the hammer/wedge. A tip is to make sure all lugs have located before you do the final taps otherwise you will get a bump where the lug may not locate correctly, also don't go too far up or the locating pin wont slot in place. I also found closing the roof a little helped with taping the cover back in place.
Good luck.
NJSS
John757
Active Member
- Joined
- Aug 7, 2010
- Messages
- 843
- Location
- South East UK
- Car
- E350CDi Coupe , Gwagen 280GE , SL55 AMG , Audi SQ5 Quattro
I ordered one.. it took 1 year, to arrive from MB .. not fitted it yet.
NJSS
Active Member
- Joined
- Aug 7, 2008
- Messages
- 825
- Location
- Near Petersfield, Hampshire.
- Car
- 2011 SL 350 Fire Opal Red|||2016 Land Rover Discovery|||1973 MGB GT V8|||1959 MGA Roadster
John well done !
Can you confirm that I quoted the correct part numbers, as I have tried to order them without success. I am concerned that it has been suggested that the part numbers I quoted above may be for pre-facelift R230s, so if anyone is shopping around & finds a pair this needs to be checked.
It would also be very helpful to know when you ordered them, from whom & what you paid for the pair.
Thanks in advance.
NJSS
Last edited:
John757
Active Member
- Joined
- Aug 7, 2010
- Messages
- 843
- Location
- South East UK
- Car
- E350CDi Coupe , Gwagen 280GE , SL55 AMG , Audi SQ5 Quattro
My Car is 2003 R230 this part is for UK passenger side, rear window, side trim... the part has been updated and a new mounting plate has to be used as well.
£130 each sounds right, I think the mounting plate was about £50.. waiting on an email for other side part number from my contact at MB.


mounting plate
trim


£130 each sounds right, I think the mounting plate was about £50.. waiting on an email for other side part number from my contact at MB.
mounting plate
trim
OP
OP
PhantomF4
Active Member
Thanks guys. I think I’ll go for the DIY paint solution. Can anyone suggest what the best primer and topcoat paint would be?
If I screw this up I’ll go look for somewhere to get them wrapped instead.
Cheers
If I screw this up I’ll go look for somewhere to get them wrapped instead.
Cheers
Be very careful how you remove them, they get very brittle and break easily.Thanks guys. I think I’ll go for the DIY paint solution. Can anyone suggest what the best primer and topcoat paint would be?
If I screw this up I’ll go look for somewhere to get them wrapped instead.
Cheers
Pete.
OP
OP
PhantomF4
Active Member
So I’ve heard. I thought I’d try to paint them in situ.Be very careful how you remove them, they get very brittle and break easily.
Pete.
John757
Active Member
- Joined
- Aug 7, 2010
- Messages
- 843
- Location
- South East UK
- Car
- E350CDi Coupe , Gwagen 280GE , SL55 AMG , Audi SQ5 Quattro
Got the up to date prices;
Mounting plates;
A2307900304 (*Left side -as you look towards the front of the car from the boot)
A2307900404 (Right)
£63.50 each plus vat
Black Trim:
A2307920330 ( *Left) ( Very Long, back order, wait 6 months+)
A2307920430 (Right)
£62 each plus vat
The trim is of an updated design re- it's attachment, so a new mounting plate may be required.
All rest in stock
OP
OP
PhantomF4
Active Member
My car is a 2007 model, am I right in thinking it will have the updated mounting plates?Got the up to date prices;
Mounting plates;
A2307900304 (*Left side -as you look towards the front of the car from the boot)
A2307900404 (Right)
£63.50 each plus vat
Black Trim:
A2307920330 ( *Left) ( Very Long, back order, wait 6 months+)
A2307920430 (Right)
£62 each plus vat
The trim is of an updated design re- it's attachment, so a new mounting plate may be required.
All rest in stock
John757
Active Member
- Joined
- Aug 7, 2010
- Messages
- 843
- Location
- South East UK
- Car
- E350CDi Coupe , Gwagen 280GE , SL55 AMG , Audi SQ5 Quattro
I think if you look at the wider end of the trim piece, it has a small 'U' shaped protrusion.. this is one obvious point of difference.. you can see the same cut out in the mounting plate.. if you have this U shaped cut out, I don't think you need the Mounting plate.My car is a 2007 model, am I right in thinking it will have the updated mounting plates?
Mercedes have apparently sold thousands of the replacement trims.. so you will have to see if your mount matches the one in the pic I posted here.
John757
Active Member
- Joined
- Aug 7, 2010
- Messages
- 843
- Location
- South East UK
- Car
- E350CDi Coupe , Gwagen 280GE , SL55 AMG , Audi SQ5 Quattro
I plan to swap my trim in the next few days.. and will post pics of my old (cracked) one vs my new one.
OP
OP
PhantomF4
Active Member
Thanks John, much appreciatedI plan to swap my trim in the next few days.. and will post pics of my old (cracked) one vs my new one.

Gbrowncls55
MB Enthusiast
- Joined
- Sep 11, 2016
- Messages
- 1,588
- Location
- Surrey
- Car
- CLS500 4.7TT 2012,, SL350 09, 996 cab, all current. Gone :CLS 55 E500 W211, 2x M5s and too many 911s
Given how many outside SLs suffer from this (mines the same) you would think a) they would have found a better solution by now and b) would always have stock available. My w218 cls had the same issue with the B pillar trims both of which i have now replaced. (parts came in two days)
John757
Active Member
- Joined
- Aug 7, 2010
- Messages
- 843
- Location
- South East UK
- Car
- E350CDi Coupe , Gwagen 280GE , SL55 AMG , Audi SQ5 Quattro
Today I replaced my rear window side trim.
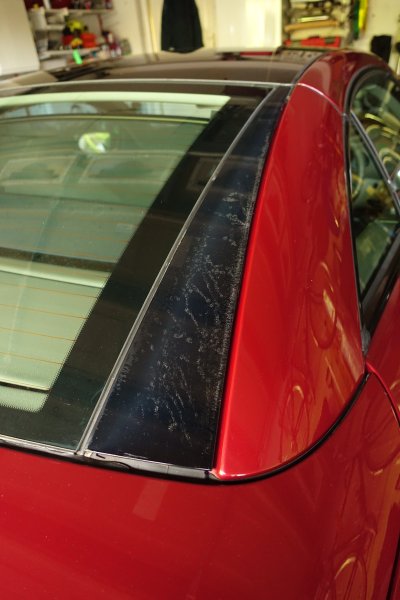
The reason I changed it was because it had an unsightly crack in it, which I missed when I bought it. The trims have not delaminated in any way like they have unfortunately on yours PhantomF4.

To remove the trim... you must have the roof half open, so you don't damage the rear boot seal. I have the special tool that holds the roof open, so I dont need to leave the engine on when replacing this seal.

Insert a plastic trim tool wedge 330mm from the top on the glass side of the trim

This will lift the plastic peg on the trim piece out of its hole, allowing you to tap the top of the trim gently with a block of wood and a hammer.. pushing the trim down and releasing all the catches holding it in place. below is a shot of the peg and its locating hole.


This peg is very important... it stops the trim piece sliding down when its fitted... if you do not lift the trim about 10mm at 330mm from the top of the trim it will not come off.


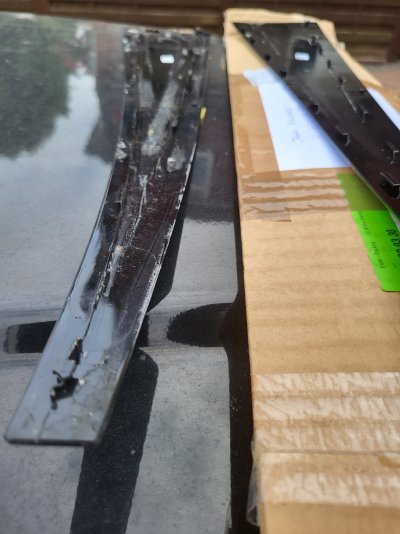
Trim removed.
The sticker on the underneath of the trim shows 19.10.14 which I assume is the date of quality control checks.. my car is a 2003 so it is safe to assume it has already been replaced before. because of delamination and the person who fitted it broke it in the process and glued it together and to the mounting plate where the break was with some kind of impact adhesive.
It did come off in one piece... however as it had been glued to the back plate the force of removing it broke off two of the moulded on retaining clips.. the very top appeared to have been glued too.. and its retaining lobe was missing.
I examined the mounting plate and compared it to my new one.. they are identical except for the slight recessed central bolt holes on the metal bracket.. so these have obviously been previously fitted in replacement of the original 2003 brackets. After a gentle clean I left my mounting plate where it was., no point in changing it.
The new Trim part it 100% black gloss plastic type material... and is obviously the updated part which since my old ones were replaced 12 years ago.. have not delaminated.
The many mounting clips moulded into the trim pieces hold it onto the bracket securely.
to replace align the trim so the top is about an inch from its final position and holding it evenly and pressing in firmly ..slide it up until it locks in place

The top and bottom of the trim has a more pronounced U shaped peg which locates in a similarly shaped slot top and bottom.


New plate sitting on old one for comparison

my old retained mount plate cleaned up

new trim fitted on


When refitting new trim there is no need to use the wedge (330mm down) because the peg rides along the mount plate then drops into its hole when it is in the correct position.
There is a need to use butyl rope to seal the mounting plate to the roof when the plate is removed. I have included the extracts from WIS for this procedure.
If your trims are delaminated... I have to guess they are original and not updated items and will need plates and trims.
I now have a spare n/s mount plate which I might consider selling.
The reason I changed it was because it had an unsightly crack in it, which I missed when I bought it. The trims have not delaminated in any way like they have unfortunately on yours PhantomF4.
To remove the trim... you must have the roof half open, so you don't damage the rear boot seal. I have the special tool that holds the roof open, so I dont need to leave the engine on when replacing this seal.
Insert a plastic trim tool wedge 330mm from the top on the glass side of the trim
This will lift the plastic peg on the trim piece out of its hole, allowing you to tap the top of the trim gently with a block of wood and a hammer.. pushing the trim down and releasing all the catches holding it in place. below is a shot of the peg and its locating hole.
This peg is very important... it stops the trim piece sliding down when its fitted... if you do not lift the trim about 10mm at 330mm from the top of the trim it will not come off.
Trim removed.
The sticker on the underneath of the trim shows 19.10.14 which I assume is the date of quality control checks.. my car is a 2003 so it is safe to assume it has already been replaced before. because of delamination and the person who fitted it broke it in the process and glued it together and to the mounting plate where the break was with some kind of impact adhesive.
It did come off in one piece... however as it had been glued to the back plate the force of removing it broke off two of the moulded on retaining clips.. the very top appeared to have been glued too.. and its retaining lobe was missing.
I examined the mounting plate and compared it to my new one.. they are identical except for the slight recessed central bolt holes on the metal bracket.. so these have obviously been previously fitted in replacement of the original 2003 brackets. After a gentle clean I left my mounting plate where it was., no point in changing it.
The new Trim part it 100% black gloss plastic type material... and is obviously the updated part which since my old ones were replaced 12 years ago.. have not delaminated.
The many mounting clips moulded into the trim pieces hold it onto the bracket securely.
to replace align the trim so the top is about an inch from its final position and holding it evenly and pressing in firmly ..slide it up until it locks in place
The top and bottom of the trim has a more pronounced U shaped peg which locates in a similarly shaped slot top and bottom.
New plate sitting on old one for comparison
my old retained mount plate cleaned up
new trim fitted on
When refitting new trim there is no need to use the wedge (330mm down) because the peg rides along the mount plate then drops into its hole when it is in the correct position.
There is a need to use butyl rope to seal the mounting plate to the roof when the plate is removed. I have included the extracts from WIS for this procedure.
If your trims are delaminated... I have to guess they are original and not updated items and will need plates and trims.
I now have a spare n/s mount plate which I might consider selling.
Attachments
OP
OP
PhantomF4
Active Member
Thanks for the extremely detailed description and excellent photos John. I’ve a much clearer idea how this all works now.Today I replaced my rear window side trim.
The reason I changed it was because it had an unsightly crack in it, which I missed when I bought it. The trims have not delaminated in any way like they have unfortunately on yours PhantomF4.
View attachment 130400
To remove the trim... you must have the roof half open, so you don't damage the rear boot seal. I have the special tool that holds the roof open, so I dont need to leave the engine on when replacing this seal.
View attachment 130401
Insert a plastic trim tool wedge 330mm from the top on the glass side of the trim
View attachment 130402
This will lift the plastic peg on the trim piece out of its hole, allowing you to tap the top of the trim gently with a block of wood and a hammer.. pushing the trim down and releasing all the catches holding it in place. below is a shot of the peg and its locating hole.
View attachment 130404View attachment 130406
This peg is very important... it stops the trim piece sliding down when its fitted... if you do not lift the trim about 10mm at 330mm from the top of the trim it will not come off.
View attachment 130407
View attachment 130403
Trim removed.
The sticker on the underneath of the trim shows 19.10.14 which I assume is the date of quality control checks.. my car is a 2003 so it is safe to assume it has already been replaced before. because of delamination and the person who fitted it broke it in the process and glued it together and to the mounting plate where the break was with some kind of impact adhesive.
It did come off in one piece... however as it had been glued to the back plate the force of removing it broke off two of the moulded on retaining clips.. the very top appeared to have been glued too.. and its retaining lobe was missing.
I examined the mounting plate and compared it to my new one.. they are identical except for the slight recessed central bolt holes on the metal bracket.. so these have obviously been previously fitted in replacement of the original 2003 brackets. After a gentle clean I left my mounting plate where it was., no point in changing it.
The new Trim part it 100% black gloss plastic type material... and is obviously the updated part which since my old ones were replaced 12 years ago.. have not delaminated.
The many mounting clips moulded into the trim pieces hold it onto the bracket securely.
to replace align the trim so the top is about an inch from its final position and holding it evenly and pressing in firmly ..slide it up until it locks in place
View attachment 130408
The top and bottom of the trim has a more pronounced U shaped peg which locates in a similarly shaped slot top and bottom.
View attachment 130409View attachment 130411
New plate sitting on old one for comparison
View attachment 130412
my old retained mount plate cleaned up
View attachment 130413
new trim fitted on
View attachment 130414View attachment 130415
When refitting new trim there is no need to use the wedge (330mm down) because the peg rides along the mount plate then drops into its hole when it is in the correct position.
There is a need to use butyl rope to seal the mounting plate to the roof when the plate is removed. I have included the extracts from WIS for this procedure.
If your trims are delaminated... I have to guess they are original and not updated items and will need plates and trims.
I now have a spare n/s mount plate which I might consider selling.
Cheers
John757
Active Member
- Joined
- Aug 7, 2010
- Messages
- 843
- Location
- South East UK
- Car
- E350CDi Coupe , Gwagen 280GE , SL55 AMG , Audi SQ5 Quattro
No problem.. I have learned from others how to do, boot seal, PSE pump etc.. If I can help another person.. the circle of comradeship continues...")
Cheshire350
New Member
Hi John, I'm looking for a bit of guidance on this topic but first let me say what an excellent write-up. Today I was opening the roof on my SL350, which had been opened the previous day - several times, when mid operation there was a loud cracking sound and the bottom section of the n/s trim landed on my drive. Not sure as to what caused it to snap, could have been the very high heat as the pillar cover was directly facing the sun. However my questions relate to a) the part number as looking at a parts diagram on LLLParts website the n/s would be described as the right with part ref ending 0403, yet in your earlier comments your description indicates that the N/S would be the left. My second question relates to the bracket. As the Perspex snapped it distorted the the bottom right of the bracket. In whishing to bend it back in to shape would you say that either side of the small cutaway are flush. Hoping you can helpToday I replaced my rear window side trim.
The reason I changed it was because it had an unsightly crack in it, which I missed when I bought it. The trims have not delaminated in any way like they have unfortunately on yours PhantomF4.
View attachment 130400
To remove the trim... you must have the roof half open, so you don't damage the rear boot seal. I have the special tool that holds the roof open, so I dont need to leave the engine on when replacing this seal.
View attachment 130401
Insert a plastic trim tool wedge 330mm from the top on the glass side of the trim
View attachment 130402
This will lift the plastic peg on the trim piece out of its hole, allowing you to tap the top of the trim gently with a block of wood and a hammer.. pushing the trim down and releasing all the catches holding it in place. below is a shot of the peg and its locating hole.
View attachment 130404View attachment 130406
This peg is very important... it stops the trim piece sliding down when its fitted... if you do not lift the trim about 10mm at 330mm from the top of the trim it will not come off.
View attachment 130407
View attachment 130403
Trim removed.
The sticker on the underneath of the trim shows 19.10.14 which I assume is the date of quality control checks.. my car is a 2003 so it is safe to assume it has already been replaced before. because of delamination and the person who fitted it broke it in the process and glued it together and to the mounting plate where the break was with some kind of impact adhesive.
It did come off in one piece... however as it had been glued to the back plate the force of removing it broke off two of the moulded on retaining clips.. the very top appeared to have been glued too.. and its retaining lobe was missing.
I examined the mounting plate and compared it to my new one.. they are identical except for the slight recessed central bolt holes on the metal bracket.. so these have obviously been previously fitted in replacement of the original 2003 brackets. After a gentle clean I left my mounting plate where it was., no point in changing it.
The new Trim part it 100% black gloss plastic type material... and is obviously the updated part which since my old ones were replaced 12 years ago.. have not delaminated.
The many mounting clips moulded into the trim pieces hold it onto the bracket securely.
to replace align the trim so the top is about an inch from its final position and holding it evenly and pressing in firmly ..slide it up until it locks in place
View attachment 130408
The top and bottom of the trim has a more pronounced U shaped peg which locates in a similarly shaped slot top and bottom.
View attachment 130409View attachment 130411
New plate sitting on old one for comparison
View attachment 130412
my old retained mount plate cleaned up
View attachment 130413
new trim fitted on
View attachment 130414View attachment 130415
When refitting new trim there is no need to use the wedge (330mm down) because the peg rides along the mount plate then drops into its hole when it is in the correct position.
There is a need to use butyl rope to seal the mounting plate to the roof when the plate is removed. I have included the extracts from WIS for this procedure.
If your trims are delaminated... I have to guess they are original and not updated items and will need plates and trims.
I now have a spare n/s mount plate which I might consider selling.
In that case, would you be interested in selling it??I ordered one.. it took 1 year, to arrive from MB .. not fitted it yet.
John757
Active Member
- Joined
- Aug 7, 2010
- Messages
- 843
- Location
- South East UK
- Car
- E350CDi Coupe , Gwagen 280GE , SL55 AMG , Audi SQ5 Quattro
HIHi John, I'm looking for a bit of guidance on this topic but first let me say what an excellent write-up. Today I was opening the roof on my SL350, which had been opened the previous day - several times, when mid operation there was a loud cracking sound and the bottom section of the n/s trim landed on my drive. Not sure as to what caused it to snap, could have been the very high heat as the pillar cover was directly facing the sun. However my questions relate to a) the part number as looking at a parts diagram on LLLParts website the n/s would be described as the right with part ref ending 0403, yet in your earlier comments your description indicates that the N/S would be the left. My second question relates to the bracket. As the Perspex snapped it distorted the the bottom right of the bracket. In whishing to bend it back in to shape would you say that either side of the small cutaway are flush. Hoping you can help
The part numbers were obtained from my friend who works at Mercedes-Benz , but check before ordering. Yes the metal plate sits flush both sides of the cut out. The plastic trim part bottom, sits just above the boot seal so, should never touch anything when opening the boot. Perhaps the middle small retaining peg 330mm down broke off allowing the cover trim to slip down into the danger zone.?
I have a new spare mount plate if you cant fix it or cannot get a replacement one for the passenger side.
Hope that helps.
John
Users who are viewing this thread
Total: 2 (members: 0, guests: 2)
Similar threads
Share: