Navigation
Install the app
How to install the app on iOS
Follow along with the video below to see how to install our site as a web app on your home screen.
Note: This feature may not be available in some browsers.
More options
You are using an out of date browser. It may not display this or other websites correctly.
You should upgrade or use an alternative browser.
You should upgrade or use an alternative browser.
SOS HELP: How can i remove W203 headlamps??
Page may contain affiliate links. Please see terms for details.
tudu
MB Enthusiast
SOS Needed!
I just unscrewed two bolts each side of my W203 headlights. I could feel the movement, but i couldn't remove the headlights out. Both cables have been dismantled.
Pls advise whether i have missed out any other bolts or nuts?
[/quote]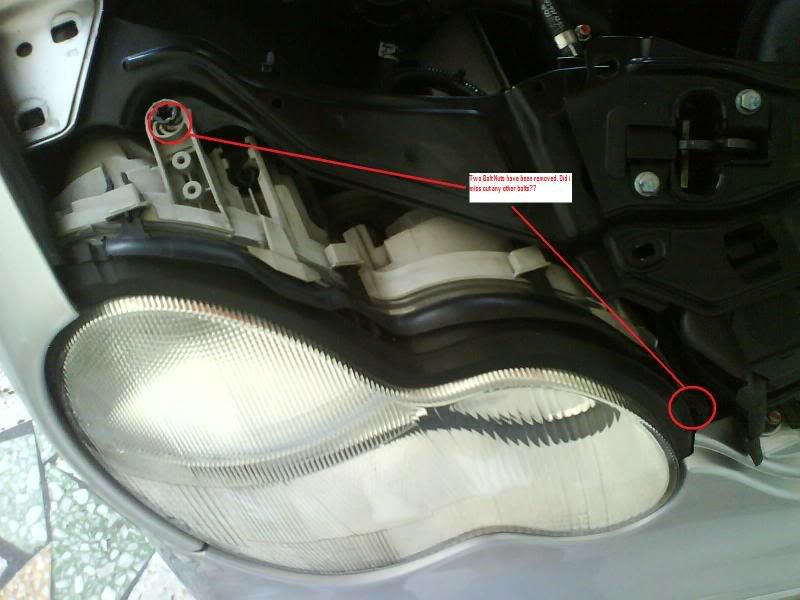
There is another bolt that sits at the bottom off each headlight. You either have to remove the front bumper, or remove inner plastic wheel arch and remove the bolt that holds headlight through there 8mm i think it is.
There is thread for it on the forum do a search.
miro
MB Enthusiast
There is another bolt that sits at the bottom off each headlight. You either have to remove the front bumper, or remove inner plastic wheel arch and remove the bolt that holds headlight through there 8mm i think it is.
There is thread for it on the forum do a search.
Really the bumper needs to come off. This is to record the alignment position of the 3rd bolt which is actually horizontal and east-west. Just happens to also hold the bumper support.
Without that alignment the lights just have the wrong orientation and panel gap. If you take that screw off with a spanner in the wheel arch then you have no chance of matching things up.
I did several upgrades and I saw a massive improvement in appearance with the gaps kept as they were originally. I can always tell the DIY !
CiaranMcKeown
Active Member
I posted a how to about removing these headlights, the bumper does not have to come off but when you do take it off you can see how easy it is.
I have posted how to's on both removing the headlights without taking the bumper off and also removing the bumper.
If you need any assistance i will be happy to guide you further, good luck!
I have posted how to's on both removing the headlights without taking the bumper off and also removing the bumper.
If you need any assistance i will be happy to guide you further, good luck!
tudu
MB Enthusiast
Really the bumper needs to come off. This is to record the alignment position of the 3rd bolt which is actually horizontal and east-west. Just happens to also hold the bumper support.
Without that alignment the lights just have the wrong orientation and panel gap. If you take that screw off with a spanner in the wheel arch then you have no chance of matching things up.
I did several upgrades and I saw a massive improvement in appearance with the gaps kept as they were originally. I can always tell the DIY !
As you say it is much easier to remove the front bumper however, i did mine through the wheel arches with full lock on and there was no problems with alignment or any panel gaps. Its just a much trickier job to do due to the limited room to remove and re-install the bolt, but both ways fulfill the same purpose in removing and fitting headlights.
tudu
MB Enthusiast
I posted a how to about removing these headlights, the bumper does not have to come off but when you do take it off you can see how easy it is.
I have posted how to's on both removing the headlights without taking the bumper off and also removing the bumper.
If you need any assistance i will be happy to guide you further, good luck!
Thanks Ciaran i knew there was a thread somewhere, and yes i did mine through the wheel arches as well.
H13BS M
Banned
Im glad this was here as im just bout to do mine!!
CiaranMcKeown
Active Member
If you are taking them off to upgrade them to the facelift type they are a very dramatic change, they are far better looking. Very sleek.
While you are doing them (if you are upgrading) do the foglights aswell to complete the fresh look at the front, its really ads to the difference.
While you are doing them (if you are upgrading) do the foglights aswell to complete the fresh look at the front, its really ads to the difference.
R...If you take that screw off with a spanner in the wheel arch then you have no chance of matching things up...
I'm getting bit confused with this, screws, bolts, gaps and alignment. Is this DIY or not? Also fwwong & H13BS M please post some pics when done. I'm hoping to do mine soon and will post but now unsure about the method now?
- Joined
- May 7, 2007
- Messages
- 19,911
- Car
- Lexus RX450h F-Sport with Takumi Pack 2020
The gap should be 5mm
Last edited:
Thanks 'whitenemesis' I've never seen those pics before - quite interesting, sorry but I'm still a bit confused where this critical gap is. The adjustment screw as they call it is (5) (side bolt to light unit) and so I take it the gap is (A)? Thanks for any help
- Joined
- May 7, 2007
- Messages
- 19,911
- Car
- Lexus RX450h F-Sport with Takumi Pack 2020
Yup, gap at A should be 5mm. This ensures units are centrally located.
miro
MB Enthusiast
I'm getting bit confused with this, screws, bolts, gaps and alignment. Is this DIY or not? Also fwwong & H13BS M please post some pics when done. I'm hoping to do mine soon and will post but now unsure about the method now?
The whole car is DIY. Just a question of finish.
If you look at the screw coming out you will see what a large amount of movement that assembly has when released. The light can tilt quite a bit actually and you need to score the frame lightly for that reason. Then on the new lights you need to keep a record of the offset depth.
If you did the job like a repair shop you would do it perfectly.
http://www.mbclub.co.uk/forums/showthread.php?t=23546&highlight=w203+coupe+xenon
I should point out that 1/10 is WAY outside the tolerances. When looking to aim the lamps afterwards you need to be within specification or you will run out of adjustment and the adjustment screw will wind out of the internal height adjustment - then the lamp will flop around loosely inside the housing.
DIY can be expertly done. Just need to be very fussy about position. With the bumper over the screw you simply cant see it so then your vertical and yaw adjustment can be a long way out. Not to mention that the bumper is weighing on the assembly (as the screw passes through the bumper support) so the light is bound to sit too low.
Hi Bro,
Managed to have it swapped over the weekend. It was a long journey.
In fact, you do not need to remove the front screw and bumper clips. But, it is a little narrow to do so. Be expected to get some scratches on your hands if you don't wear gloves to do so. :bannana:
It took me almost 12 hours to complete it, which include changing the front projector fog lights and HID Xenon kit conversion + light tuning.
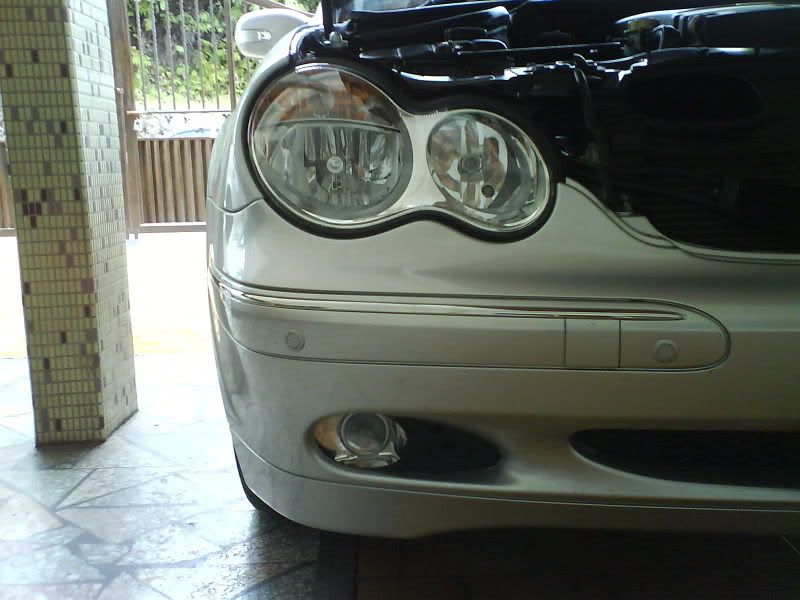
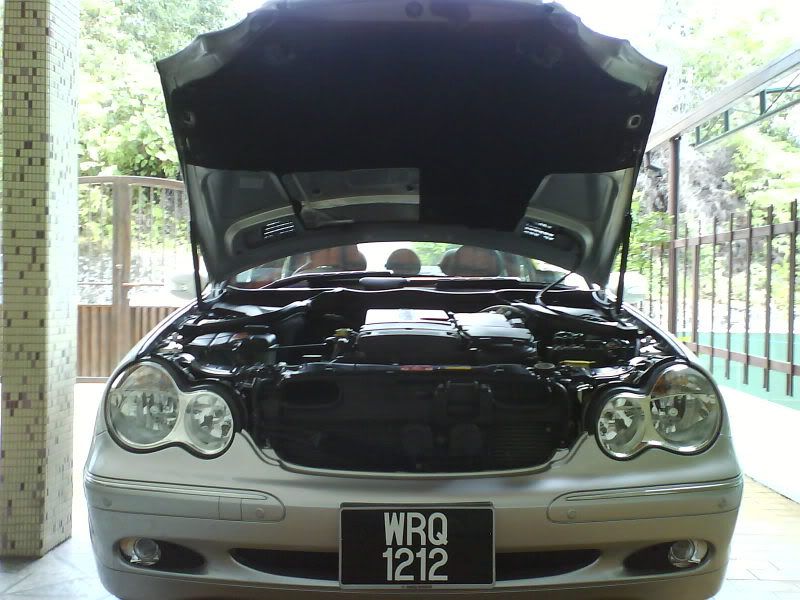
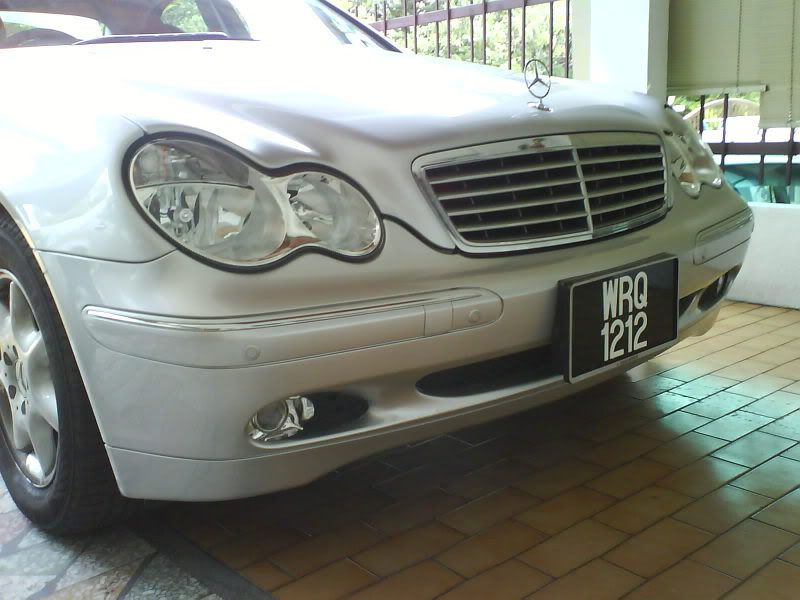
So, here are the photos:
TADAA!!!!!!!!!!!!!
BEFORE SURGERY:


AFTER SURGERY:

Managed to have it swapped over the weekend. It was a long journey.
In fact, you do not need to remove the front screw and bumper clips. But, it is a little narrow to do so. Be expected to get some scratches on your hands if you don't wear gloves to do so. :bannana:
It took me almost 12 hours to complete it, which include changing the front projector fog lights and HID Xenon kit conversion + light tuning.
So, here are the photos:
TADAA!!!!!!!!!!!!!
BEFORE SURGERY:
AFTER SURGERY:
Oh yes, for those who are interested to DIY this, here is the complete instructions with photos attached to it. I used this web link so much to guide me with the complete process.
Of course, there are certain part that you need to justify and resolve it yourself. I am confident it would guide you through.
Hope it helps!
This was given to me by one of my friends in WWW.MBWORLD.ORG
http://www.mbworld.org/forums/showthread.php?t=175716
Of course, there are certain part that you need to justify and resolve it yourself. I am confident it would guide you through.
Hope it helps!
This was given to me by one of my friends in WWW.MBWORLD.ORG
http://www.mbworld.org/forums/showthread.php?t=175716
miro
MB Enthusiast
Oh yes, for those who are interested to DIY this, here is the complete instructions with photos attached to it. I used this web link so much to guide me with the complete process.
Of course, there are certain part that you need to justify and resolve it yourself. I am confident it would guide you through.
Hope it helps!
This was given to me by one of my friends in WWW.MBWORLD.ORG
http://www.mbworld.org/forums/showthread.php?t=175716
Yeah I have never seen it done with the wheels off. For my money it's actually far quicker to take the bumper off than take the wheels off.
I think that is really so much harder than the way it is done in the manual.
Not to mention that the markings on the body were forgotten.
Bro,
But, removing the wheel off would allow more rooms for your hand to removethe front bumper off the hook a bit.
Well, i did it all by myself alone at home. So, removing whole bumper off would require two persons to do so...
Anyway, different people have different preference. :bannana:
But, removing the wheel off would allow more rooms for your hand to removethe front bumper off the hook a bit.
Well, i did it all by myself alone at home. So, removing whole bumper off would require two persons to do so...
Anyway, different people have different preference. :bannana:
miro
MB Enthusiast
Bro,
But, removing the wheel off would allow more rooms for your hand to removethe front bumper off the hook a bit.
Well, i did it all by myself alone at home. So, removing whole bumper off would require two persons to do so...
Anyway, different people have different preference. :bannana:
You work for Microsoft don't you ?
http://www.youtube.com/watch?v=aeXAcwriid0
Users who are viewing this thread
Total: 2 (members: 0, guests: 2)
Similar threads
- Replies
- 0
- Views
- 448
- Replies
- 8
- Views
- 3K
- Replies
- 9
- Views
- 9K
Share: