mr vandango
Member
- Joined
- Aug 26, 2014
- Messages
- 59
- Car
- CLK 320 W208
Hi guys, I thought I'd try to update my interior trim a little, as I'm not keen on the wood effect, so I gave wrapping a bit of a go. Right near the end I figured I could turn it into a bit of a how to, so I took a handful of pictures to show some of the steps involved and the finished result.
Firstly you need to order the wrap of your choice. I went for matt black, and ordered a 300mmx1500mm roll for about a fiver. It has a special backing that allows air bubbles to be released. I got mine from ebay, and here is a typical example of what ma be available:
4D Carbon Fibre Vinyl Wrap (Air/Bubble Free) 4 Colours Multi sizes | eBay
I started with the cup holder lid, as I couldn't figure out how to remove it, and I knew I could do it in place. You will need:
A sharp craft knife (I used a 'Stanley' knife) with the snap off blades is ideal, and a decent pair of scissors
A heat gun (or your wife/husband's hairdryer)
All pieces spotlessly clean and dust free
Patience!
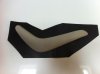
I measured the lid itself, then marked this on the back of the vinyl. This is then cut out (allow at least a 10mm overlap) and you're ready to go. I used the knife to gently prise the backing away (handy if you don't have long nails).
I then positioned the sheet over the lid and lay it over it from front to back and smoothed out any bubbles with the edge of my fingers.
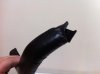
Once the sheet was in place I pushed it down the sides (much easier if the piece is off the car!) and again smoothed it down with my fingers. It is the smoothing and pressing which activates the adhesive.
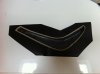
Now it's time to apply a little heat. Doing one corner at a time, I gently heated the sheet up until it looked pliable and soft. I'd say 3/4 secs with a heat gun on low, maybe double that with the hairdryer (I tried both). Once it looked right, then I gently pulled the vinyl around and over the corner with a slight stretch and held it there for a little while. When released, it should stay in place and be wrinkle free. I did the same on the remaining corners and it was done.
I trimmed the excess off as I went to stop it getting in the way as I progressed, but only once I cleared a corner or 'stretch' section, as you need some material to get hold of to manipulate. Gently score along the line you wish to trim and peel away. It cuts very easily, so you don't need to apply much pressure. I trimmed along the back edge where the wood effect stops and becomes the black plastic.
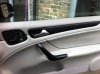
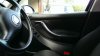
Repeat for all other pieces and you're done!
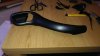
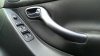
I googled how to remove the other trim. I did all the wood effect, and the door grab handles as one of mine was tatty.
The seat switch unit prises off, and you then have to release the tabs holding the cover back.
The trim on the door cards requires the door card to be removed. Each trim is held in place my four metal clips. Prise these off with a small screwdriver and pull away.
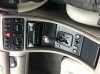
The gear selector trim requires you to remove the gear knob. The lower part twist anti-clockwise (I think!) and falls away. You then just pull hard on the know and it comes straight off. Open up the ash tray lid and pull the selector trim in the two corners. It may need quite a tug.
The trim around the heater dials and switches should be levered gently away with a flat bladed screwdriver.
Pictures are poor, but they give a rough idea!
Firstly you need to order the wrap of your choice. I went for matt black, and ordered a 300mmx1500mm roll for about a fiver. It has a special backing that allows air bubbles to be released. I got mine from ebay, and here is a typical example of what ma be available:
4D Carbon Fibre Vinyl Wrap (Air/Bubble Free) 4 Colours Multi sizes | eBay
I started with the cup holder lid, as I couldn't figure out how to remove it, and I knew I could do it in place. You will need:
A sharp craft knife (I used a 'Stanley' knife) with the snap off blades is ideal, and a decent pair of scissors
A heat gun (or your wife/husband's hairdryer)
All pieces spotlessly clean and dust free
Patience!
I measured the lid itself, then marked this on the back of the vinyl. This is then cut out (allow at least a 10mm overlap) and you're ready to go. I used the knife to gently prise the backing away (handy if you don't have long nails).
I then positioned the sheet over the lid and lay it over it from front to back and smoothed out any bubbles with the edge of my fingers.
Once the sheet was in place I pushed it down the sides (much easier if the piece is off the car!) and again smoothed it down with my fingers. It is the smoothing and pressing which activates the adhesive.
Now it's time to apply a little heat. Doing one corner at a time, I gently heated the sheet up until it looked pliable and soft. I'd say 3/4 secs with a heat gun on low, maybe double that with the hairdryer (I tried both). Once it looked right, then I gently pulled the vinyl around and over the corner with a slight stretch and held it there for a little while. When released, it should stay in place and be wrinkle free. I did the same on the remaining corners and it was done.
I trimmed the excess off as I went to stop it getting in the way as I progressed, but only once I cleared a corner or 'stretch' section, as you need some material to get hold of to manipulate. Gently score along the line you wish to trim and peel away. It cuts very easily, so you don't need to apply much pressure. I trimmed along the back edge where the wood effect stops and becomes the black plastic.
Repeat for all other pieces and you're done!
I googled how to remove the other trim. I did all the wood effect, and the door grab handles as one of mine was tatty.
The seat switch unit prises off, and you then have to release the tabs holding the cover back.
The trim on the door cards requires the door card to be removed. Each trim is held in place my four metal clips. Prise these off with a small screwdriver and pull away.
The gear selector trim requires you to remove the gear knob. The lower part twist anti-clockwise (I think!) and falls away. You then just pull hard on the know and it comes straight off. Open up the ash tray lid and pull the selector trim in the two corners. It may need quite a tug.
The trim around the heater dials and switches should be levered gently away with a flat bladed screwdriver.
Pictures are poor, but they give a rough idea!

")
