Celicasaur
Active Member
- Joined
- Dec 17, 2011
- Messages
- 199
- Car
- W212 E63 AMG PP
Today I figured I'd be bold and fit my new engine mounts to the car. It started off quite straightforward with the driver-side, but damn that passenger-side mount was a really difficult one for me to do. I wonder how other people have fared in the past with doing this task...?
I made a bit of a how-to of the steps which I took. Here's how it went down.
First up, remove the upper airbox and arm, then 6 x 10mm bolts need to be removed so that the manifold heat shield can come off:
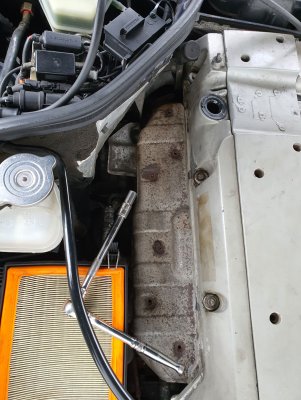
With the heat shield out of the way, you can kinda just make out the top bolt of the mount:
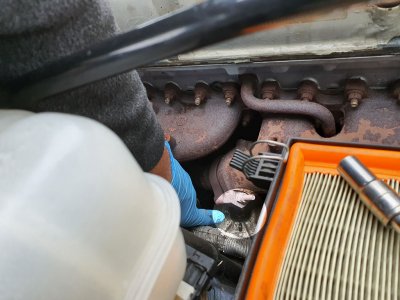
I'm of course using the useful special 17mm weird ratchet tool thing which is meant to make this entire task a doddle.....which is partly true....but only for this side:
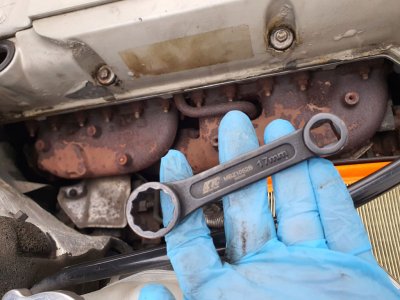
The tool is pretty cool. The 17mm head fits onto the bolt which has really bad access to itself, then you can fit a 3/8 drive onto the other side and unwind it like you normally would...
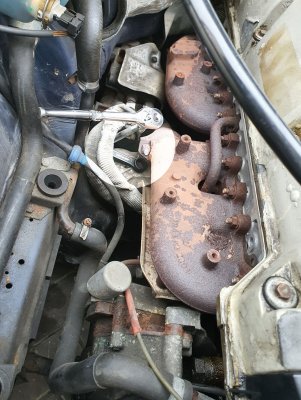
...except I'm quite small and not very strong, so I had to use an extension bar onto my ratchet for added VTEC to break the bolt loose:
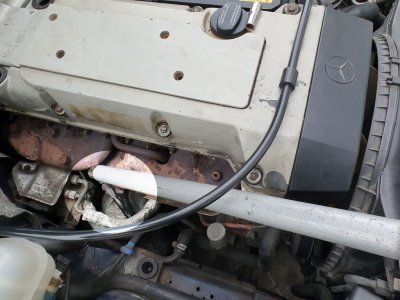
With the bolt loosened (not removed) I turned my attention to the lower 17mm bolt:
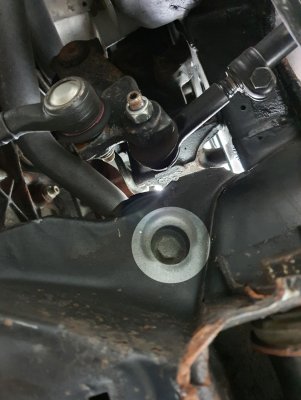
I needed to support the engine via a jack and wooden block before removing the lower bolt though of course:
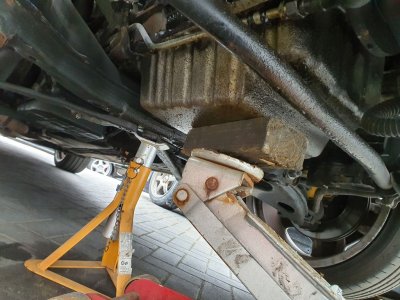
With the lower bolt removed, I went back to the top bolt and used a 10mm wrench to take off a little retaining bolt holding the heat shield to the block. Once that was out of the way, I removed the upper 17mm bolt and the heat shield came off:
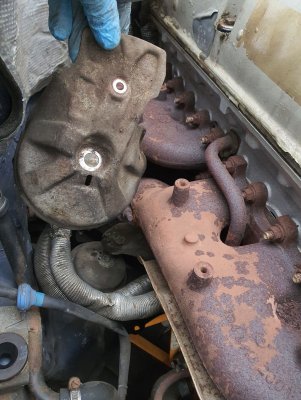
And subsequently, the mount came off too:
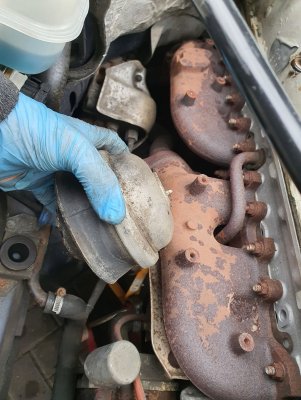
Side by side with the new mount, the age of the old one can be clear to see. My car is on 180k now...I wonder if these are the original mounts which I've replaced, or if these are the second ones...I fitted the new mount as reversal of removal.
The other side (the passenger side) was horrid. My fancy 17mm tool was of no use to me because no matter which angle I tried to fit it, I was never able to get the 3/8 drive and ratchet onto it in such a way that enabled me to unwind the top bolt. This meant that I had to take off the mount arm assembly which was a lot harder because the two rear bolts by the firewall have such minimal access that made it almost impossible to get a large bar in there to help break the bolts loose. At least the first two bolts at the front of the mount are easy to get to and come loose without any fuss due to good access:
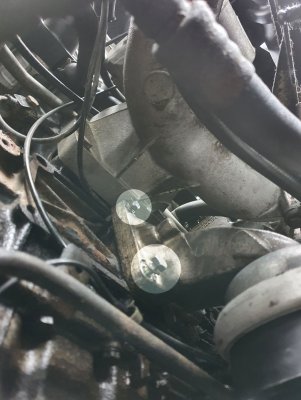
Now, for this upper rear bolt, it took me forever to work out that a swan-neck wrench was the way to go. A lot of swearing and cursing occurred before this eureka moment. I've combined two pics here to help illustrate how to route the wrench once you're under the car. It wont make a lot of sense if you'll never tackle this, but if you're reading this now while looking for help in the future, it will make a lot of sense to you and you'll thank me for it:

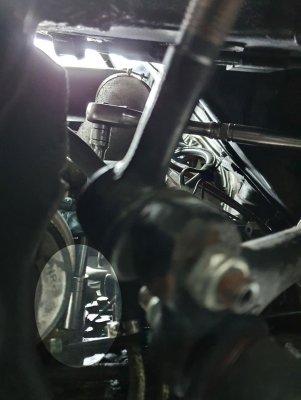
Lastly, the lower bolt (the worst one) forced my hand to using a ratchet like this...again...wont make much sense unless you're under the car evaluating how your life's choices took you to this point:
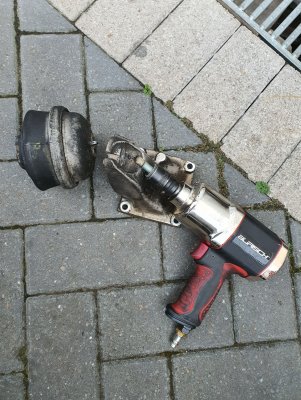
Once the assembly was off, I struggled hard to use a breaker bar to break the bolt loose because of course nothing strong enough (apart from my foot!) was able to hold the assembly down, so all that happened was I kept rotating the assembly on the floor. Lucky for me, I'm awesome and have an air compressor, so I grabbed my impact gun and it broke the bolt loose without so much as breaking a sweat:
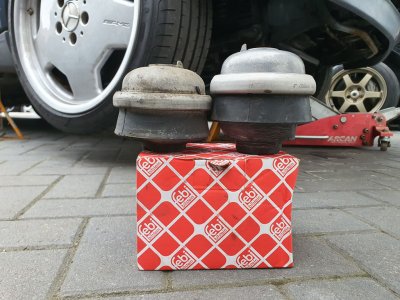
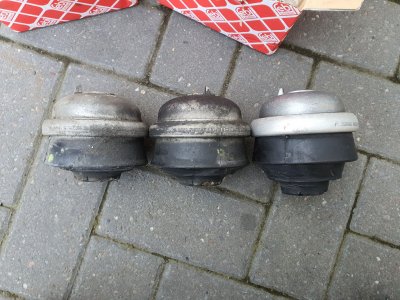
Comparison of both sides vs a new mount. The passenger side is ever so slightly less worn than the driver side, but both still quite worn on the whole:
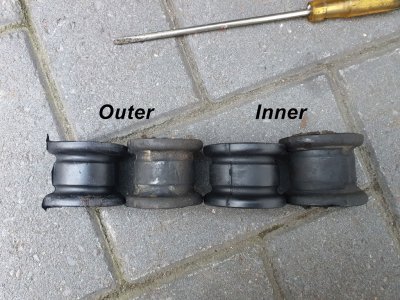
As a bonus, I also replaced the front sway bar bushes. You can see how much the old bushes had stretched and lost their tension on the brackets vs the new ones:
Final verdict:
wow, what a nice difference! The first turn of the ignition key felt so strange...it just felt so much sharper and smoother once fired up and dare I say it, quieter! Everything was so muted. I put it in reverse and oh wow, the engagement of the transmission felt smoother and there was a lot less lurch than I'd ever experienced in this car. I took it for a drive...gosh so weird, it felt so much tighter and yet more comfortable on the front end. Vibrations in the cabin are virtually all gone and it just feels like a much more pleasant place to be. I'm really pleased with the outcome and it was well worth the effort and expense. For what it's worth, I replaced my transmission mount a couple of months ago, but it didn't make anything like the difference that I felt with the engine mounts today. The mounts I have in the car now are Febi Bilstein units with fluid inside them (you can hear it if you shake them too), which I bought from Autodoc.
This week I'll be having the rear inner sway bar bushes replaced, steering box rebuilt and maybe I'll replace the gearbox too. If I can gain a similar level of improvement in terms of drivability, I might actually start to like this car!
Hope you found this post insightful and maybe it'll help somebody in the future.
I made a bit of a how-to of the steps which I took. Here's how it went down.
First up, remove the upper airbox and arm, then 6 x 10mm bolts need to be removed so that the manifold heat shield can come off:

With the heat shield out of the way, you can kinda just make out the top bolt of the mount:

I'm of course using the useful special 17mm weird ratchet tool thing which is meant to make this entire task a doddle.....which is partly true....but only for this side:

The tool is pretty cool. The 17mm head fits onto the bolt which has really bad access to itself, then you can fit a 3/8 drive onto the other side and unwind it like you normally would...

...except I'm quite small and not very strong, so I had to use an extension bar onto my ratchet for added VTEC to break the bolt loose:

With the bolt loosened (not removed) I turned my attention to the lower 17mm bolt:

I needed to support the engine via a jack and wooden block before removing the lower bolt though of course:

With the lower bolt removed, I went back to the top bolt and used a 10mm wrench to take off a little retaining bolt holding the heat shield to the block. Once that was out of the way, I removed the upper 17mm bolt and the heat shield came off:

And subsequently, the mount came off too:

Side by side with the new mount, the age of the old one can be clear to see. My car is on 180k now...I wonder if these are the original mounts which I've replaced, or if these are the second ones...I fitted the new mount as reversal of removal.

The other side (the passenger side) was horrid. My fancy 17mm tool was of no use to me because no matter which angle I tried to fit it, I was never able to get the 3/8 drive and ratchet onto it in such a way that enabled me to unwind the top bolt. This meant that I had to take off the mount arm assembly which was a lot harder because the two rear bolts by the firewall have such minimal access that made it almost impossible to get a large bar in there to help break the bolts loose. At least the first two bolts at the front of the mount are easy to get to and come loose without any fuss due to good access:

Now, for this upper rear bolt, it took me forever to work out that a swan-neck wrench was the way to go. A lot of swearing and cursing occurred before this eureka moment. I've combined two pics here to help illustrate how to route the wrench once you're under the car. It wont make a lot of sense if you'll never tackle this, but if you're reading this now while looking for help in the future, it will make a lot of sense to you and you'll thank me for it:

Lastly, the lower bolt (the worst one) forced my hand to using a ratchet like this...again...wont make much sense unless you're under the car evaluating how your life's choices took you to this point:

Once the assembly was off, I struggled hard to use a breaker bar to break the bolt loose because of course nothing strong enough (apart from my foot!) was able to hold the assembly down, so all that happened was I kept rotating the assembly on the floor. Lucky for me, I'm awesome and have an air compressor, so I grabbed my impact gun and it broke the bolt loose without so much as breaking a sweat:

Comparison of both sides vs a new mount. The passenger side is ever so slightly less worn than the driver side, but both still quite worn on the whole:

As a bonus, I also replaced the front sway bar bushes. You can see how much the old bushes had stretched and lost their tension on the brackets vs the new ones:

Final verdict:
wow, what a nice difference! The first turn of the ignition key felt so strange...it just felt so much sharper and smoother once fired up and dare I say it, quieter! Everything was so muted. I put it in reverse and oh wow, the engagement of the transmission felt smoother and there was a lot less lurch than I'd ever experienced in this car. I took it for a drive...gosh so weird, it felt so much tighter and yet more comfortable on the front end. Vibrations in the cabin are virtually all gone and it just feels like a much more pleasant place to be. I'm really pleased with the outcome and it was well worth the effort and expense. For what it's worth, I replaced my transmission mount a couple of months ago, but it didn't make anything like the difference that I felt with the engine mounts today. The mounts I have in the car now are Febi Bilstein units with fluid inside them (you can hear it if you shake them too), which I bought from Autodoc.
This week I'll be having the rear inner sway bar bushes replaced, steering box rebuilt and maybe I'll replace the gearbox too. If I can gain a similar level of improvement in terms of drivability, I might actually start to like this car!
Hope you found this post insightful and maybe it'll help somebody in the future.

