W124 Estate Suspension Repair

Page may contain affiliate links. Please see terms for details.

grahamf900

New Member
Joined
May 7, 2017
Messages
3
Car
Mercedes W124 320E
Hi guys

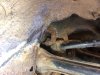
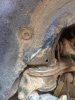
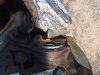
I need a bit of help as to what best to do. I bought what I thought was a nice W124 Estate just over a week ago and it turns out to have severely corroded rear subframe mounts. I feel pig sick over it to be honest as I think I allowed myself to be ripped off and I didn't check things properly ahead of buying it.

Have spoke to a number of specialists including Andy Gale, Nick Froome and Gerry Doverman and I'm being advised that I shouldn't drive it. In a moment of desperation I've put it back on ebay with an honest description because I don't want to rip anybody off or mislead anyone. Having done this, I still have the nagging doubt that someone, somewhere might be able to fix this without it costing me an arm and a leg (an arm and a leg being £1,000 or more in my world).

There's also a problem with the self levelling suspension in that fluid spurts out somewhere underneath when I top up the reservoir and the pipes are badly corroded. I'm having a bad time here. I've loved driving it for the short time I've had it, but i don't have the time or resources to fix it myself.

The only thing I can think of is whether there is anyone around near to me (in Coventry) who has repaired the same on their own car and would be willing to do the same on mine (obviously at a price). Taking it to an independent specialist feels like its going to cost too much money and probably more than the car is worth.

I've attached a couple of photos and you can find it here on ebay where I've given a full description of the car: http://www.ebay.co.uk/itm/132186667854?ssPageName=STRK:MESELX:IT&_trksid=p3984.m1555.l2649

Any suggestions welcome.
 

Attachments

  • Nearside rear front subframe mount_2.jpg
    Nearside rear front subframe mount_2.jpg
    223 KB · Views: 40
  • Nearside rear front suspension mount_1.jpg
    Nearside rear front suspension mount_1.jpg
    231.3 KB · Views: 38
  • Offside rear front subframe mount_1.jpg
    Offside rear front subframe mount_1.jpg
    223.3 KB · Views: 40
Last edited:
Hi and welcome to the forum
Selling you gonna take a huge loss so just keep it and fix it
The problems you mention ^ are both common so sooner or later you would have had to deal with
 
Reason why you shouldn't drive it is due to power steering pump
The corroded pipes can just be made
The welding is the bigger issue as to do properly you have to drop the subframe
 
Reason why you shouldn't drive it is due to power steering pump
The corroded pipes can just be made
The welding is the bigger issue as to do properly you have to drop the subframe
I was advised that the risk of damage to the propshaft and risk that the front mounts could detach completely (given the offside already has) was the reason why I shouldn't drive it. The power steering is a separate system as far as I understand it as it uses ATF fluid and not the hydraulic fluid used for the rear suspension.

Cheers

Graham
 
While they're seperate the power steering and SLS systems share a 'tandem' pump i.e. two seperate resevoirs and pumps within one body. There's a shear pin within the pump which acts as a built in weak link should one side of the pump seize due to lack of fluid or whatever. Damaging/killing the tandem pump would make the repair bill bigger but given the state of the subframe mounts i'd be more worried about them if driving the car regularly

As said it's a common corrosion spot on these as are all the SLS, brake and fuel hard lines. And jacking points. Making new lines is an easy job as are the subframe mounts. It's the labour involved in dropping the subframe to gain access that makes it a fairly big/spendy job
 
The near side mount has hole in it but otherwise looks OK (which is a good thing). Just so that we are on the same page it is important to recognise that the rear of the car is supported on its springs and the subframe takes no vertical load. Ask yourself what would happen if you were to remove the subframe retaining bolts while the car is sat on the ground. Very little is the answer. However if the car is of the ground and supported on its jack points the tension in the rear springs, now no longer compressed be the vehicle's weight, effectively pushes the subframe downwards away from the body work. So to summarise the subframe mounting points are not subject to compressive loads but are occasionally subject to tension. I say all this because it important to recognise what is needed to repair these subframe mounts. Within the mounts is a captive nut that the subframe mount bolts mount to.

The removal of the rear subframe is a major job. A less involved method is to lift the rear of the car and support it on axel stands and then remove the wheels. Disconnect the diff from the prop. Put a high lift jack (or set a standard jack on a stack of paving slabs/wooden blocks to give it some lifting height) under the diff and take most (not all) of the load of the car onto it (some load can still be left on the axel stands). Remove the two front subframe mounting bolts only (leave the rear ones alone). As you slowly lower the jack the subframe will pivot about the rear subframe mounts and the front of the subframe will drop down. Remember that the flexible fuel line runs beneath the subframe so it is important not to allow the frame to drop too far. This will allow enough room to work on the mounting brackets.

I said earlier it was a good thing that the near side mount was OK since you can take measurements from it and make cardboard templates. The 'L' part of the bracket can be made from 5mm thick x 50mm wide steel bar and the 'fill in' triangles with 2mm sheet. Use an angle grinder with cutting disc to remove the old mounts. Weld the heavy bracket 'L's in place and drill the mount holes. Lift the subframe back up into position using the jack and insert the mount bolts and thread on the nuts. Weld the nuts to the inside of the 'L'. Weld on the 'fill in' triangles or just leave open (you will need to paint and under seal liberally as all manner of crud is going to get in here). If the rubber subframe bushes look bad you can replace these during the above process.

Looks easy but be prepared to have a thesaurus of Anglo Saxon swear words at the ready! Hope this helps.
Hi Joe

Thanks for your comprehensive reply. Much appreciated. This is the type of repair I need for my car. I'm not looking for it to be restored to perfection, just to make it solid, usable and roadworthy. Back in the day, I might have attempted this myself, but at the moment I'm really short of time. Do you know of anyone around my area (Midlands) who could do this work for me as an experienced Merc DIYer?

Cheers

Graham
 
Car appears to basically sound enough for restoration. While getting the rear subframe mounts and rear suspension sorted out may cost, if that's all that required then you get a car that's virtually depreciation proof- unlike many others you may buy. A couple of other things to check- if the the front mounts to the rear subframe are gone then often the rear jacking points/sill may be gone under that nice cladding also . Unfortunately being a 96 car it may also suffer from the degraded wiring insulation. Two more things to price/take into account before committing to repair it.
 
Also the inner wings behind the headlights will have rotted through. Every post-facelift car I've seen in the last few years has rot there. Not structural, just annoying

Nick Froome
 
Hi Graham,
Sorry I am based in Edinburgh so I do not know of anyone who is local to you who could do this work for you. On my own cars I do not do any welding myself and entrust that sort of thing to alocal welding chap. To keep my expenditure down I do a lot of the preparation. So I use an angle grinder and twisted wire brush wheel to remove under seal from affected areas and dress the work areas back to good metal. I have found that the more you can provide in terms of materials and templates the better the resultant job will be.

Although the chassis is monocoque, Mercedes incorporate within it box framing so even when the rust looks bad the car is rarely structurally compromised.. That said the places for rust are:
Front inner wings - always remove the outer wing, bumper and plastic wing liner to gain better access
Where the floor meets the rear wheel arch and sill. Rear seat and carpet need to be removed
Around the jacking points
Pipes:
Pipe brackets

Cheers,
Joe
 

Users who are viewing this thread

Back
Top Bottom