W203 C180 Engine Temperature problems

Page may contain affiliate links. Please see terms for details.

Yogi bear

Member
Joined
Dec 9, 2012
Messages
43
Location
Lincoln
Car
W203 C180 Kompressor Coupe
Guys,

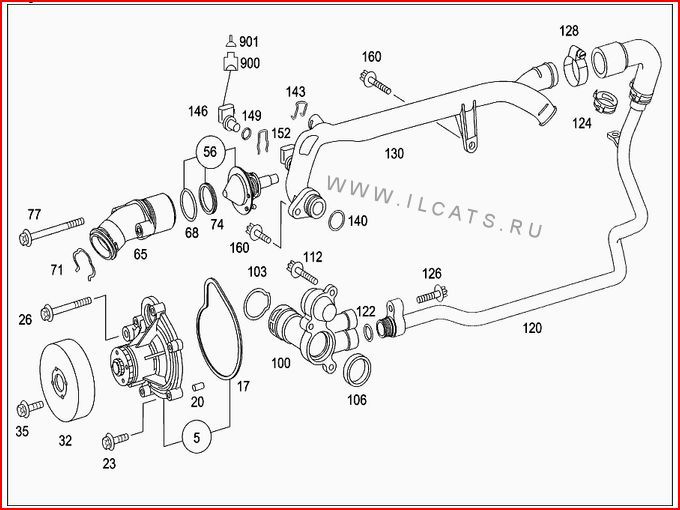
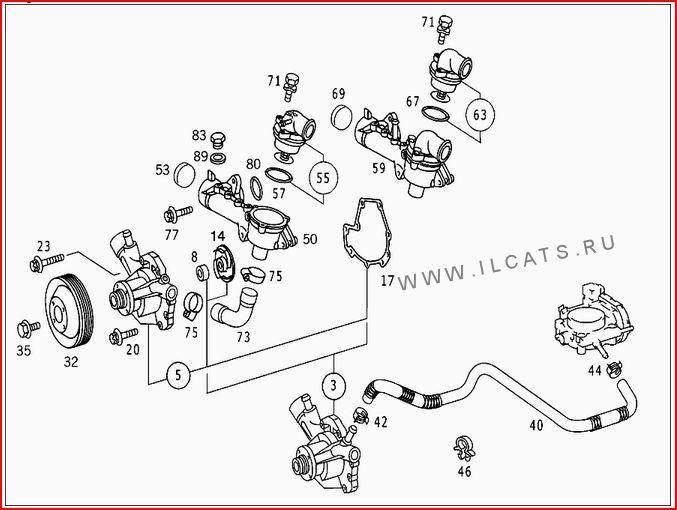
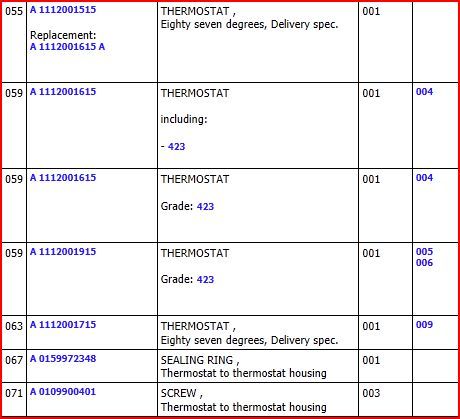
Got a C180 and it literally takes a decade for the engine temp to get up to 80 degrees?! I did a journey from Lincoln to Leeds yesterday (a distance of 80 miles) and the hottest it got was about 60 degrees?!

Any advice would be great.
 
Mine has the same problem so I'm buying a new thermostat today at Eurocarparts
 
A very common problem on these cars. Recently changed mine and I'm now as warm as toast! :bannana:
 
I got it from www.eurocarparts.co.uk £24.02 using MB Club discount code. £42.00 for an original from main stealers.

You have to use their online 'Reserve & Collect' or free delivery (subject to your location) to qualify for the discount. Enter MBClub30 at the checkout stage. I think it's still valid, if not try MBClub25. You pay on collection using the Reserve & Collect option, but I don't know about the delivery option payment.

New thermostat comes complete with the housing and rubber gasket/seal.
 
I've just bought mine today from Eurocarparts today so just need to get it fitted now,is it something I can do myself or need experts to do it? Will this improve my MPG aswell do you think as now my temp does not even rise above 50*
 
I've just bought mine today from Eurocarparts today so just need to get it fitted now,is it something I can do myself or need experts to do it? Will this improve my MPG aswell do you think as now my temp does not even rise above 50*

Hard to answer if you can do it yourself, not knowing how much experience you've had, but a guide (courtesy of someone on another MB forum) follows. The car will probably run a little smoother and return slightly better mpg.

Basic How-to-change a thermostat (C270CDi W203)

Thermostat change for C270 CDI W203.
(C220 CDi W203 looks the same)

Tools:
Ratchet and 4” and/or 6” extension bar (¼” drive preferred).
Sockets 6mm, 7mm, 8mm.
Oil Filter housing socket.
Star/Torq bits, preferably ¼” drive size E12 and T27.
Suitable Jack.
Suitable Axle stands.
Soft material scraper.

Consumables:
Anti Freeze
Degreaser
Lint free cloth
Tooth brush

Parts:
Thermostat Housing and Gasket.
‘O’ ring for oil filter housing.
(Stubby pipe between housing and block – If you feel it’s worth changing at the same time)

The first timers attempt….

If you would like to avoid expelled coolant sitting inside the under-tray tray….
1st Jack up the car, support with axle stands. Give your self enough room to be able to remove the engine under tray using 8mm socket.

Working from above, remove engine covers using the T27 socket.

Assess what you can move out of the way to make the job easier.
I decided to remove the fuel delivery hose from fuel filter to pump. I took this off the fuel filter can, and covered the exposed hole to keep out dirt.


I also removed, what I can only assume is a test point, using a T12 and secured it out of my way.
I also removed the fuel rail sensor wires.

Allow engine to cool, and open the header tank to relieve pressure from system.
I then removed the water hoses.

NOTE: Be aware that there may be some pressure still in the system.
I removed the small bore to the header tank (6mm socket), first.

Then the large bore hose to the Radiator (7mm socket). And finally another small bore hose to the fuel cooler.

I thought it wise to clean the crud and dirt off the area before I unbolted the housing. Preventing contaminants from entering my coolant tracts.
I used a water-washable degreaser and a tooth brush, washing away the dirt with clean water once scrubbed up.

NOTE: there is one more “hose” under the thermostat housing.
This is a stiff 2 or 2 1/2” hose with flared ends. It is simply held in place by the clamping force between the engine block and thermostat housing. I re used the hose, however, this would be a good time to change it if you decide to do so.
It can only be changed when the housing is removed.
Be aware that once the housing is unbolted this hose will fall away.

Also this would be a good time to check the condition of all your hoses.

Remove the sensor wire from the housing. Push the small clip release with a small screw driver.

Identify the three E12 securing bolts, one on top, two below.

I tried to get away with not removing the oil filter housing out of fear or dropping stuff or seeping water into the oil system.
I quickly discovered that life is much easier with this removed.
Once removed, I bunged the exposed area up with a lint-free cloth, and coved over to stop bits falling in.

Using a size E12 torq bit carefully crack off the bolts on at a time, then remove.

My housing was stuck to the block and took some force to pry it away.
As soon as it came free the ‘short stiff hose’ talked about earlier made a break for freedom. Falling down the side of the engine.
Keep this in mind when removing the housing.

Clean up the area with cloth, and scraper if required but be careful with the alloy face. It goes without saying, do not damage the face!

The new part will come with a rubber gasket, fit this in place.

Get your ‘short stiff hose’ and press it into the opening in the block it came from, and offer up the housing, navigating between a fuel rail and everything else in the way, while making sure the annoying ‘short stiff hose’ also sits in the lower opening in the housing.
Once lined up, get your bolts into the housing and nip them up.

Make sure the ‘short stiff hose’ is in place, and the housing is aligned onto the block. Once happy, tighten up the bolts, bearing in mind that you are tightening a hard bolt into soft block, go one step too far and you will strip the threads.
Advised torque is 9 Nm.

Replace oil filter housing as soon as possible. Torque down to 25Nm. Strictly speaking, I should have used a new ‘O’ ring.
Add this to your list, if you like, when buying your thermostat.

Once tight, start getting all you hoses back in place.
I changed my hose clips at the same time. I left off the large radiator hose till last. I am going to try fill this hose with coolant before I replace.

Once all hoses are back in place, mix up some coolant.
Pour into the top hose, I managed to get 3 litres into the hose before if started to pour out of the housing.
Attach hose, tighten up clip.

Top up header tank.


On the C270 there is an electric water pump mounted behind the drivers side headlamp. (I checked on my C220 CDI W203 and there is no such pump) Switching on the ignition activates this.

I left it running for ten min in the hope that it may help remove air locks.
After a lot of gargling, the noises stopped.
I then started that car and let it warm up.

As far as I am aware I have no air locks and the car is heating up and cools as it should.

Over the next few days of running, keep an eye out for leaks, and check header tank levels if your paranoid (like me).
I left the engine covers off so I could check for leaks.
600miles later everything is ok.
My car warms up much faster, and blows warm air within 10min, (80deg within 15min) with an ambient of 5-6deg C, travelling almost immediately at 60mph.
Temp sits in the region of 85 to 95 deg C.

I hope this will give a heads-up to anyone attempting to change a thermostat one for the first time.
Save your self £185 of labour charges.
 
Last edited:
Finally do not use any old coolant/antifreeze. If you intend keeping your vehicle for any length of time and do not want engine cooling problems ensure that you use Mercedes coolant mixed with good quality water. :thumb:
 
Right, so now I'm majorly confused...the thermostat that I bought from Euro Car parts doesn't seem to want to fit! It looks exactly the same as the other 'stat but will not clip into the 'stat housing nor will it go into the 'barrel'

Has anyone else had this problem?
 
No Problems at all with my ECP thermostat...
I have replaced a thermostat in the past on a previous C270 with a genuine MB one..
In BOTH case one of the holes that holds a fuel pipe clamp was NOT threaded..
I was advised to "re tap" using the bolt that was supposed to fit within the hole..
This sounds a dodgy rememdy but I did it and it did indeed work..

People who criticise the replacement ECP thermostat as "not being genuine MB" should remember we are regularly having to repolace the "Oh so superior Gernuine MB Thermostat" in the first place !!

I have no qualms at all about using ECP for parts...

In the case of Brake Discs and Pads I would say they are better than the OEM ones I replaced 30,000 miles ago !!
 
Right, so now I'm majorly confused...the thermostat that I bought from Euro Car parts doesn't seem to want to fit! It looks exactly the same as the other 'stat but will not clip into the 'stat housing nor will it go into the 'barrel'

Has anyone else had this problem?

No problem with mine either. (ECP)

However, the stat on the C180 Kompressor petrol engine is different to and is in a different location to diesel models.

I believe your engine type is M271 and the following images are of the stat for that engine.

M271stat1_zps4c5a27cd.jpg

M271stat2_zpsd19f8846.jpg

M271stat3_zps5035a835.jpg


The following is the stat, which is supplied complete with a new housing, for diesel engine models.

OM612stat1_zps0813da08.jpg
 
They might of given me a diesel one by mistake then. I got no seal rings with it or anything
 
You wouldn't have been able to fit the wrong one. The petrol and diesel thermostats are very different.
 
Can you post a picture up of the one you have and a picture of the housing.

Here is a diagram of the parts. The thermostat should fit in the front of the engine, followed by the housing.

C180kompressor_zpsfd0b8083.jpg


NB: Do not over tighten the housing bolts.
 
Last edited:
Are you sure it's a Kompressor model?

The standard C180 is different and looks like this Diagram. No.55 or 63 is the stat. No idea why two are shown unless it's a modification. List of parts also attached, note different part numbers.

C180_zps8d3ce605.jpg


C180partnos_zpsd1cc4dfc.jpg
 
Last edited:
Cracked

No problem with mine either. (ECP)

However, the stat on the C180 Kompressor petrol engine is different to and is in a different location to diesel models.

I believe your engine type is M271 and the following images are of the stat for that engine.

M271stat1_zps4c5a27cd.jpg

M271stat2_zpsd19f8846.jpg

M271stat3_zps5035a835.jpg


The following is the stat, which is supplied complete with a new housing, for diesel engine models.

OM612stat1_zps0813da08.jpg

i faced the same issue just today, when removing the old one. the stat housing was cracked right where it enters the engine (right at the seal area). fortunatley i was able to pull it out by the actual sensor with some pliers. followed this guide though... cheers, hopefully i wont get a coolant reminder every now and again now.:D
 
Last edited:

Users who are viewing this thread

Back
Top Bottom