W203 Can this trim be replaced?

Page may contain affiliate links. Please see terms for details.

fatdazza

Active Member
Joined
Feb 20, 2010
Messages
438
Location
Cambridge
Car
Vauxhall Chevette
Hi,

hope someone can help?

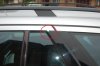
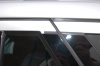
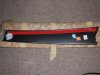
The rubber / plastic trim on the rear door (see attached photos) has broken (caught in a synthetic wash mitt) when washing (washmitt now binned and replaced with a sheepskin one).

The car is a 2005 W203 estate (S203 if being accurate :)).

Has anyone had this happen to them and can anyone offer advice as to the part number and how it can be replaced. Quite minor I know but it is bugging me!)

Thanks
 

Attachments

  • DSC_4149.jpg
    DSC_4149.jpg
    113.2 KB · Views: 88
  • DSC_4150.jpg
    DSC_4150.jpg
    50.3 KB · Views: 86
Yes done this myself (with a sheepskin mitt, so be careful).

The complete trim strip has to be replaced, the rubber is not a separate part. About £30 from MB. I think it is just stuck on but I'm not sure on that. I haven't tried replacing mine yet...
 
Yes done this myself (with a sheepskin mitt, so be careful).

The complete trim strip has to be replaced, the rubber is not a separate part. About £30 from MB. I think it is just stuck on but I'm not sure on that. I haven't tried replacing mine yet...

Thanks for the response. When you say the "complete trim strip", do you mean the gloss black panel as well (mine shamefully showing the swirl marks from previous owner's washing habits!).

Perhaps I should go back to using my crusty old sponge - these washmitts just seem to cause damage:eek: I'll post a warning on Detailing World:D
 
Yes they stick on and there is one screw on the bottom,Be carefull as there are different finishes about £30
 
Yes they stick on and there is one screw on the bottom,Be carefull as there are different finishes about £30
Any tips for removing them (after removing the screw)? Is the the brute force route to unstick it? Also any tips on what to use to stick the new one in place (or do they come with sticky stuff on)?

Thanks
 
i.ll take a piccy of the back.
Opps battery flat see piccy later
 
Last edited:
There is a lip on one side and the other side is self adasive tape/To get to the screw you have to lever up carefully the window trim.
Hope this helps
 

Attachments

  • DSCF1411 (648 x 486).jpg
    DSCF1411 (648 x 486).jpg
    105.5 KB · Views: 44
racall, many thanks for posting this - it is incredibly helpful of you to post the picture. As they say "a picture paints a thousand words".

I am confident now to order a replacement part:thumb:
 
To get the glass frim of first it needs to be levered up.
I used a couple of old wooden cloths pegs to lever them up, saves the paint bieng damaged.
 

Users who are viewing this thread

Back
Top Bottom