Frankor
Member
Looking for some advice on an ignition live supply for my Road Angel: -
I don't want to have to penetrate the forward bulkhead, so would like to pick up an ignition live supply from either the power socket in the centre console, or the overhead console.
Problem is I cannot see how to gain access to either, so I am hoping any of you knowledgeable ladies/gentlemen can advise.
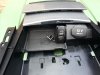
 Centre Console with closed and opened sliding lid
 Inner trays and divider removed, but not enough clearance to detach the power socket module.
Anyone know how to remove the sliding lid, or is there an alternative way to gain access?

Alternatively: Can anyone advise on how to detach the overhead console?

Thanks in advance.
I don't want to have to penetrate the forward bulkhead, so would like to pick up an ignition live supply from either the power socket in the centre console, or the overhead console.
Problem is I cannot see how to gain access to either, so I am hoping any of you knowledgeable ladies/gentlemen can advise.

Anyone know how to remove the sliding lid, or is there an alternative way to gain access?

Alternatively: Can anyone advise on how to detach the overhead console?

Thanks in advance.
 . I've pre-ordered this
 :bannana: