W212 glove box out wiring Q

Page may contain affiliate links. Please see terms for details.

Darragh1

Active Member
Joined
Apr 24, 2009
Messages
224
Hi again,
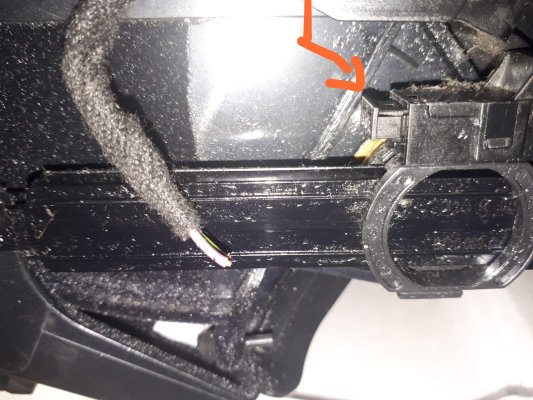
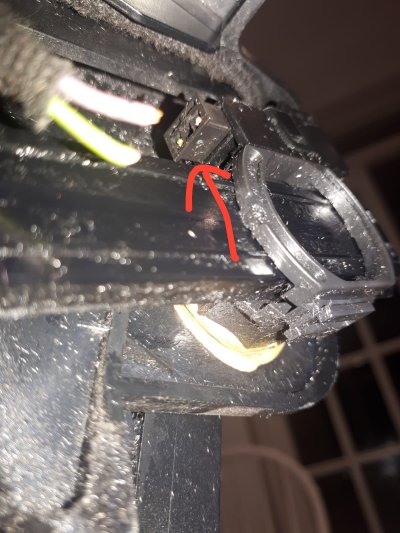
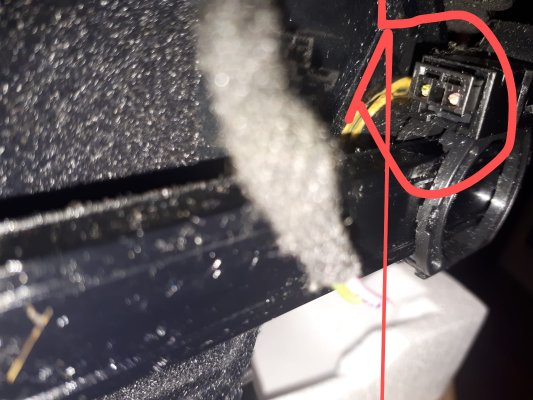
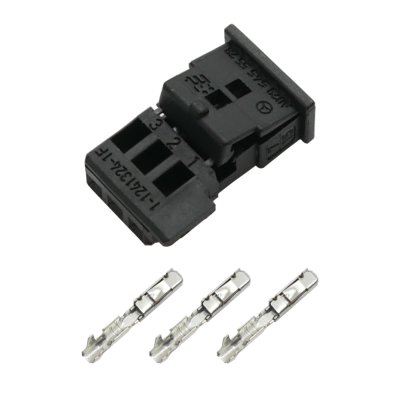
To fix the broken wires for the glove box light I removed the glove box. I have learned that this is common and a design fault. How do I disconnect the wiring block (so that I can crack it open to fix)? It is a bit fragile so I don't want to just yank it. It there a release tab or do i need to take the whole mechanism apart?
Thank you,
D.
 

Attachments

  • IMG-20220215-WA0000(1).jpg
    IMG-20220215-WA0000(1).jpg
    239.4 KB · Views: 14
  • IMG-20220215-WA0001.jpg
    IMG-20220215-WA0001.jpg
    203.4 KB · Views: 14
  • IMG-20220215-WA0002.jpg
    IMG-20220215-WA0002.jpg
    185.8 KB · Views: 14
funnily enough i have just done mine this morning, i used pliers to pull the plug out of the actual switch housing, the little plug does split put it does not really do you any favours. So i stripped an old usb cable as its nice thin wire used 2 strands for each terminal.
Now the switch has 2 pins that the plug goes onto, i did not save the original instead i got two very small red crimps put the usb wires in it and crimped it tight i then pushed the crimps onto the switch pins, joined my bodge job to the original harness and then hot glued the crimps into the switch housing, job done all works and will not snap again as there is now sufficient flexible wire.

i used the red ones as they were the best fit nice n tight, i was going to solder them but this was easier
1644929845291.png
 
That is very informative.
I pulled out the little block successfully removed the little wire holder fellows with a pick tool and then ordered new parts
(0295455528 the block plastic cover part and 0165454126 the receptacles needed for each wire) because they are too tiny for my eyesight and soldering is not my thing nor am i hot glue inclined.

Did you add on an inch or two extra length of the wires or not?
Thank you very much,
D.
 

Attachments

  • Reparatursatz-Stecker-Buchse-S_33-1409_1458_0.jpg
    Reparatursatz-Stecker-Buchse-S_33-1409_1458_0.jpg
    336.7 KB · Views: 5
Sorry, I'm not clear - Did you cut out 5"old and then add on 5" of new or just add on 5" to the old?
I ordered from MB 0295455528 €2.78 PLUS VAT and 0165454126 €3 EACH
The kit in the attached image is €7ish from autoelectrik.de , i presume they'd catch you for shipping too but I don't know. It is also used for some temperature sensor where three wires are used.
Thanks,
D.
 

Attachments

  • Screenshot_20220215-202547_Samsung Internet.jpg
    Screenshot_20220215-202547_Samsung Internet.jpg
    263.1 KB · Views: 1
i added 5" of cable to my plug that goes into the switch then i joined this to the old original bit of wire in the glove box, so its extended by 5 inch and now free to move
cheers for the info
 
MQS female contacts. Just order some with a little cable attached, then you can change them (we would just put new MQS contacts on end of existing, or extend if tight fit, but special tool needed to do it properly). Plug just pulls out. Theres a little bit of plug that clips up (a locking section) - don't break it off, then you can release the old pin with a spike. You'll have to release the pin in 2 positions (one is the visible slot, one is through where the locking section sat.

Buy 1x A000 540 48 05, which is a lead with 2 MQS females on it and chop it in half. They are the gold ones, but they don't do standard ones in double lead so not bad for £3.10 plus VAT
If you break the locking clip of the plug, order another - part number is on it in tiny print !

Cheers
Richard

 
can either of you provide a direct link to where to order these from am new to benz so still finding my way round where to buy stuff etc
 
MQS female contacts. Just order some with a little cable attached, then you can change them (we would just put new MQS contacts on end of existing, or extend if tight fit, but special tool needed to do it properly). Plug just pulls out. Theres a little bit of plug that clips up (a locking section) - don't break it off, then you can release the old pin with a spike. You'll have to release the pin in 2 positions (one is the visible slot, one is through where the locking section sat.

Buy 1x A000 540 48 05, which is a lead with 2 MQS females on it and chop it in half. They are the gold ones, but they don't do standard ones in double lead so not bad for £3.10 plus VAT
If you break the locking clip of the plug, order another - part number is on it in tiny print !

Cheers
Richard

Richard
That is informative and detailed. I have already ordered the little holder and some mqs female receptacles from mb. I'll need the tiniest pliers in the history of humanity to crimp the wires in. P/n A000 540 48 05 is a great idea but I'd have to wait another week for it to arrive here in Ireland stock coming from uk (brexit delays I think).
Any chance you know what gauge of wire? I presume it's some standard size?I said.
The guy at the motor factors wasn't amused when confidently told him I needed the same gauge used by the shoemaker to thong his elves little booties. Not accurate enough obviously.

Thank you,
D.
 
can either of you provide a direct link to where to order these from am new to benz so still finding my way round where to buy stuff etc
Forgive me if i misread your request..
If you are wondering if there is a mercedes benz online catalog from which you can order parts online, i don't think so.
As Richard says, contact your most local mb dealer. I used to have a $45 subscription for online epc but i don't think it's available any more.
I use a relatively primitive russian site into which i put my chassis number. It is in russian but my laptop automatically translates each page into english.


Usually I use the russian site to help me along with part numbers and cross reference the part numbers for finding cheaper original equipment manufacturer parts on heneral car parts sites. Also I would be a bit like a cork in the ocean (or paying too much to afford) without my local mb parts man whom I habe known for years.
Thanks,
D.
 
You'll be safe with 0.75mm2 which is the biggest size for MQS. - you want the pliers that do the butterfly crimp (not sure that's the official term. If you don't get them crimped properly, the connector won't go into the plastic body - which is why I said you need a special tool (MQS crimping tool which is £££)
 
So I used a little jewellery pliers and crimp to connect the wires to the mqs female connectors.
How long will I get out of it?
Before I put it all back together, if you can see how I might make it better please advise. Brace yourselves for my 16second movie masterpeice-
To view this content we will need your consent to set third party cookies.
For more detailed information, see our cookies page.
Thank you,
D.
looks good to me
 
Thanks for the reply. I haven't reinstalled yet to witness the 5w (or is it 3w) illumination. I anticipate a big thrill.
D
 

Users who are viewing this thread

Back
Top Bottom