Water leaks

Page may contain affiliate links. Please see terms for details.

wongl

MB Enthusiast
Joined
May 29, 2005
Messages
1,418
Location
Surrey and Hong Kong
Car
A180CDI, B200d, C300h, SLK250
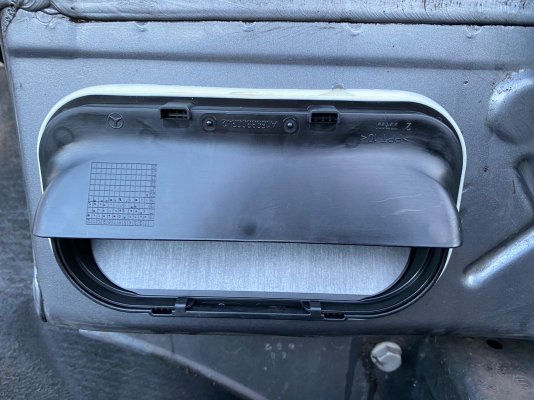
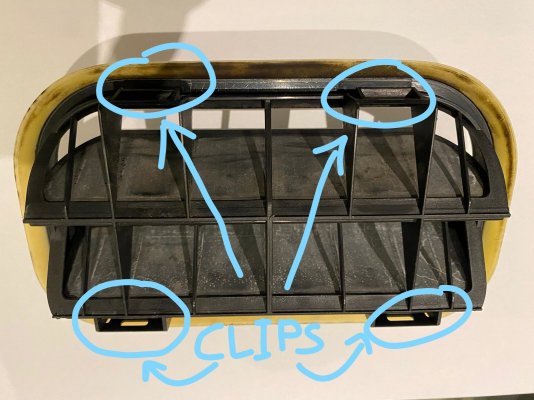
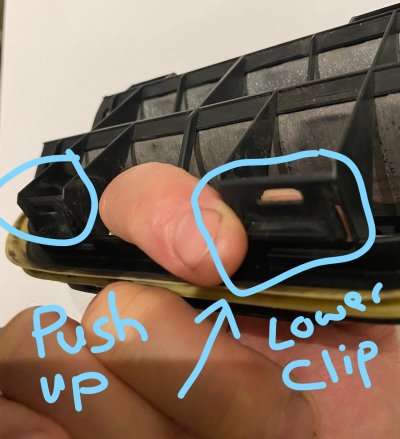
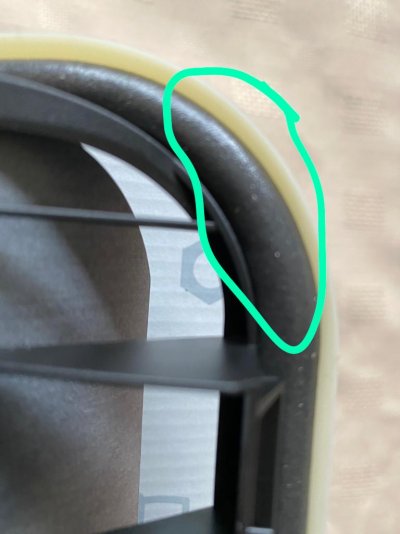
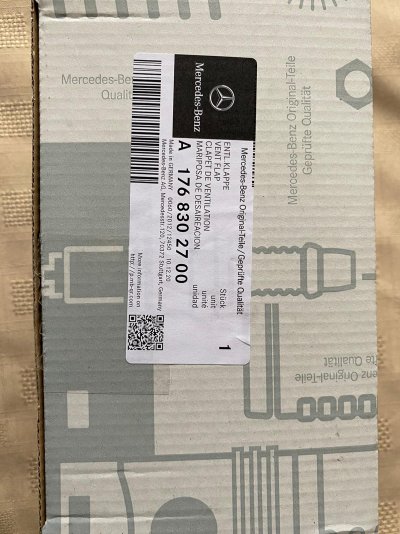
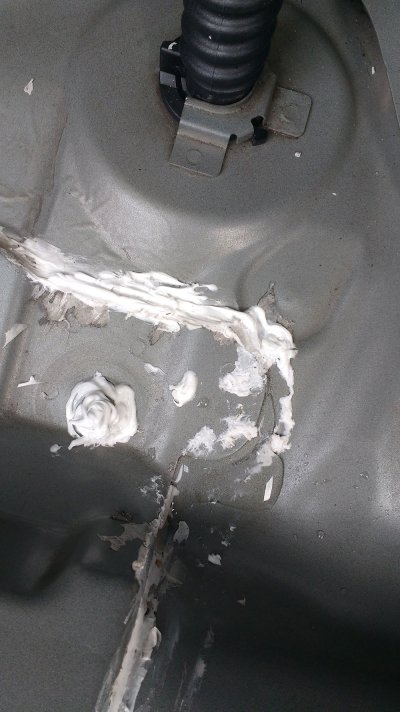
During a recent service at a main dealer, it was reported that the trunk of my W169 A-Class is full of water! I had this problem in another W169 where the water is entering the boot via the rear bumper vents. My indie fixed this by replacing both vents, however, I just found a Youtube video from Belgium where it was suggested that the original vents can be reuse by sealing them in with silicone sealant.

This got me thinking, is it actually necessary to replace the old vents with new vents, or is it simply resealing the old vents into place to stop the water from entering the trunk via the gaps between the vents and the bodywork?

Any opinion on this?
 
Presumably the vents are there for a reason?

Blocking them might have an adverse effect on something else (but possibly only a very marginal one).
 
  • Like
Reactions: GLK
@GLK is the expert on these cars.... David? ;)
 
  • Like
Reactions: GLK
This got me thinking, is it actually necessary to replace the old vents with new vents, or is it simply resealing the old vents into place to stop the water from entering the trunk via the gaps between the vents and the bodywork?
Yeah, a known issue - and absolutely no need to replace the vents: I have done exactly that on my old A200: removed the existing vents, laughed at naivety of engineers thinking the flimsy rubber and an inch-wide covers/shades will protect from water running down off the rear light assembly and tailgate sides ... Cleaned the removed vents, did away with covers completely, re-fitted the vents and sealed around properly with Tiger Seal - not a hint of moisture in the boot / spare wheel well since.

Sorry, no pictures - was rather tired that day ...

I also sealed the top of the rear bumper trim, where it links with the boot outer trim - tailgate lock flap and along the line each side.
@GLK is the expert on these cars.... David? ;)
You're too kind - I only know how to mess with superficial stuff on this car :p
Presumably the vents are there for a reason?
Blocking them might have an adverse effect on something else (but possibly only a very marginal one).
It's not blocking the vents, that's required - it's re-sealing the perimeter: they literally rattle in the their seats, as the rubber used to fix (as in click in) them is deteriorating with time.
 
Yeah, a known issue - and absolutely no need to replace the vents: I have done exactly that on my old A200: removed the existing vents, laughed at naivety of engineers thinking the flimsy rubber and an inch-wide covers/shades will protect from water running down off the rear light assembly and tailgate sides ... Cleaned the removed vents, did away with covers completely, re-fitted the vents and sealed around properly with Tiger Seal - not a hint of moisture in the boot / spare wheel well since.

Sorry, no pictures - was rather tired that day ...

I also sealed the top of the rear bumper trim, where it links with the boot outer trim - tailgate lock flap and along the line each side.

You're too kind - I only know how to mess with superficial stuff on this car :p

It's not blocking the vents, that's required - it's re-sealing the perimeter: they literally rattle in the their seats, as the rubber used to fix (as in click in) them is deteriorating with time.
This is great @GLK and thanks for confirming. I will give this a go on a nice day since I don't need to get new parts!

Here is the Youtube video in case others are interested.

To view this content we will need your consent to set third party cookies.
For more detailed information, see our cookies page.
 
  • Like
Reactions: GLK
Incidentally, I have two new OEM plastic holders for the rear bumper - those that screwed on to the body of the car, and into which the bumper clips (see 1:33 in above clip) - these often get damaged, when bumper is removed, particularly in cold weather.
A169 885 1463 & A169 885 0363

50840133998_24515f537f_o.jpg


I was planning to replace mine, but then I sold the car, so have no use for these anymore - you're more than welcome to them :)
 
Mine snapped :-( bumper is only just holding on now, but so many other issues with car right now even a pop rivet gun looks a viable solution LOL

I had water leaks from vents, tail gate handle , tail gate seal and rear lights plus the normal from front drains ect


Tezz
 
Sorry to hear about this, Tezz.
The fixing clips are not too dear direct from MB, but as you said - with so many other issues, these would have to wait...
To be honest, MB could have easily added an extra lug with a normal screw, instead of these and it would've been perfect (it's not like you can see those from outside).
As crude as it sounds, a thin roll (sausage :) ) of ABRO Steel, with a matching paint touch up after, would fix the issue with broken clips and can be removed easily later on, when the time comes to replace the clips (the bumper lugs might also be damaged - so check that too).
 
An update on this.

Armed with the information from this discussion, I purchased some gutter sealant from Wickes with the aim of resealing the original rear bumper vents.

Removing the rear bumper was easy enough, but I struggled a little with two areas:-

  1. The two 8mm screws under the rear wheel arch - initially I couldn't find these and instead removed the 10mm plastic bolt from the plastic holder. This wasn't obvious until I tried to lift off the bumper
  2. The two clips holding the wheel arch liners to the rear bumper was difficult to remove. I ended up pulling both liners through the plastic clips and them removing the plastic clips with the bumper taken off the car. I don't think it is possible to detach the liners from the rear bumper with the rear wheels in situ, to be honest (perhaps possible if the car was halfway up a ramp?).
Having removed the bumper, I broke the first vent while trying to remove it from the bodywork; the 11-year old plastic casing has become brittle and cracks/breaks easily. Since I had to pop down to the main dealership to pick one vent up, I decided on replacing both of them. Surprisingly the vent is relatively cheap given the complex construction/assembler (£6.45 plus VAT). I also replaced two rubber grommets behind the bumper which were 'torn'.

While fitting the new vents, I also applied some marine grade silicone grease to the inside face of the vents as I detected the remains of something that looked like white grease on the factory fitted vents.

A tip to others planning on fixing their rear vents - with a view into the rear of the vent, it is possible to insert one's finger to gently prise the clip to pop the vent out without damaging them. Please refer to the attached photo.
 

Attachments

  • W169 Rear Vent New.jpeg
    W169 Rear Vent New.jpeg
    249.5 KB · Views: 8
  • InkedW169 Rear Vent Old Clips.jpg
    InkedW169 Rear Vent Old Clips.jpg
    1.2 MB · Views: 8
  • InkedW169 Rear Vent - lower clip.jpg
    InkedW169 Rear Vent - lower clip.jpg
    1.1 MB · Views: 9
  • Like
Reactions: GLK
Further update to this. Having completed the replacement of the rear vents on my W169 A-Class, I agreed to help a friend to replace their W169 rear vents today.

We went to the same MB dealership to get the parts - to my surprised the dealership quoted a new part number A1768302700 which is now boxed and at an increased price of £8.85 instead of £6.45 for the A16983042 I paid for mine only last week.

Intrigued by the somewhat steep price increase, I examined the parts closely and noticed the new part now has an additional foam seal added to the vent to improve its seating and sealing performance. The new part no longer clicks into place, but rather squashes into place. Feels like a better fit and I prefer this to the older parts.
 

Attachments

  • W169 New Rear Vents.jpeg
    W169 New Rear Vents.jpeg
    51.9 KB · Views: 2
  • W169 New Rear Vents Box.jpeg
    W169 New Rear Vents Box.jpeg
    311.5 KB · Views: 3
  • Like
Reactions: GLK
Only took them 15 years to figure this out. I'm impressed :rolleyes:
 
Anybody know where the door and boot drain holes on the 2012 ML250 please? ... can't see them. Looked underneath ... just a door rubber
 
Anybody know where the door and boot drain holes on the 2012 ML250 please? ... can't see them. Looked underneath ... just a door rubber
Try making a new thread about the ML specifically, you’ll get more replies.
 
As others have said above: I removed rear bumper on my wife's W169 after finding a boot full of water after power washing the car . After drying the boot out, I removed the air vents, they are not well sealed in the original factory installation, removed them left and right cleaned area and vent frames well, dried and refitted . I used Tec 7 to seal around the vents/body opening, with out inhibiting the air flaps. I used some good Duct tape to create an over hang at the top of the vents to direct any water away from the vents. I used waxoly underbody sealant over the duct tape to leave a semi flexible waterproof overhang . Reassembled everything . No more leaks
 
I have the same problem, loads of water i the boot. I can see it's coming in from behind the central plate which has two screw heads coming in from under the car. I removed the bumper and the air vents, but it's dry behind them and it only rained yesterday. I was expecting water, even the foam is dry.
Removing the bumper was easy'ish, but I don't want to do it again. Not sure if I should seal them or buy new ones. They may not even be the issue, but I can't see anything else, the surrounding carpets are dry, there is no leak from the boot door, the rear lights are fine as well.
 
Sealed both air vents. The sealant is before I knew that the air vents are probably the issue, I went mad with it!

Hasn't rained since I sealed the vents, but water is still coming in, must be what's being held back by all my stupid sealant.
 

Attachments

  • water-in-boot.jpg
    water-in-boot.jpg
    391.2 KB · Views: 2

Users who are viewing this thread

Back
Top Bottom