Wheel arches and MOP ...

Page may contain affiliate links. Please see terms for details.

chrisk2010

MB Enthusiast
Joined
Oct 1, 2014
Messages
1,202
Location
Essex
Car
C230 w203
So i have had a week off which allowed a few days to work on the cars wheel arches and peek behind the covers plus get a bit of winter prep done with machine polish and Coat of wax.

I'll apologise now as when i work i don't take as many pictures as i intend to for the soul reason that i forget and tend to put everything back.

So i started off on the front and removed the wheel arch covers. It really is suprising how much dirt get behind there but for a 12 year old car it wasn't bad at all.
IMG_0549.JPG IMG_0550.JPG IMG_0551.JPG IMG_0552.JPG

I used a dry brush to remove the loose bits and sprayed some fallout remover under there then sat down with a bucket of PH neutral detergent and gave all the nooks and crannies a good seing too then rinsed it all off. I done this this a couple of times on each arch.

IMG_0556.JPG

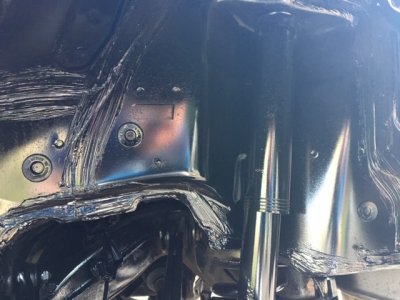
I also managed to get the drain cleared which is a known problem with these cars usually resulting in the passenger footwell getting wet. I must say i was suprised at how blocked it was considering i regularly jet down the holes a the bottom of the windscreen, the only thing i will say is i wish i had done this at the begining as it shot crud all over the area i had just cleaned so needed another rinse.

IMG_0557.JPG

There's the little drain, both the rubber bit hanging down and the hole to the right were completly blocked.

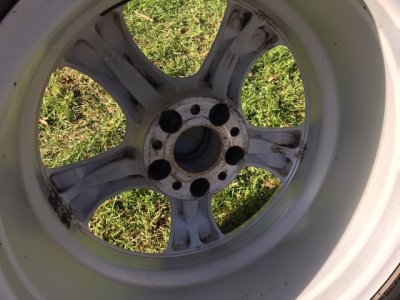
Whilst this was all drying i went over the wheels with a non scratch pad and some Bilt Hamber fall out remover.

IMG_0554.JPG IMG_0572.JPG IMG_0574.JPG

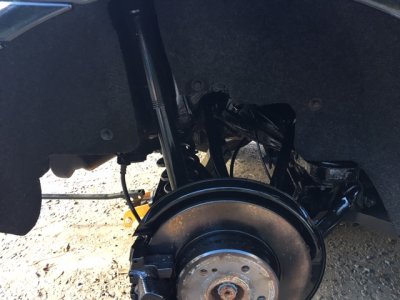
Once it had all dried i set to giving everything a good coating of hammerite under the arch which i repeated to the other side.

IMG_0558.JPG

I did the brake disc after this but forgot to take the final picture. I also done the caliper but left the front of it witht the Mercedes writing as i intend to revisit this at a later stage.

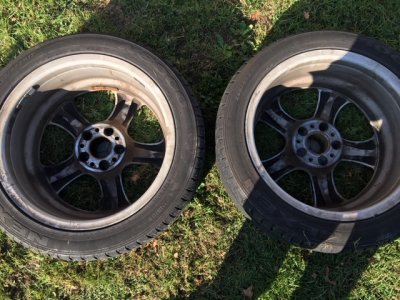
I also forgot to take picture of the wheel arch covers which i cleaned with a wee bit of fall out remover and also some megs tar remover which was absolute rubbish and ended up using a lot of boiling hot water and a hard brush. I treated them to some megs tyre shine after as i forgot to bring a bit of old oil home from work which Merc85 reccomended doing.

Next was onto the rears for the same treatment ...

IMG_0560.JPG IMG_0561.JPG IMG_0562.JPG IMG_0563.JPG IMG_0564.JPG IMG_0565.JPG IMG_0566.JPG
 

Attachments

  • IMG_0573.JPG
    IMG_0573.JPG
    118 KB · Views: 23
  • IMG_0555.JPG
    IMG_0555.JPG
    174.3 KB · Views: 25
  • IMG_0567.JPG
    IMG_0567.JPG
    118.2 KB · Views: 24
Then painted ..
IMG_0567.JPG IMG_0568.JPG

I wasn't to worried about getting the shocks perfect as i'll be turning my attention to the rear next year replacing various bits and pieces.

Now at the very begining of all this i discovered that the tip to my pressure washer broke and i had to ordered a new one which took a couple of days to arrive. So i waited before puting the rear wheel arch covers back as they aren't fully plastic and not as easily scrubbed as the fronts were but it was worth the wait as they came up a treat.

IMG_0569.JPG

I also gave the wheel bolts a quick sprayed while waiting for everything to dry, sorry the picture is wonky the iphone does this sometimes.

IMG_0570.JPG

OK here is where i really forgot to take pictures ! Everthing assembled and back together it was time for the cars paintwork.

I done the usual and snow foamed, pressure washed, to bucket washed all over. It was really nice not having to worry about the wheels and wheels arches though.

IMG_0577.JPG IMG_0578.JPG
The snowfoam had been on a while when i took those pics as you can see by the floor.

Then i treated the car with fallout remover and the last half a tin of megs tar remover and gave the car another good clean as above then used bilt hamber regular clay and clay lube.

IMG_0579.JPG

I dont know why i thought i took more pics but nope i forgot again i think i just to wrapped up in things and move quickly onto the next.
 

Attachments

  • IMG_0576.JPG
    IMG_0576.JPG
    112.4 KB · Views: 14
Last edited:
Looks in great condition under there buddy, What a excellent job, it's a slippery slope you know ;) lol :thumb:
 
Now once all done dried and squeaky clean put everything away and broke out the DA, some Nanotech SST which Toobad recomended to me in the below thread and the green hex logic pad.

Which Soft99 to go for ?

I went around the car once panel by panel doing six reps of cross hatching movements on each and the results were very pleasing.

IMG_0580.JPG IMG_0585.JPG

Now the light was getting low and i was playing with the idea of either applying the poorboys glaze or in the other thread Toobad suggested using my blue hex pad for a "jewelling polish" and well after pacing around and around and around i went the the jewelling polish as i woould get the chance to do this again for a while and i can apply PB glaze anytime.

That done i went around and applied a coat of my new Fusso Coat wax to finish off, sorry for the lack of quality pics the light was really fading.

IMG_0586.JPG IMG_0587.JPG IMG_0588.JPG

Smooth as baby bottom, it was a hard day and every part of me ached after not only that i had to head back in and sort the house out after the builders.
 
Looks in great condition under there buddy, What a excellent job, it's a slippery slope you know ;) lol :thumb:

Thanks fella :) i was really pleased at how clean it was i did take off a few bits along the way to clean behind but i could have spent another week polishing everything with a toothbrush.

I have to say though it was suprisingly satisfying considering that apart from the pics no one will ever see the work that went in under the covers.
 
Good effort, looks great :cool:

Want to come round and do mine? :D
 
Thanks Will, you have no idea how many times i was asked by neighbours and random people to do there's last week lol.

It really makes you fully appraciate the prices professional detailers charge. The time, effort, concentration and products it takes just to do one part of a detail is epic and time consuming and if i'm honest i didn't get half of what i intended to get done like wash the carpets steam clean around the inside, and get in the engine bay.
 
Nice work Chris, I have the same model and this might just inspire me to take off the wheel arch covers and have a peek myself.
 
Thanks Will, you have no idea how many times i was asked by neighbours and random people to do there's last week lol.

It really makes you fully appraciate the prices professional detailers charge. The time, effort, concentration and products it takes just to do one part of a detail is epic and time consuming and if i'm honest i didn't get half of what i intended to get done like wash the carpets steam clean around the inside, and get in the engine bay.

Hi Chris,

I can fully appreciate all your efforts, I have done similar to my own cars over the years :thumb:

Unfortunately I don’t have the free time that I used to these days, so the cars have taken a back seat for a while. I’m sure I’ll get back into it in the future though :)

If I get time the easiest thing is just to do it bit by bit - you can always go back and do the interior or the engine bay another day :cool:

Always find it therapeutic bringing a slightly tired looking car back to looking sharp again, it’s the little details that make all the difference.
 
Thanks Colesy, It was definitely worth a look and apart from removing those dowel clips which hold everything on it's an easy job and i feel much better for it.

I'm lucky as i'm almost sure mine is galvinized and having zero rust on the wings helps reinforce this but i was prepared incase it turned out i wasn't so lucky with some BH rust treatment.

To be honest most of the time was speant literally waiting for paint to dry so i stripped everything down and cleaned then took the arches in to clean in the garden only loose putting the wheels back on over night and then refitting the next day.

I did however wash the car twice that week to remove the over spray from the body work each time with a G3 clay mit which made claying by the end of the week so easy it was almost pointless doing it but i wanted to be safe than sorry when it came to machine polishing and the clay did get a few bits the mit didn't ..... not much though.
 
Hi Chris,

I can fully appreciate all your efforts, I have done similar to my own cars over the years :thumb:

Unfortunately I don’t have the free time that I used to these days, so the cars have taken a back seat for a while. I’m sure I’ll get back into it in the future though :)

If I get time the easiest thing is just to do it bit by bit - you can always go back and do the interior or the engine bay another day :cool:

Always find it therapeutic bringing a slightly tired looking car back to looking sharp again, it’s the little details that make all the difference.

I totally agree, time is a big factor for me too although last week it didn't help that the nozzel for the presure washer broke which i didn't realise till i aimed it at the wheels and shot a stream of water 40-50 degrees to the right.

I ordered a new one for next day delivery but in there wisdom they sent it via Yodel who are just useless but this meant washing everything by hand twice instead of jetting the muck away while the nozzel sat in the depot a mile up the road for 48hrs.

Ifi got it all done i'd have nothing left to do i guess. :)
 
A good job well done. Alas, I am no longer physically able to do jobs like that.
The daughter however.....:D

I wish my lot would take an interest my back was broken on friday night although credit to my better half she is very very supportive of my little projects and apreciates the work i put ... understanding it is another matter however lol.
 
My daughter, now in her early 40s has always taken an interest in all things oily. She is a dab hand at all sorts of things. Decorating is yet another string to her bow.
I really miss not being able to ' get stuck in ' as it were.
 
Maximum kudos to you, Chris. Thanks for taking the time to thoroughly document the whole process, that kind of write-up doesn't just happen in 5 minutes. What is even more impressive is that you have done all of this at the side of the road. I'm somewhat blessed by having a very large front driveway with power and water supplies readily to hand. You gave now got the paintwork looking totally boss but I suspect, like me, you will never stop searching for that Holy Grail of finishes. Fusso Coat, being a polyurethane-based sealant, is certainly delivering maximum reflectivity and longevity but I suspect you will feel happier if you apply a very light top-up coat every month. Resistance is futile ;)

Now that your paint is fully corrected, if you eventually get bored with the retina-searing gloss a sealant produces you could explore the world of carnauba-based waxes (or the naturally black montan-based waxes). Many owners, especially those with black cars love the slightly muted gloss it creates but in return substitutes a shimmering depth a mile deep that you could drown in. I've never bought into the higher end boutique wax market where the likes of Zymol Glasur or Pinnacle Souveran command prices over 3 figures. Red Ken is currently wearing Blackfire's Wet Ice Over Fire kit which keeps a foot in both the sealant and carnauba camps. It is not that common a product here in the UK but held in very high regard across the Pond.

BLACKFIRE Wet Ice Over Fire Kit

Looking forward to seeing some final reflection shots and perhaps some signature beading/sheeting photos. At this time of the year optimum lighting occurs at around 10.00 and 16.00 if you really want to guild the lily. Once again, well done mate. :thumb:

Trev.
 
Thanks Trev and thank you for the advice in the other thread, i was going to go about it a completly different way but your advice really helped clear things up. Like you i have never bought in the higher end of the market but what i love most about the finish is it didn't break the bank what so ever and the Nanotech polish i'm totally sold on!

It had very little splatter when using it and best of all no white residue, when i was actually using it it was very easy you felt like you could almost work it in forever. I'm sure if i had a covered area to work in like a garage i could have gone around the whole car and buffed up afterwards as it didn't want to dry just keep on polishing, being on the side of the road though i was working each panel and wiping AF quick detailer prior to polishing to remove any debris that might have settled and then buffing each as i went.

Fusso Coat - £21.95
Nanotech super gloss polish - £16.99
2 x Hex logic pads - £18.24 (£9.12 each)
BH Fallout remover - £12.93 - I have used several and this is by far the best for the price. It lasts for ages as you only need a light spray which covers well.
BH Clay bar - £9.95
Meq tar remover - £10 from halfords but i won't be getting this again i think i go for AF oblitarate which i have heard good things about.

Assuming you have every else like Snowfoam, Shampoo, a DA polisher (mine is just a challenge one from argos) and so on ... it is really amazing what you can achieve on a budget and being able to do it a few times over in the future.

I suspect you will feel happier if you apply a very light top-up coat every month. Resistance is futile ;)

i'm already itching to apply another coat and if we still had the long days i would have already and unlike some people i have a very weird ftish if you like about it raining after i have waxed the car as i almost look forward it so i can see it bead and see how well the wax holds up.

IMG_0582.JPG
Here's one i didn't put up. This is after the first pass with the DA notice the cool box i keep my bits in which also acts as a stool to sit on :cool:
 
Beautiful work my friend.

Gosh I love preventative measures when done to this extreme. Very nice.
 
I got caught in the heavy rain yesterday nipping to the post office.

Que beading shot.

IMG_0678.JPG IMG_0679.JPG IMG_0681.JPG

I really need to get better with a camera my photo skills are terrible. And today no rain in sight ...

IMG_0682.JPG
 
  • Like
Reactions: GLK
Hats off to you Chris.... that’s some dedication that you have shown there.

Shout up when you put her up for sale lol
 
Cracking job. The underside especially.
 

Users who are viewing this thread

Back
Top Bottom