Installation of Android Auto/Apple Carplay with COMAND NTG4.0

Page may contain affiliate links. Please see terms for details.

Borris1954

Active Member
Joined
Feb 4, 2013
Messages
414
Location
South Bucks
Car
S204 C 250 CGI BlueEFFICIENCY, R170 SLK 230, B 180d AMG Line
This afternoon I have commenced the installation of one these "Wireless Apple CarPlay Android Auto Ai Box for Mercedes-Benz C W204 2008-2010 NTG 4.0 Support Mirror Link Navigation AI Voice BT".

172.27£ 42% OFF|Navifly Wireless Apple Carplay Android Box For Mercedes Benz C W204( 2008-2010 ) Ntg 4.0 Support Android Auto Module Video Wifi - Car Multimedia Player - AliExpress

The install isn't finished as I haven't yet solved the issue of fitting everything back into the car with all those extra and bulky cables. Everybody seems to comment that this a bit of a PITA to complete but I'm sure given some time and patience that will get sorted.

Initial testing has thrown up two somewhat unexpected things, one good and one bad:
The good one was that as soon as I connected my Android phone to the boxes Bluetooth it connected almost instantly to Android Auto with no issues. I had expected this to require the cable connection as I had understood all these boxes needed a cable connection for Android and were only wireless for Apple Carplay.​
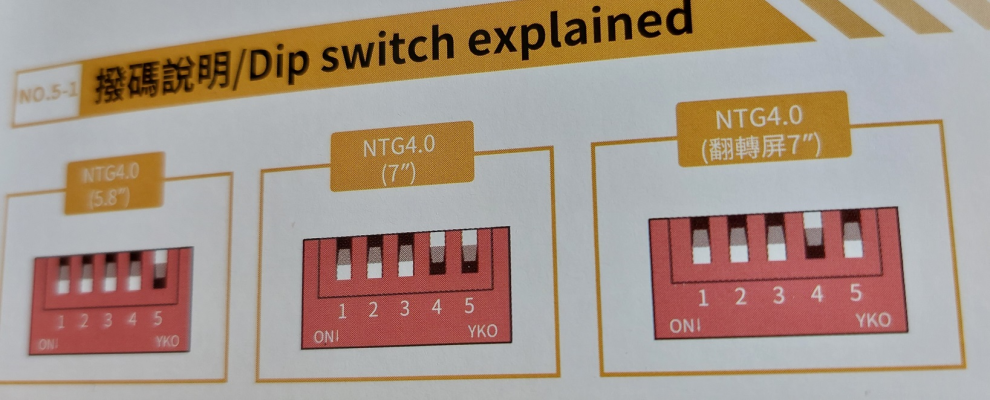
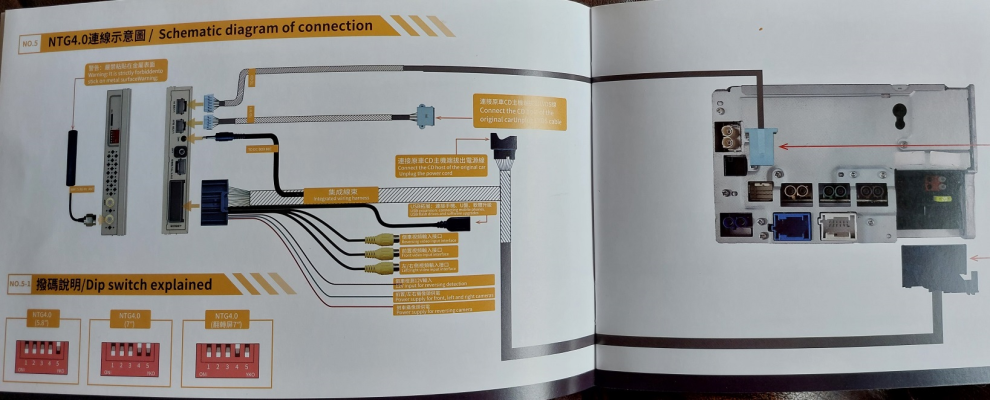
The bad one is that I have no audio at the moment. I have one cable in the main harness not yet connected to anything and it's the one with a 3.5mm jack plug (audio out?). Interestingly this cable doesn't appear on the wiring diagram in the box for NTG4.0. Also I thought that as my car had the factory media interface I just needed to unplug my iPod device and enable aux input and that would would link up the audio. Apparently not! I have tried the various combinations via the Engineering Menu in the HU:​
  • UCI installed, iPod unplugged, Aux audio on, Audio source to internal. Result no sound in Android Auto but sound from Radio when I switch back to original system
  • UCI installed, iPod unplugged, Aux audio on, Audio source to external. Result no sound in Android Auto and no sound from Radio when I switch back to original system
  • UCI Uninstalled, Aux audio on, Audio source to internal. Result no sound in Android Auto but sound from Radio when I switch back to original system
  • UCI Uninstalled, Aux audio on, Audio source to external. Result and no sound in Android Auto and no sound from Radio when I switch back to original system
I'm not sure but suspect you only need Audio source to external. If you have a "posh" sound system such as Harman Kardon.

I have ordered up a suitable cable to hook that surplus phono jack to the multi media socket in the glove box and will keep my fingers crossed that with UCI installed, Aux Audio on and Audio source to internal I get some sound.

Has anybody else had a similar experience and how did you sort it? Have I done something stupid or missed something obvious?

Thanks for reading.
 
BTW I have just tested that the internal microphone is working OK. There is another 3.5m jack plug at the "box" end of the new harness labelled MIC which goes into the MIC socket on the box (obviously!). Well when I select the microphone in Android Auto my words get picked up and put into text so that's all good.
 
Amazon came up with the goods and all now working as it should. I just need to put the car back together.
When I get time I will put together a short "Lessons Learned" in case it helps someone else. So far at least I am really impressed and especially as it works wirelessly for Android which I did not expect;.
 
Lessons Learned installing a LIMCET Apple Carplay / Android Auto Box with NTG4.0
  1. The large number of YouTube videos are a fantastic help in terms of getting the car apart and how to complete the installation work. However, do not assume everything you see will apply to your car and installation. For example if you have, as I did, the full media interface socket in the glove box and not just an aux input jack socket then there is no need to tinker with the Engineering Menu in the COMAND Head Unit. Just plug in the media interface to 3.5mm jack lead and use that as your Audio input from the new unit (I also needed a female to female adapter to connect two 3.5mm jack plugs). When you unplug a media device from the interface the Aux option in the Audio Menu will become enabled for selection. If you do have to change something in there make sure to take photos of each screen before you start making changes. This will help if you need to undo changes – turning MOST to OFF and then back on again can I believe make some other changes such as disabling the UCI media Interface and changing the Audio Source. Those YouTube videos that tell you to set the Audio Source to External are only correct if the source was originally External.
  2. Do not assume the documentation you have been sent is 100% correct! For example the connection schematic with mine (below) has no mention of a 3.5mm jack plug lead as part of the new harness yet that must be connected to the Aux Audio input socket to get sound.Connection Schematic.png
  3. Setting the DIP switch. The factory setting on the new box didn’t work for me. When I switched to the box the screen briefly displayed something and then turned off. This was a setting for a 7” screen and had switches 1,2,3 down and 4 and 5 up. The documentation showed another setting for 7” of 1,2,3,5 down and just 4 up – this one worked fine for me.DIP Switch Settings.png
  4. Putting the COMAND Head Unit back in is tricky. There are lots of wires and not much space. It took me 2 hours to get it sorted. Just take your time and don’t force anything just a firm pressure. I found that there were two main issues:
    • Where to put that “big lump” of a connector of the original COMAND main plug inserted in the corresponding female plug of the new harness. I found it could be pushed down into an opening at the rear right hand side below where the COMAND unit will be in its final position. You can tuck some of the wires from the plug down this opening and toward the front of the car. This will help keep the plugs located down in this space (above the Aircon Controls)
    • The thick cables were bunching up behind the rear left the COMAND as you push it backwards. If you pull the thick harness cable that you should have emerging into the passenger side upper footwell gently as you push the COMAND back in it will slide fully into position.
  5. Once you have the COMAND back in test everything thoroughly. Put the Aircon Vents back in and test again.
  6. Take care locating the new box up behind the glove box. I fixed it in place up high and as far back as I could get it (behind where the rear right glove box locating peg goes through a slotted bracket. I have temporarily secured the USB socket onto the top of the centre console just to the left of the ash tray with a 3M adhesive pad. The cable can be easily pushed behind the trim panel with a suitable plastic tool. When I get chance I want to move this so it emerges inside the ashtray itself.Box Location 2.pngUSB Port 2.png
  7. Refit the glove box with a couple of the screw to hold it AND THEN test everything again. I missed this step and spent ages getting all the glove box and remaining trim back only to find the screen no longer displayed the original COMAND system. It all had to come out again so I could plug in the cable that I had managed to pull out and not notice!
  8. Make sure you fully test the microphone is working. I had done this by making a test phone call. WRONG!!! This is not sufficient as this doesn’t test the connection to the MIC socket at all as it uses the original COMAND connections! You must test by selecting the microphone in Android Auto and checking your speech appears as text on the screen. So it was strip glovebox out again to find that in putting one plug back I had managed to half pull out the microphone jack! If I were doing it again I think I would use some strips of duct tape to ensure all plugs are held firmly in place.
  9. The following were noted during initial usage:
    • You need both COMAND and the new box “fully up” to see the reverse Camera image. If not you either see the COMAND Audio screen or connecting to Android device screen. Not a major issue as start-up and connection is pretty quick.
    • If when using Android auto you press the Radio button the sound source is switched to Radio and you hear the COMAND Radio and loose sound in Android Auto (so no navigation direction but you can still see the map etc). To revert just press the DISC Button and Aux Audio is reselected. This means if you are desperate to use the original radio you still can but at the price of no Android Auto sound or ability to change the radio station without reverting to the COMAND system (which is easily done). BUT a better solution is just to install an Android Radio streaming app on you Android phone and make sure it’s enabled in your Android Auto Launcher settings on the phone. I use the Radio UK app which gets all the Radio stations I want and more.
    • Presumably because of “Driver Distraction” legal requirements the somewhat annoying adverts that I see when using the Radio UK app on my phone just disappear when I use it in Android Auto. It’s great!
All in all I am very pleased with the final setup and functionality for a total cost of less than £180 probably one of the best add ons I have ever bought for a car. Even better than that first Eight Track…
 

Attachments

  • DIP Switch Settings.png
    DIP Switch Settings.png
    1.6 MB · Views: 3
  • Connection Schematic.png
    Connection Schematic.png
    1.3 MB · Views: 5
  • Like
Reactions: Ted
That’s a great writeup Boris 👍🏻👍🏻👍🏻
Should help a good few people.
 
Regarding your audio not working issue that you experienced, I believe if you enter engineering mode (think it's 'hang up', 1 and 'hash' on the car head unit for 10 seconds) disable MOST in the menu somewhere, enable 'Aux' in a different menu, then re enable MOST and make sure to save settings and not just turn it off, that it activates the aux input on the back of the head unit to which the CarPlay box is already connected via the harnesses, so no need for the 3.5mm adaptor. Might explain it being missing in the schematic diagram they sent you.

To view this content we will need your consent to set third party cookies.
For more detailed information, see our cookies page.

That said, I am working off my knowledge of NTG 4.5, not 4.0, so your solution may be the only one. It may also be only for COMAND units and not Audio 20 units.

Thought it might be worth exploring if the 3.5mm adaptor gets in the way.
 

Users who are viewing this thread

Back
Top Bottom