I've been doing this little job for the last few days and have decided to put it in it's own thread as opposed from clogging up various other places. It would normally have taken a day at the most but I had problems with running out of things, including patience and interest.
The car is a 2019 C217 AMG S63 with a relatively low mileage of around 1,000 so, in theory, it shouldn't need anything doing to it at all. However, we've all seen how the hubs/brake centres rust on these so I thought I'd get them done and out of the way as I can't use the car anyway in the current climate. This is not the first time I've done this job, I've done them on nearly everything I've owned over the last few years, but it does seem to be predominantly Mercedes that suffer the most for some reason.
I'm lucky in that I have a ramp in the garage so it makes the first part easy, which is removing the wheels. It makes it so much easier to remove them all at once as, once all the preparation is done, it's easy to just go round all four corners with the paint.
As I mentioned earlier, mine was in pretty good condition to start with but I've also managed to bring old rusty scabby things back to life with the same treatment, like this example when I had my 190E:
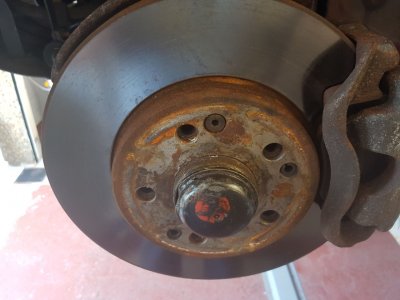
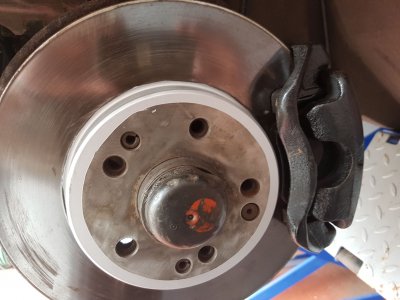
Worth a mention at this stage that before you remove the wheel use a scribe, or even a marker pen, to determine which bit of the hub it covers and what is on view. Doing it now takes the guesswork out of it later and gives you a good guide for the masking to come. I know that some people paint the lot, centres included, but this is not something I ever do due to wheel fitment and wanting to torque it back up afterwards correctly.
This was what I started with on the 217: -
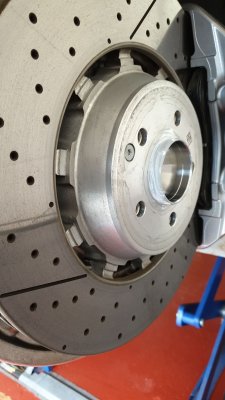
As you can see not too bad at all, so relatively light prepping required but worth taking a bit of time as it's not a job that should warrant doing twice. All I did was a light rub down with a green Scotch-Brite pad which gets all the muck off and keys the surface for paint. The ones above on the 190E were done with a strip and clean disc as they needed something a bit more aggressive. Now it's just a case of masking it up. This sounds simple but in effect is probably the most time consuming part of the job and is something which needs to be done properly. I always start with the centre of the disc and work outwards, covering everything which I don't want paint on. This used to be the brake caliper and hoses, bits of suspension etc but nowadays I tend to cover the complete car with a couple of dust sheets, then mask up to these using doubled up newspaper. Single tends to be porous. As mentioned earlier, this takes time but it saves having to go round all the car with a clay bar afterwards if any overspray does get on the bodywork or glass.
Hub masked and in it's first coat of paint: -
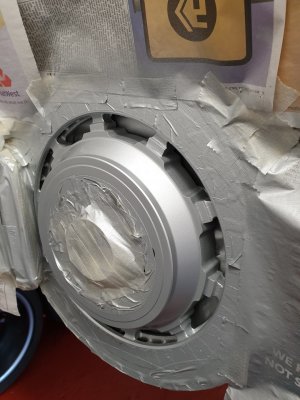
Front of car masked, rear and roof had the same treatment: -
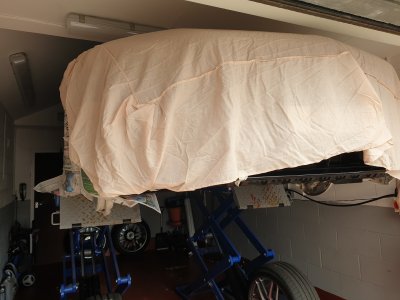
The paint I use is Hammerite Smooth Silver in an aerosol. I gave mine three coats, with several light coats working better than one heavy one. I've tried brushing but never get the desired finish that way as I'm basically useless and impatient. I've been told by a few people that Hammerite is unsuitable for brakes but it's never let me down yet, even on my old 900bhp Taxi which used to be braked hard from well over twice the legal speed limit until we came close to running out of runway so I'm going to stick with it.
Finished product: -
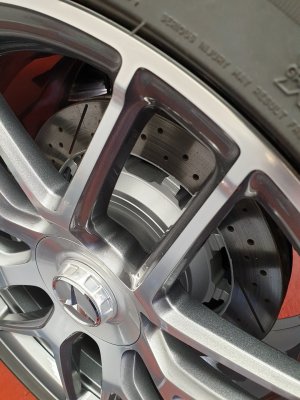
Unfortunately I forgot to take pictures of the finished job before I put the wheels back on but you can at least see how they look through this one. Not a perfect finish but a lot better than they were and they should hopefully now last for many months.
Time taken: Approximately 4 hours, most of which was spent masking up.
Cost: Maximum £20, I used one tin of paint and 2 partial rolls of masking tape (25mm + 50mm). Oh, and one sheet of Scotch-Brite.
The car is a 2019 C217 AMG S63 with a relatively low mileage of around 1,000 so, in theory, it shouldn't need anything doing to it at all. However, we've all seen how the hubs/brake centres rust on these so I thought I'd get them done and out of the way as I can't use the car anyway in the current climate. This is not the first time I've done this job, I've done them on nearly everything I've owned over the last few years, but it does seem to be predominantly Mercedes that suffer the most for some reason.
I'm lucky in that I have a ramp in the garage so it makes the first part easy, which is removing the wheels. It makes it so much easier to remove them all at once as, once all the preparation is done, it's easy to just go round all four corners with the paint.
As I mentioned earlier, mine was in pretty good condition to start with but I've also managed to bring old rusty scabby things back to life with the same treatment, like this example when I had my 190E:


Worth a mention at this stage that before you remove the wheel use a scribe, or even a marker pen, to determine which bit of the hub it covers and what is on view. Doing it now takes the guesswork out of it later and gives you a good guide for the masking to come. I know that some people paint the lot, centres included, but this is not something I ever do due to wheel fitment and wanting to torque it back up afterwards correctly.
This was what I started with on the 217: -

As you can see not too bad at all, so relatively light prepping required but worth taking a bit of time as it's not a job that should warrant doing twice. All I did was a light rub down with a green Scotch-Brite pad which gets all the muck off and keys the surface for paint. The ones above on the 190E were done with a strip and clean disc as they needed something a bit more aggressive. Now it's just a case of masking it up. This sounds simple but in effect is probably the most time consuming part of the job and is something which needs to be done properly. I always start with the centre of the disc and work outwards, covering everything which I don't want paint on. This used to be the brake caliper and hoses, bits of suspension etc but nowadays I tend to cover the complete car with a couple of dust sheets, then mask up to these using doubled up newspaper. Single tends to be porous. As mentioned earlier, this takes time but it saves having to go round all the car with a clay bar afterwards if any overspray does get on the bodywork or glass.
Hub masked and in it's first coat of paint: -

Front of car masked, rear and roof had the same treatment: -

The paint I use is Hammerite Smooth Silver in an aerosol. I gave mine three coats, with several light coats working better than one heavy one. I've tried brushing but never get the desired finish that way as I'm basically useless and impatient. I've been told by a few people that Hammerite is unsuitable for brakes but it's never let me down yet, even on my old 900bhp Taxi which used to be braked hard from well over twice the legal speed limit until we came close to running out of runway so I'm going to stick with it.
Finished product: -

Unfortunately I forgot to take pictures of the finished job before I put the wheels back on but you can at least see how they look through this one. Not a perfect finish but a lot better than they were and they should hopefully now last for many months.
Time taken: Approximately 4 hours, most of which was spent masking up.
Cost: Maximum £20, I used one tin of paint and 2 partial rolls of masking tape (25mm + 50mm). Oh, and one sheet of Scotch-Brite.


