Ingarageagain
New Member
I thought I'd post my findings after my recent dpf clean experience -
If I can do it myself I usually will. I draw the line at plastering unless shabby chic finish is what's required") So when P2463 (soot accumulation) arrived I decided I'm going to get all over this. I had a beemer 330d some years ago and had the dpf removed and mapped but never got used to the smell around the car. And sooty tailpipes/rear bumper also annoying - but hey each to their own. Just spare a thought for the environment eh?
So when P2463 (soot accumulation) arrived I decided I'm going to get all over this. I had a beemer 330d some years ago and had the dpf removed and mapped but never got used to the smell around the car. And sooty tailpipes/rear bumper also annoying - but hey each to their own. Just spare a thought for the environment eh?
I know two scan tools pictured here - I like to reference against each other sometimes - and the only pics I could find") The icarsoft a recent addition which suits my needs but a long way from what vcds is for VAG cars and obviously Star for MB. It will have to do for now.
The icarsoft a recent addition which suits my needs but a long way from what vcds is for VAG cars and obviously Star for MB. It will have to do for now.
Note at idle the differential pressure sensor is sitting at 61hPa - hector pascals = millibars. The B60 EG Pressure sensor measures absolute pressure. So with engine off would show ~1bar depending on the weather/altitude


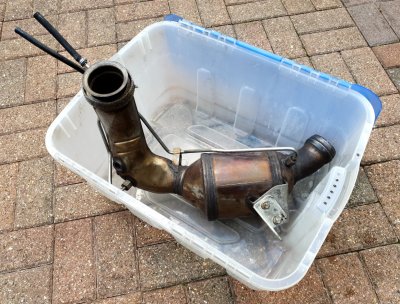
Up the ramps in the garage and off come the Cat from above and the dpf from below without too much drama. Taking my time probably a couple of hours to get to this stage.


I did a bit of research on how best to clean and then just did it my own way! PPE required - Goggles, face mask, nitrile gloves.
1. Tipped a kettle full of boiling water into the 'exit' end - i.e Not the end pointing up!
2. Used a cold water jetwash to follow the hot water through ( hot water pressure washer would no doubt be better)
3. Repeat with the boiled kettle two more times until the water starts to become clear.


4. Screwfix - Heavy duty degreaser = 1 litre at a time (x 3) followed through with the jetwash each time again. The last 2 litres I let soak in the dpf for 2 hours. Before emptying picked up and shook from side to side for about 5 minutes - Follwed but a final jetwash. A good core exercise.
5. Homebase - Caustic soda granules - Make the solution in a container so that the body of the dpf is completely submerged. Leave overnight. Flush out with the jetwash next day.
The amount a black gunk and solids removed though the whole process was quite something. I found directing the jetwash at different angles was effective at removing the last remains.
Also while it was off I blasted the cat, again from the exhaust side but only with fresh cold water and also from some distance - this didn't take long to clear at all but still a significant amount of soot removed.
The only parts I had to buy was the cat to turbo flange gasket and the crushable seal between the cat and the dpf both parts ~£15
Cat to DPF SEAL - MA220 492 02 81
CAT to Turbo gasket MA219 492 00 80
Apologies for not reading out this screen 'before' (was still finding my way around the scantool) but hopefully this shows all is good.
After - Faults clear - 7 millibar differential pressure at idle - performance now astonishing!

Btw, I have mileage at 124K having only put 14K on myself since owning from last year. I change the engine oil every 6K - Shell Helix Ultra Professional AF SAE 5W30 with Slik50 synthetic
Hopefully of some interest to someone thinking of doing the same.
If I can do it myself I usually will. I draw the line at plastering unless shabby chic finish is what's required
So when P2463 (soot accumulation) arrived I decided I'm going to get all over this. I had a beemer 330d some years ago and had the dpf removed and mapped but never got used to the smell around the car. And sooty tailpipes/rear bumper also annoying - but hey each to their own. Just spare a thought for the environment eh?I know two scan tools pictured here - I like to reference against each other sometimes - and the only pics I could find
The icarsoft a recent addition which suits my needs but a long way from what vcds is for VAG cars and obviously Star for MB. It will have to do for now.Note at idle the differential pressure sensor is sitting at 61hPa - hector pascals = millibars. The B60 EG Pressure sensor measures absolute pressure. So with engine off would show ~1bar depending on the weather/altitude
Up the ramps in the garage and off come the Cat from above and the dpf from below without too much drama. Taking my time probably a couple of hours to get to this stage.
I did a bit of research on how best to clean and then just did it my own way! PPE required - Goggles, face mask, nitrile gloves.
1. Tipped a kettle full of boiling water into the 'exit' end - i.e Not the end pointing up!
2. Used a cold water jetwash to follow the hot water through ( hot water pressure washer would no doubt be better)
3. Repeat with the boiled kettle two more times until the water starts to become clear.
4. Screwfix - Heavy duty degreaser = 1 litre at a time (x 3) followed through with the jetwash each time again. The last 2 litres I let soak in the dpf for 2 hours. Before emptying picked up and shook from side to side for about 5 minutes - Follwed but a final jetwash. A good core exercise.
5. Homebase - Caustic soda granules - Make the solution in a container so that the body of the dpf is completely submerged. Leave overnight. Flush out with the jetwash next day.
The amount a black gunk and solids removed though the whole process was quite something. I found directing the jetwash at different angles was effective at removing the last remains.
Also while it was off I blasted the cat, again from the exhaust side but only with fresh cold water and also from some distance - this didn't take long to clear at all but still a significant amount of soot removed.
The only parts I had to buy was the cat to turbo flange gasket and the crushable seal between the cat and the dpf both parts ~£15
Cat to DPF SEAL - MA220 492 02 81
CAT to Turbo gasket MA219 492 00 80
Apologies for not reading out this screen 'before' (was still finding my way around the scantool) but hopefully this shows all is good.
After - Faults clear - 7 millibar differential pressure at idle - performance now astonishing!
Btw, I have mileage at 124K having only put 14K on myself since owning from last year. I change the engine oil every 6K - Shell Helix Ultra Professional AF SAE 5W30 with Slik50 synthetic
Hopefully of some interest to someone thinking of doing the same.