Navigation
Install the app
How to install the app on iOS
Follow along with the video below to see how to install our site as a web app on your home screen.
Note: This feature may not be available in some browsers.
More options
You are using an out of date browser. It may not display this or other websites correctly.
You should upgrade or use an alternative browser.
You should upgrade or use an alternative browser.
Switched 12v supply in front of vehicle
- Thread starter omega1
- Start date
m80
MB Enthusiast
- Joined
- Apr 26, 2015
- Messages
- 6,413
- Location
- Derbyshire, High Peak
- Car
- Viano ex long, 651 2014. S211 646 2009 (till the Gov't drones blow 'em off the road)
Usually picked up from the front fag lighter if you have one.
But not in N America.
But not in N America.
OP
OP
omega1
Active Member
Do you remember which Fuse? ThanksHad to run my w204 from the boot, it was a pain, but worth it.
I use an OBD power adapter with built in switch.
That way I can choose between ignition or permanent live, useful if you want use parking mode on dashcam occasionally.
That way I can choose between ignition or permanent live, useful if you want use parking mode on dashcam occasionally.
 see photo
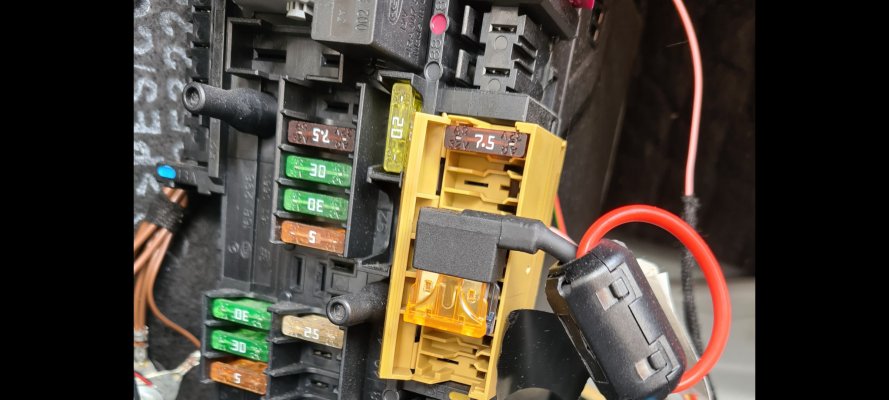
geoffus
MB Enthusiast
- Joined
- Apr 2, 2020
- Messages
- 1,512
- Location
- Burbage
- Car
- E250 AMG Sport Convertible, B200, Yamaha YZF R1, Suzuki 650 Bandit.
Just doing mine again this morning, taking the feed from the interior light cluster and using screened cable.
Originally took it from the cigarette lighter with basic cable but got a lot of radio interference, especially on DAB.
Originally took it from the cigarette lighter with basic cable but got a lot of radio interference, especially on DAB.
OP
OP
omega1
Active Member
As in the light cluster above the rear view mirror? Is there a switched supply there? Do you have more info? Thanks.Just doing mine again this morning, taking the feed from the interior light cluster and using screened cable.
Originally took it from the cigarette lighter with basic cable but got a lot of radio interference, especially on DAB.
geoffus
MB Enthusiast
- Joined
- Apr 2, 2020
- Messages
- 1,512
- Location
- Burbage
- Car
- E250 AMG Sport Convertible, B200, Yamaha YZF R1, Suzuki 650 Bandit.
Yes that's the one.As in the light cluster above the rear view mirror? Is there a switched supply there? Do you have more info? Thanks.

Prize down the cluster and I found a Blue/red wire in the blue connector that is switched live.
Use a suitable brown one for the earth.

Connect this to a 12v to 5v stepdown module via an inline fuse. like this

12V to 5V Power Adapter DC Converter Connector Car Motor 3A Charger UK | eBay
The 12-28V DC input and 5V-DC output Connections are the Wrong Way Around. Output: 5V DC. Input: 12V DC – 28V DC. Light compact, convenient to use and transport. The label is incorrect or you are inserting the main PCB board back to front.
www.ebay.co.uk
Use screened cable to minimise any radio interference. likethis.

NextBase InCarCam 412GW & 402G Dash Cam REPLACEMENT USB CABLE/LEAD 8944721083725 | eBay
Find many great new & used options and get the best deals for NextBase InCarCam 412GW & 402G Dash Cam REPLACEMENT USB CABLE/LEAD at the best online prices at eBay! Free delivery for many products.
www.ebay.co.uk
Job done.

I cut off the USB plug from the lead, soldered the red and black wires to the blue/red and brown car wires. then heat shrunk all the connections. As soon as the car is unlocked the camera comes on, when locked the camera goes of after couple of seconds.
OP
OP
omega1
Active Member
Awesome! Thanks so much, already have the bits so will get onto that. Really didn't want to route a cable to the back (again!)Yes that's the one.
View attachment 116101
Prize down the cluster and I found a Blue/red wire in the blue connector that is switched live.
Use a suitable brown one for the earth.
View attachment 116102
Connect this to a 12v to 5v stepdown module via an inline fuse. like this
12V to 5V Power Adapter DC Converter Connector Car Motor 3A Charger UK | eBay
The 12-28V DC input and 5V-DC output Connections are the Wrong Way Around. Output: 5V DC. Input: 12V DC – 28V DC. Light compact, convenient to use and transport. The label is incorrect or you are inserting the main PCB board back to front.www.ebay.co.uk
Use screened cable to minimise any radio interference. likethis.
NextBase InCarCam 412GW & 402G Dash Cam REPLACEMENT USB CABLE/LEAD 8944721083725 | eBay
Find many great new & used options and get the best deals for NextBase InCarCam 412GW & 402G Dash Cam REPLACEMENT USB CABLE/LEAD at the best online prices at eBay! Free delivery for many products.www.ebay.co.uk
Job done.
View attachment 116103
I cut off the USB plug from the lead, soldered the red and black wires to the blue/red and brown car wires. then heat shrunk all the connections. As soon as the car is unlocked the camera comes on, when locked the camera goes of after couple of seconds.
Thanks again.
OP
OP
omega1
Active Member
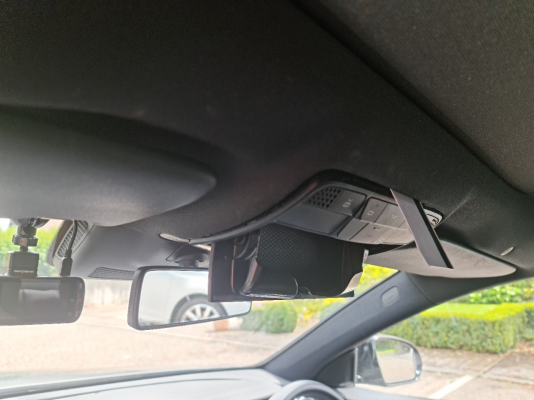
@geoffus Quick question if I may, how did you get the console to come out? I read that you have to push a card up and it pops out, but mine seems really stiff and I feel I'm going to break it, it 'did' come out slightly, but only on one side.
Any tricks or tips?
I watched this but mine really doesn't pop out like that
Thanks!
Any tricks or tips?
I watched this but mine really doesn't pop out like that
Thanks!
Attachments
Last edited:
geoffus
MB Enthusiast
- Joined
- Apr 2, 2020
- Messages
- 1,512
- Location
- Burbage
- Car
- E250 AMG Sport Convertible, B200, Yamaha YZF R1, Suzuki 650 Bandit.
@geoffus Quick question if I may, how did you get the console to come out? I read that you have to push a card up and it pops out, but mine seems really stiff and I feel I'm going to break it, it 'did' come out slightly, but only on one side.
Any tricks or tips?
I watched this but mine really doesn't pop out like that
Thanks!
On mine there are 2 clips that need to be prized back to release the console, it hinges at the back, I used a steel ruler it takes a fair bit of pressure to release it.

OP
OP
omega1
Active Member
Thank you sir, will have another go today!On mine there are 2 clips that need to be prized back to release the console, it hinges at the back, I used a steel ruler it takes a fair bit of pressure to release it.
View attachment 116150


Users who are viewing this thread
Total: 1 (members: 0, guests: 1)
Similar threads
- Replies
- 4
- Views
- 178