farhanali89
Active Member
- Joined
- Oct 28, 2015
- Messages
- 71
- Car
- C63 AMG PPP 2013
Just thought i would contribute on my findings when removing the front and rear diffusers for a facelift C63. Guides across the forums tend to lean more towards the pre-facelift or facelift cars which use slightly different bolt configurations so hopefully this is helpful and relevant. Pictures were to a minimum but hopefully best explains the method i took.
Rear Diffuser:
Notes: Rear diffuser is held on the corners by 2 rivets which are extremely difficult to remove. You will need the following tools:
Dremel with a drill bit (Drill bit sizes 3/3.5/4 any of these sizes should be fine), If you do not own a dremel a regular hand drill which is small enough should suffice providing the drill bit is fairly long to reach to the rivet, Standard size drill bits are fine just lock them in slightly longer into the drill.
Diagonal cutting pliers
10mm Socket & Ratchet Set
WD40
Small needle nose pliers
Goggles (Safety when drilling/snipping the rivet)
Trolley Jack/Axle Stands (I did not need these as i was able to lay on the ground and access everything without, My Performance pack car is high enough to get my head under quite comfortably so other models which are standard height shouldn't be a problem)
Step Drill Bit (Cuts clean holes especially for Carbon Fibre parts or when fitting parking sensors into bumpers)
Hand File (Used to file away any burrs/ uneven edges on the new CF lip.)
Cable Ties
Removal:
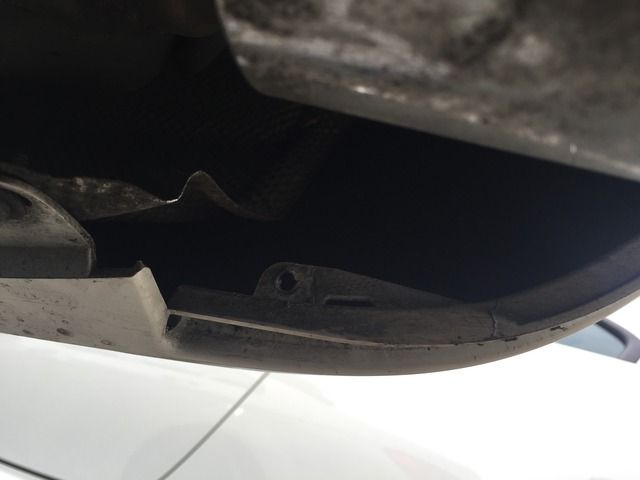
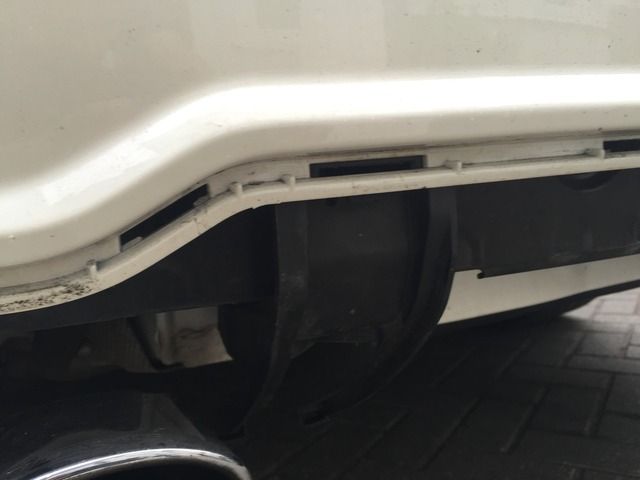
1. Look under the rear bumper on the corners next to each of the tail pipes, You will be able to see a rivet on each side of the car. The Rivet holds the diffuser to the bumper. (Picture below shows a torx screw but our cars will have a rivet in that same location)

2. Carefully push the bumper outwards to allow you more room to work with, It may be handy to have a helper slightly pull outwards from underneath to give you better stability when holding the dremel/drill.
3. Begin drilling the rivet, To play this safe i drilled down the centre but did not punch through the rivet, These rivets are evil and the risk of going through the rivets and out the bumper is a strong possibility. You only want to drill enough to loosen the rivets so it moves around but is still in place. We are only breaking the tension to be safe.
4. Once the rivet is slightly loose continue pulling the bumper outwards and take your cutting pliers and snip the head of the rivet. This is difficult to do but if the rivet has been loosened enough you should be able to catch it enough to cut through. Each time you snip a corner, Take your needle nose pliers and spin the rivet to then cut the next part of the rivet head. Slowly work your way round continuing to spin and snip the head. Eventually the rivet will weaken enough, You can then take a thin flat head and fold the snipped head of the rivet to push it through completely, As you work round the head of the rivet and cut away you will notice some metal pieces flying off which helps break it free. Rivet removed in photo below.
5. Once done complete the other side in exactly the same way.
6. Now the hard part is done look under the centre of the diffuser, Look underneath the centre section of the diffuser and you will see two brackets supporting the diffuser, The diffuser slides into this bracket. Use some WD40 to ease the removal of the diffuser from the bracket slide in tabs at the bottom Push the diffuser outwards and it should come away from the bracket.
Close up of brackets
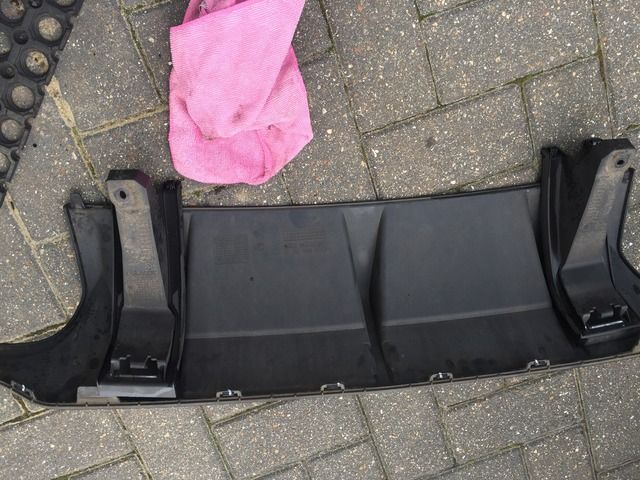
7. Underneath on the brackets will also be 2 x 10mm socket bolts which need to be removed, Remove these.
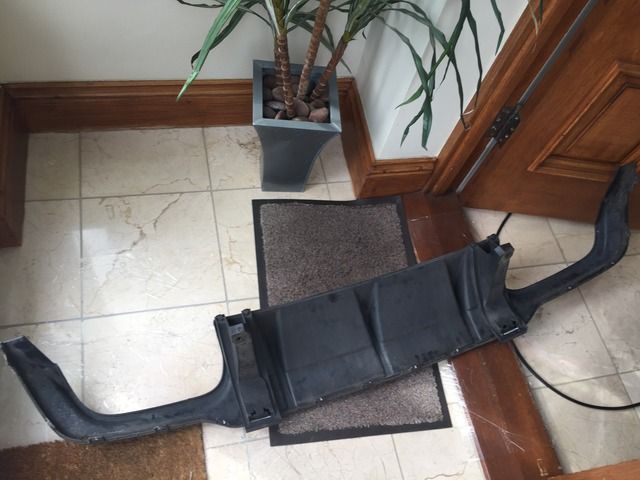
8. The diffuser is now unbolted and can be pulled out, Starting from either edge start tugging away at the diffuser. Mine came away fairly easily but start from an edge and slowly work your way round pulling the diffuser outwards. As you get to the centre it may get difficult but carry on carefully pulling away and it should break free. On my car the brackets dropped out once i removed it but you can leave the bracket bolts in whilst you tug away at it. If you are finding it difficult from the get go from under the car on the visible tabs spray some WD40, This seems to aid removal and allows them to slide out a lot easier. Be sure to wipe this down once removed.
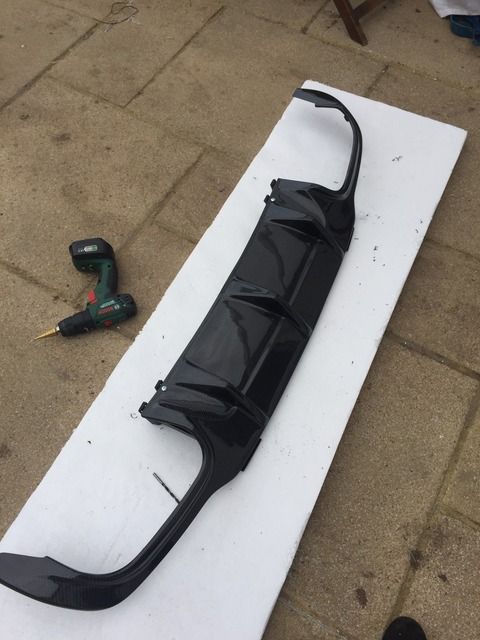
9. Fitting the carbon diffuser took a bit of work, Quality of the lip i ordered was good but no fixings were provided, Luckily i was able to use the original brackets. I used the OEM lip as a comparison and drilled a clean hole on the corner raised tabs similar to the stock one (the area we removed the rivet) I drilled this hole large enough to accommodate a bit of play and movement by using the step drill bit.
10. I then heated up the upper tabs of the OEM brackets and pushed the tab slightly in to accommodate the carbon diffusers larger tab. I also took a file to file any never inner edges on the tabs to get a better fitment as there were some protruding raises which may cause fitment issues. This is precautionary as i didn't want these raised edges to damage the paint when fitting this diffuser to the car.

8. I left a fair bit of play in the tabs to help accommodate when fitting the diffuser back. I then took the step drill, Fitting the brackets over the CF diffusers tabs to get a mark. I managed to find the lowest point to drill through the bracket and then the lip on the lowest edge to use a Nut & Bolt to fix the bracket to the diffuser. (My diffuser did not come with the slide in part for the brackets) Please refer to photos of this step, I drilled the brackets off the diffuser then marked with a pencil on the underside of the diffuser. I then took the step drill and made a hole on the CF diffuser. Drill from the inside, Once a small hole has been made then drill from the outside using the step drill and it will cut a nice clean hole. Large enough on both bracket and diffuser to accommodate a bolt.
9. Test fit the brackets to the diffuser and adjust as necessary. I used a generic bolt which i don't have sizes on but i know the length of the bolt needs to be a minimum of around 3cm to go through the diffuser and the bracket for you to place a nut on. The metric size of the bolt is up to you. Please note i have not left the silver screws/bolts on these have been changed to black. Didn't have black bolts at the time but once the diffuser is fitted these cannot be seen.
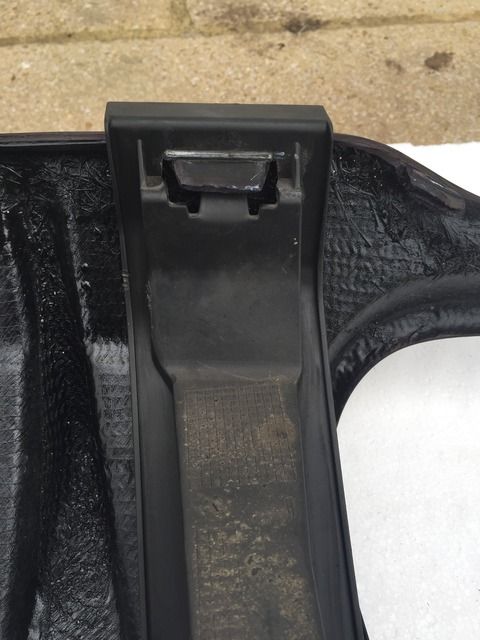
10. Take the brackets and head back to the car to fit the brackets back first, You will need to ensure the slot tabs line, Screw the brackets back into place and adjust to line the holes as you tighten as shown below.
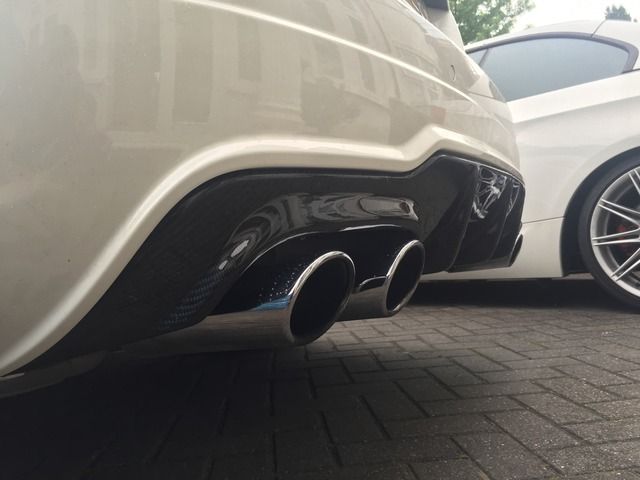
11. Take the CF diffuser and begin push it into place, This was slightly difficult as the carbon is extremely rigid and again fitment was not pin point. Heating the tabs may help but i managed to push the diffuser in on a majority of the tabs, Some possibly fell short but the diffuser slotted in and was a tight fit. Ensure you test fit first and line it up evenly as removing carbon always runs the risk of cracking it.
12. Once done being to push in on the diffuser and it should pop into place, Mine didn't pop into place but wedged in instead as the tabs were large on the CF diffuser (This is where the hand file would have also come in handy)
13. Get underneath the car again and adjust the brackets to line up to the holes in your diffuser and begin to bolt the brackets to the diffuser. Tighten the brackets to the car and tighten the diffuser to the bracket (Moderately tight as you risk cracking the diffuser)
14. Finally for the corners where the rivets were, I used cable and tightend the cable tie enough to hold firmly, Ensure you place the locking portion of the cable tie up top incase if you ever need to remove the diffuser it is easy to just take the cutting pliers and snip the cable tie.
I know some may ask why i used a cable tie and not a nut and bolt, This is simply because i have bolted the centre portion of the diffuser, It is tightened down and also pushed into the the clips of the bumper. Placing a nut and a bolt in the corners will be very difficult to do and also difficult to remove in the future. The nuts and bolts will be hard to get on with the minimum access in that area and also as the car gets older these are likely to rust which makes removal later more difficult!
Hope this guide is helpful, I will do a write up on the removal of the front lip shortly!
Rear Diffuser:
Notes: Rear diffuser is held on the corners by 2 rivets which are extremely difficult to remove. You will need the following tools:
Dremel with a drill bit (Drill bit sizes 3/3.5/4 any of these sizes should be fine), If you do not own a dremel a regular hand drill which is small enough should suffice providing the drill bit is fairly long to reach to the rivet, Standard size drill bits are fine just lock them in slightly longer into the drill.
Diagonal cutting pliers
10mm Socket & Ratchet Set
WD40
Small needle nose pliers
Goggles (Safety when drilling/snipping the rivet)
Trolley Jack/Axle Stands (I did not need these as i was able to lay on the ground and access everything without, My Performance pack car is high enough to get my head under quite comfortably so other models which are standard height shouldn't be a problem)
Step Drill Bit (Cuts clean holes especially for Carbon Fibre parts or when fitting parking sensors into bumpers)
Hand File (Used to file away any burrs/ uneven edges on the new CF lip.)
Cable Ties
Removal:
1. Look under the rear bumper on the corners next to each of the tail pipes, You will be able to see a rivet on each side of the car. The Rivet holds the diffuser to the bumper. (Picture below shows a torx screw but our cars will have a rivet in that same location)
2. Carefully push the bumper outwards to allow you more room to work with, It may be handy to have a helper slightly pull outwards from underneath to give you better stability when holding the dremel/drill.
3. Begin drilling the rivet, To play this safe i drilled down the centre but did not punch through the rivet, These rivets are evil
and the risk of going through the rivets and out the bumper is a strong possibility. You only want to drill enough to loosen the rivets so it moves around but is still in place. We are only breaking the tension to be safe. 4. Once the rivet is slightly loose continue pulling the bumper outwards and take your cutting pliers and snip the head of the rivet. This is difficult to do but if the rivet has been loosened enough you should be able to catch it enough to cut through. Each time you snip a corner, Take your needle nose pliers and spin the rivet to then cut the next part of the rivet head. Slowly work your way round continuing to spin and snip the head. Eventually the rivet will weaken enough, You can then take a thin flat head and fold the snipped head of the rivet to push it through completely, As you work round the head of the rivet and cut away you will notice some metal pieces flying off which helps break it free. Rivet removed in photo below.
5. Once done complete the other side in exactly the same way.
6. Now the hard part is done look under the centre of the diffuser, Look underneath the centre section of the diffuser and you will see two brackets supporting the diffuser, The diffuser slides into this bracket. Use some WD40 to ease the removal of the diffuser from the bracket slide in tabs at the bottom Push the diffuser outwards and it should come away from the bracket.
Close up of brackets
7. Underneath on the brackets will also be 2 x 10mm socket bolts which need to be removed, Remove these.
8. The diffuser is now unbolted and can be pulled out, Starting from either edge start tugging away at the diffuser. Mine came away fairly easily but start from an edge and slowly work your way round pulling the diffuser outwards. As you get to the centre it may get difficult but carry on carefully pulling away and it should break free. On my car the brackets dropped out once i removed it but you can leave the bracket bolts in whilst you tug away at it. If you are finding it difficult from the get go from under the car on the visible tabs spray some WD40, This seems to aid removal and allows them to slide out a lot easier. Be sure to wipe this down once removed.
9. Fitting the carbon diffuser took a bit of work, Quality of the lip i ordered was good but no fixings were provided, Luckily i was able to use the original brackets. I used the OEM lip as a comparison and drilled a clean hole on the corner raised tabs similar to the stock one (the area we removed the rivet) I drilled this hole large enough to accommodate a bit of play and movement by using the step drill bit.
10. I then heated up the upper tabs of the OEM brackets and pushed the tab slightly in to accommodate the carbon diffusers larger tab. I also took a file to file any never inner edges on the tabs to get a better fitment as there were some protruding raises which may cause fitment issues. This is precautionary as i didn't want these raised edges to damage the paint when fitting this diffuser to the car.
8. I left a fair bit of play in the tabs to help accommodate when fitting the diffuser back. I then took the step drill, Fitting the brackets over the CF diffusers tabs to get a mark. I managed to find the lowest point to drill through the bracket and then the lip on the lowest edge to use a Nut & Bolt to fix the bracket to the diffuser. (My diffuser did not come with the slide in part for the brackets) Please refer to photos of this step, I drilled the brackets off the diffuser then marked with a pencil on the underside of the diffuser. I then took the step drill and made a hole on the CF diffuser. Drill from the inside, Once a small hole has been made then drill from the outside using the step drill and it will cut a nice clean hole. Large enough on both bracket and diffuser to accommodate a bolt.
9. Test fit the brackets to the diffuser and adjust as necessary. I used a generic bolt which i don't have sizes on but i know the length of the bolt needs to be a minimum of around 3cm to go through the diffuser and the bracket for you to place a nut on. The metric size of the bolt is up to you. Please note i have not left the silver screws/bolts on these have been changed to black. Didn't have black bolts at the time but once the diffuser is fitted these cannot be seen.
10. Take the brackets and head back to the car to fit the brackets back first, You will need to ensure the slot tabs line, Screw the brackets back into place and adjust to line the holes as you tighten as shown below.
11. Take the CF diffuser and begin push it into place, This was slightly difficult as the carbon is extremely rigid and again fitment was not pin point. Heating the tabs may help but i managed to push the diffuser in on a majority of the tabs, Some possibly fell short but the diffuser slotted in and was a tight fit. Ensure you test fit first and line it up evenly as removing carbon always runs the risk of cracking it.
12. Once done being to push in on the diffuser and it should pop into place, Mine didn't pop into place but wedged in instead as the tabs were large on the CF diffuser (This is where the hand file would have also come in handy)
13. Get underneath the car again and adjust the brackets to line up to the holes in your diffuser and begin to bolt the brackets to the diffuser. Tighten the brackets to the car and tighten the diffuser to the bracket (Moderately tight as you risk cracking the diffuser)
14. Finally for the corners where the rivets were, I used cable and tightend the cable tie enough to hold firmly, Ensure you place the locking portion of the cable tie up top incase if you ever need to remove the diffuser it is easy to just take the cutting pliers and snip the cable tie.
I know some may ask why i used a cable tie and not a nut and bolt, This is simply because i have bolted the centre portion of the diffuser, It is tightened down and also pushed into the the clips of the bumper. Placing a nut and a bolt in the corners will be very difficult to do and also difficult to remove in the future. The nuts and bolts will be hard to get on with the minimum access in that area and also as the car gets older these are likely to rust which makes removal later more difficult!
Hope this guide is helpful, I will do a write up on the removal of the front lip shortly!
