• The Forums are now open to new registrations, adverts are also being de-tuned.

A bit for the roof? SL R230

mat8n

Banned
Joined
Dec 30, 2013
Messages
1,103
Location
Stokesley....ish
Car
Sl63,honda crf450x, BMW x3, vespa lx50v, Honda goldwing in bits!
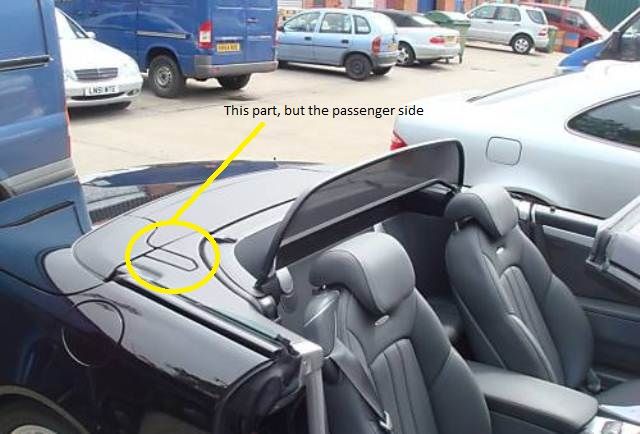
I'll try and explain the bit i'd like(i'm away and not near the car).

It's the little bit of plastic cover that is open when the roof is up but down when the roof is down, Its the little sort of d/p shaped piece of plastic(one on each side, but its my passenger side i'm after).

when the roof is up it sits against the roof mechanism and is held in place by a tiny spring, and when it is closed the spring keeps it shut.

My small plastic bit has broken where the tiny spring fits in so it flaps and flicks when the roof is up and flaps about when the roof is down.

I'll try and google for the part, but if anyone has any idea of what i'm talking about:crazy: and knows where i can get a new one, or even what the part is called!

Thanks
 
Its not the shape I thought, but it's this bit..
230-WDI-230_zpsqsraxf8t.jpg
 
Dealer only I imagine

Give your dealer parts dept a call, they'll know
 
I've just had a look on the American sites(where I imagine they have their roofs up and down more) and it's a common fault with an expensive repair!
I've found a diy fix that I think i'll do, it's invisible but stops you loosing the part but doesn't put the spring loaded effect back into it, i'll put up with a bit of tippity tapping rather than spend £200+ for a bit of plastic!
 
It's the whole panel that needs to be replaced - the flap isn't available on its own. What a surprise.

It would be worth getting the panel out now before it completely falls off & trying to reinforce the hinge & spring aspects
 
The SL has been with Star Motor Services to have a couple of jobs done that have been pending for a few months but given that I am off to Italy shortly for the Mille Miglia (including driving some Alpine Passes) they were best sorted.......especially the SRS light......I would like to be confident that the air bags will be deployed if required.

Ian replaced the yellow connectors under each seat with what are apparently upgraded modified connectors which seemingly are not obviously different from the originals. This is a known weakness with an MB driven solution.......no hand in the air with financial contribution though. Fourth time I have had to have the SRS lights ''extinguished''.
Anyway the important thing is that the SRS light is no longer glowing brightly and hopefully that means the air bags will work if needed.

The small near side ''flap'' that covers the hinge mechanism when the roof is down had broken off.......not an uncommon problem I believe. What happens (did to mine anyway) is that the female element of the hinge breaks, not part of the flap (that has the male element), which is part of the greater assembly.
The MB solution is to sell the full assembly including the hinge flab in the sum of circa £300/side (near side and off side)

Ian volunteered to do some ''DIY'' (I think my car was the guinea pig).
This involved, I think the full assembly had to be removed to do this as would have been the case for a replacement, using a dummy hinge pin which is probably about 1mm. diameter, apply a de-bonding agent such as copper grease and rebuild the female element of the hinge using some magic liquid plastic or similar that ''goes off'' almost instantly once ejected from its cartridge or whatever. Probably some fettling involved but female hinge assembly recreated.

The end result is not quite perfect and I think Ian was a little disappointed because the flap does not quite fully sit as snugly as it should.....sits proud by 2mm........it may of course settle with time.

Anyway.....well done Ian.......saved me circa £300 and no-one but Ian and myself knows that the fit is not quite perfect.

Now when the off side needs doing........

Mic
 
Sorry for bringing this up so far fwd.

Does anyone know a DIY fro replacing the entire trim area?

Many thanks
 
Any help on this will be greatly appreciated. Part is on order. I wonder if it is something that will become evident once I look at the part itself???
 
Hi everyone, I had a crack at this today and it is not too difficult at all.

You must remove the aluminium cap by the rear quater panel.

Pop the side panel ( not completely ) and with the center trim flap half open ( roof down, boot up ) then loosen a bolt ( not all the way! ) from the rear of the trim piece, and remove a torx self taper that is at the back of the trim piece and hidden by the centre flap.

The part is now only held by two trim fixings.

Assembly is the reverse order.

This might not be relevant now, but might help a member in teh future.

Worse part is the nearly £280.00 for the part!!!
 

Users who are viewing this thread

Back
Top Bottom