• The Forums are now open to new registrations, adverts are also being de-tuned.

Help Please W212 E350CDI OM642 Seprentine Auxiliary Belt Replacement

Thanks for the info - definitely a summer job.

Famous last words. Had a crack this afternoon/evening but had to stop as it was so utterly baltic out there, I couldn't carry on. Plus stuff was starting to freeze and stick.

Well, the first part of it's done.

The Gates kit fits fine. The part number relates to a 2035mm belt with 7 ribs. The old belt was a Merc original, Conti V-Tech.

I'm planning on doing the fuel filter and radiator whilst I'm at this, but for anyone attempting the aux belt and pulleys, I can advise the following procedure. Buy a 17mm 12-point 1/2" socket!!!

- remove engine cover and all plastic/air filter ducting and slam panel covers from front of engine, slam panel (use 10mm spanner for the front two 'hidden' bolts) and front undertrays.

- drain a decent amount of coolant so that you can remove the passenger/LHS coolant hose that connects to thermostat. Remove the hose.

- cut the zip ties holding the radiator fan wiring and unclip the radiator fan (connector can be reached easily from above and you pinch the release clips and move the connector downwards).

- undo one T20(ish) Torx bolt holding some transmission or PAS pipework to the bottom back of the radiator on driver's side, as I believe this also captures the fan.

- slide cooling fan up and out and marvel at having removed the coolant hose!

- now access to the auxiliary drive belt and pulleys/tensioners is straight forwards. Remove all the air charge piping. If you disconnect the intercooler hose at the passenger side, bottom, when you remove the resonator box, the piece of intercooler pipe still attached will come out with it.

- Use T50 torx/splined key to undo the idlers. E16 socket to remove the tensioner, but you will need to slip the belt off first using the 12 point 17mm socket and a breaker bar! You will find you need to remove a piece of cast aluminium over the crank pulley so you can actually remove the belt. It's only two small but long bolts. E10 I think.

- idlers only go on one way round. Roughly prise the caps off the old ones with a small screwdriver and chuck as you should have new caps. 25nm torque to do up.

- 35nm to do up the tensioner. Once installed, use a 5 or 6mm allen key to lock the tensioner into the service position. An assistant could be handy here for putting the allen key through the stop sleeve to achieve the service position lock out. The Gates tensioner looks identical to the Merc original, both actually made by Litens. At 113k miles, then tensioner pulley sounds very dry and I could imagine would have started rattling at some point. It sounds a bit like a bell when you spin it.

- Reassembly is in reverse. I haven't got to this yet, but remembering we cut off those zip ties for the fan wiring harness, it might be easier to disconnect the intercooler from resonator before it gets reattached, so there is room to add the zip ties and reach up to the fan connector from underneath.

As for my next trick, radiator removal. I'm having a pause, as it looks like transmission fluid lines go into the radiator, so I need to consider topping the ATF up once it's all reconnected. I don't know if I need or have a dipstick for that!
 
Last edited:
Famous last words. Had a crack this afternoon/evening but had to stop as it was so utterly baltic out there, I couldn't carry on. Plus stuff was starting to freeze and stick.

Well, the first part of it's done.

The Gates kit fits fine. The part number relates to a 2035mm belt with 7 ribs. The old belt was a Merc original, Conti V-Tech.

I'm planning on doing the fuel filter and radiator whilst I'm at this, but for anyone attempting the aux belt and pulleys, I can advise the following procedure. Buy a 17mm 12-point 1/2" socket!!!

- remove engine cover and all plastic/air filter ducting and slam panel covers from front of engine, slam panel (use 10mm spanner for the front two 'hidden' bolts) and front undertrays.

- drain a decent amount of coolant so that you can remove the passenger/LHS coolant hose that connects to thermostat. Remove the hose.

- cut the zip ties holding the radiator fan wiring and unclip the radiator fan (connector can be reached easily from above and you pinch the release clips and move the connector downwards).

- undo one T20(ish) Torx bolt holding some transmission or PAS pipework to the bottom back of the radiator on driver's side, as I believe this also captures the fan.

- slide cooling fan up and out and marvel at having removed the coolant hose!

- now access to the auxiliary drive belt and pulleys/tensioners is straight forwards. Remove all the air charge piping. If you disconnect the intercooler hose at the passenger side, bottom, when you remove the resonator box, the piece of intercooler pipe still attached will come out with it.

- Use T50 torx/splined key to undo the idlers. E16 socket to remove the tensioner, but you will need to slip the belt off first using the 12 point 17mm socket and a breaker bar! You will find you need to remove a piece of cast aluminium over the crank pulley so you can actually remove the belt. It's only two small but long bolts. E10 I think.

- idlers only go on one way round. Roughly prise the caps off the old ones with a small screwdriver and chuck as you should have new caps. 25nm torque to do up.

- 35nm to do up the tensioner. Once installed, use a 5 or 6mm allen key to lock the tensioner into the service position. An assistant could be handy here for putting the allen key through the stop sleeve to achieve the service position lock out. The Gates tensioner looks identical to the Merc original, both actually made by Litens. At 113k miles, then tensioner pulley sounds very dry and I could imagine would have started rattling at some point. It sounds a bit like a bell when you spin it.

- Reassembly is in reverse. I haven't got to this yet, but remembering we cut off those zip ties for the fan wiring harness, it might be easier to disconnect the intercooler from resonator before it gets reattached, so there is room to add the zip ties and reach up to the fan connector from underneath.

As for my next trick, radiator removal. I'm having a pause, as it looks like transmission fluid lines go into the radiator, so I need to consider topping the ATF up once it's all reconnected. I don't know if I need or have a dipstick for that!
Wow did it take 4 years to change the belt? 😆

Yeah removing th fan is the worst of it.

That far in is a £500+ job.
 
I know, it's been on the back burner for 4 years, I can't believe it!
Still, a perfectly manageable job for the DIYer, even if it is a bit time consuming.
Yeah you might as well pull the throttle and EGR assembly out for cleaning at this point. Can give a hand if you're near London
 
Yeah you might as well pull the throttle and EGR assembly out for cleaning at this point. Can give a hand if you're near London
That's really kind, but I'm miles away unfortunately.

I have considered the EGR, but it looks like a right mission to get to it and remove it on this engine, so I've not been brave enough yet!
 
That's really kind, but I'm miles away unfortunately.

I have considered the EGR, but it looks like a right mission to get to it and remove it on this engine, so I've not been brave enough yet!
Nothing goes wrong with the EGR valve at the back. It's the diverter assembly in front of the engine that clogs up. Some hidden bolts, but now is the best time to do it...
 
Famous last words. Had a crack this afternoon/evening but had to stop as it was so utterly baltic out there, I couldn't carry on. Plus stuff was starting to freeze and stick.

Well, the first part of it's done.

The Gates kit fits fine. The part number relates to a 2035mm belt with 7 ribs. The old belt was a Merc original, Conti V-Tech.

I'm planning on doing the fuel filter and radiator whilst I'm at this, but for anyone attempting the aux belt and pulleys, I can advise the following procedure. Buy a 17mm 12-point 1/2" socket!!!

- remove engine cover and all plastic/air filter ducting and slam panel covers from front of engine, slam panel (use 10mm spanner for the front two 'hidden' bolts) and front undertrays.

- drain a decent amount of coolant so that you can remove the passenger/LHS coolant hose that connects to thermostat. Remove the hose.

- cut the zip ties holding the radiator fan wiring and unclip the radiator fan (connector can be reached easily from above and you pinch the release clips and move the connector downwards).

- undo one T20(ish) Torx bolt holding some transmission or PAS pipework to the bottom back of the radiator on driver's side, as I believe this also captures the fan.

- slide cooling fan up and out and marvel at having removed the coolant hose!

- now access to the auxiliary drive belt and pulleys/tensioners is straight forwards. Remove all the air charge piping. If you disconnect the intercooler hose at the passenger side, bottom, when you remove the resonator box, the piece of intercooler pipe still attached will come out with it.

- Use T50 torx/splined key to undo the idlers. E16 socket to remove the tensioner, but you will need to slip the belt off first using the 12 point 17mm socket and a breaker bar! You will find you need to remove a piece of cast aluminium over the crank pulley so you can actually remove the belt. It's only two small but long bolts. E10 I think.

- idlers only go on one way round. Roughly prise the caps off the old ones with a small screwdriver and chuck as you should have new caps. 25nm torque to do up.

- 35nm to do up the tensioner. Once installed, use a 5 or 6mm allen key to lock the tensioner into the service position. An assistant could be handy here for putting the allen key through the stop sleeve to achieve the service position lock out. The Gates tensioner looks identical to the Merc original, both actually made by Litens. At 113k miles, then tensioner pulley sounds very dry and I could imagine would have started rattling at some point. It sounds a bit like a bell when you spin it.

- Reassembly is in reverse. I haven't got to this yet, but remembering we cut off those zip ties for the fan wiring harness, it might be easier to disconnect the intercooler from resonator before it gets reattached, so there is room to add the zip ties and reach up to the fan connector from underneath.

As for my next trick, radiator removal. I'm having a pause, as it looks like transmission fluid lines go into the radiator, so I need to consider topping the ATF up once it's all reconnected. I don't know if I need or have a dipstick for that!
Good write up as always buddy , can’t believe you are doing anything in this weather !
ATF is not dipstick on our cars , it’s a fill from below via the sump drain . There is a small plastic tower in the sump that sets the ATF level (too much oil runs out over the top of the plastic tower tube )
 
A few other bits to help anyone having a go at this.

You WILL need a breaker bar and that 12 point 17mm socket to release the tensioner. It's too stiff to use a normal size 1/2" ratchet, and I'm reasonably strong.
Having removed the upper passenger/LHS coolant hose, there's no restriction for tool length, so a breaker bar works great.

Even if you manage to get the old tensioner released and the belt off, I found that the new tensioner was so stiff, I initially thought it was siezed/broken. It was even more stiff than the old one, and needed to serious effort with the breaker bar rocking it backwards and forwards to get it moving. It did get moving, but it was quite slow to turn, almost like it is damped, but it seemed to be moving correctly having testeda few turns. With a handy assistant, I was able to apply enough turning pressure to the tensioner over about 20 seconds that it moved to access the service position and my glamorous assistant put a 5mm allen key in, locking it in place to allow me to slip the belt back over the tensioner.

Having got the belt back on, I turned the crank pulley a good few times (27mm socket with normal 1/2" ratchet) to check the belt was running and seated correctly.
Pro tip: If you buy the tensioner from Mercedes it comes with a pin in service position.

I also strongly recommend buying a Mercedes belt as it is far superior quality than anything else on the market.

The best 17mm socket I found for it is this:

 
I don't think I've ever bought a tensioner for any car without the holding pin in place straight out of the box.
 
Pro tip: If you buy the tensioner from Mercedes it comes with a pin in service position.
I don't think I've ever bought a tensioner for any car without the holding pin in place straight out of the box.

Yes, I've never had one without the service pin in either when new. I'm not doubting the part is new, and it's doubly strange because it's the same brand as the Merc original, Litens. Even the plastic 'damper' sheath inside was the same colour of custard yellow.
 
I also strongly recommend buying a Mercedes belt as it is far superior quality than anything else on the market.

As mentioned in the post further up, the Merc belt is the Conti belt with 7Pk2035 for my car. I'd be comfortable buying the Conti belt if price difference was significant (probably unlikely) or there was a time issue getting hold of the Merc belt.

I've gone with the Gates kit as Gates are very highly regarded, price was almost unbelievably low, and having spoken to a few mechanics from well-regarded garages over the years about timing kits, they all seem to rate Gates highly and said they always opt for Gates if fitting non-OE parts as they've never had any issues.

Gates obviously don't make the tensioner in this kit, which is supplied by the OE supplier to Merc.

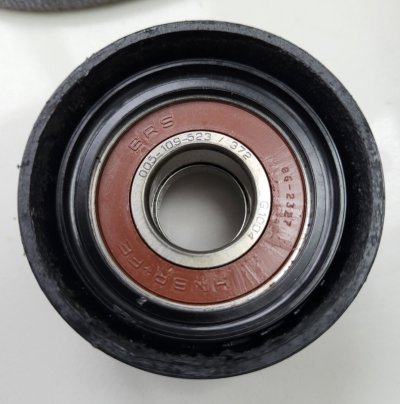
They don't make bearings either. I won't be able to check the manufacturer of the Gates idler, but the Merc idlers are made by BRS and surprisingly don't seem to have a Merc part number in them anywhere (I find it unlikely someone only changed both idlers).

Screenshot_20250104_141722_Gallery.jpg
 
Yes, I've never had one without the service pin in either when new. I'm not doubting the part is new, and it's doubly strange because it's the same brand as the Merc original, Litens. Even the plastic 'damper' sheath inside was the same colour of custard yellow.
Yeah, INA/Litens aftermarket comes without the pin.
 
As mentioned in the post further up, the Merc belt is the Conti belt with 7Pk2035 for my car. I'd be comfortable buying the Conti belt if price difference was significant (probably unlikely) or there was a time issue getting hold of the Merc belt.

I've gone with the Gates kit as Gates are very highly regarded, price was almost unbelievably low, and having spoken to a few mechanics from well-regarded garages over the years about timing kits, they all seem to rate Gates highly and said they always opt for Gates if fitting non-OE parts as they've never had any issues.

Gates obviously don't make the tensioner in this kit, which is supplied by the OE supplier to Merc.

They don't make bearings either. I won't be able to check the manufacturer of the Gates idler, but the Merc idlers are made by BRS and surprisingly don't seem to have a Merc part number in them anywhere (I find it unlikely someone only changed both idlers).

View attachment 166038
Almost all idlers on any Mercedes engine are INA supply. Bearings vary.

I'm skeptical about Gates. I know that the Mercedes belt made by continental is a completely different product with dramatically higher quality than any other aftermarket conti belt I've purchased.

DIY doesn't matter as much, especially if you maintain the engine well. If your original tensioner is not toasted, keep it as spare.

I currently run a conti 6pk1990 on my main E320CDI since the AC compressor pulley blew the original bearing
 
I know that the Mercedes belt made by continental is a completely different product with dramatically higher quality than any other aftermarket conti belt I've purchased.
This is interesting!
The belt I've taken off, whilst slightly worn on the groove profile, doesn't otherwise look in bad condition for 12 years old!

I'll keep an eye on the Gates belt, it's an easy enough DIY to get the fan out, just time consuming.
 
DIY doesn't matter as much, especially if you maintain the engine well. If your original tensioner is not toasted, keep it as spare.

The tensioner pulley bearing doesn't sound too great. It sounds totally dry, and rings slightly when you spin it. I'm sure it would be okay for another year or two, but I'd rather not risk it. By the time I've spent half a day stripping the front of the engine bay (including tidy up of things I find as I go) I'm currently in the fortunate position that I can wait a couple of days to buy a new tensioner. Worst case, recovered to garage to change.
 
The tensioner pulley bearing doesn't sound too great. It sounds totally dry, and rings slightly when you spin it. I'm sure it would be okay for another year or two, but I'd rather not risk it. By the time I've spent half a day stripping the front of the engine bay (including tidy up of things I find as I go) I'm currently in the fortunate position that I can wait a couple of days to buy a new tensioner. Worst case, recovered to garage to change.
Not that the new is going to fail. I used the aftermarket Litens and it is essentially the same as the one from Mercedes. Just hurts to scrap a heavy chunk of metal 😅
 

Users who are viewing this thread

Back
Top Bottom