• The Forums are now open to new registrations, adverts are also being de-tuned.

Seat stitching

JonnyP2468

Active Member
Joined
Jul 29, 2018
Messages
82
Location
Manchester
Car
A class
Hi,

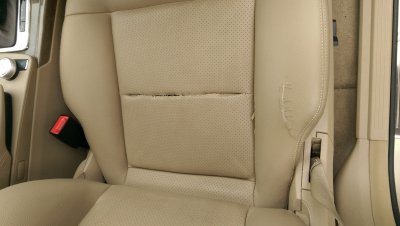
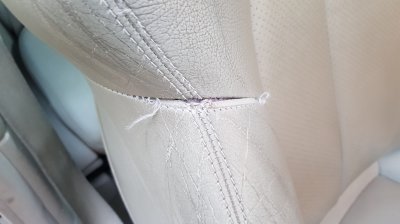
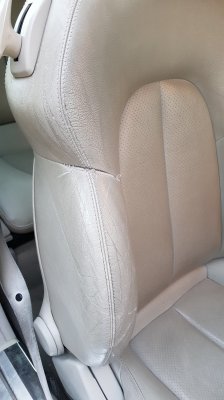
Has anybody found a prevention to white seat stitching fibres starting to fray? Reall gets on my nerves! Only very slight as it’s a new car but it can only get worst.

Thanks guys
 
I have a section on my seat thats now come unstitched and have been struggling to find someone to restitch it.
 
Hi, there are plenty of threads and needle sets on the bay, the trick is to find someone who'll do it without breaking the bank.
 
I did think about doing it, the leather isn't damaged and its only 2cm
 
Well worth a try, curved needle and matching thread, colour, thickness etc. If you do it, I'd love to see the result ! perhaps that'll encourage me to have a go.
 
I re-stitched a 2-3cm section of failed stitching on a car seat a few years ago using curved needles. It’s not difficult if you use the existing stitch holes; it’s very hard to make it look right if you don’t.


Sent from my iPhone using Tapatalk
 
This was a common problem in earlier mercs… (w212 ) 2009, 2010, and 2011.. it maybe even have occurred in a few 2012 mercs as well. They used a kind of imitation leather called "Artico" and it had the habit of the stitches in the seat cushion parting company, and separating. It also wore out on the side bolsters, cracking and flaking off in places. This is what happened in mine, and the only worthwhile solution in my case ( complete centre seam on the drivers seat had opened up ) was removable of the seat, stripping the lower cover off, and inserting a new panel in place. Its not exactly what you would expect from a premium build car.
 
Well, I have just bought a curved needle and some Off-White Thread.....
 
Well, I have just bought a curved needle and some Off-White Thread.....
As a matter of interest Mark, what year and mileage is yours? 2 CMs is only a small area, so you should be successful with your repair, and will be able to nip it in the bud !!! :) I wish you Good Luck with it ( and maybe you should get a sewing thimble too, while you are at it?? LOL :) )
I attach a pic of the seat in my car....
 

Attachments

  • Mercedes E Class Seat Pic.jpg
    Mercedes E Class Seat Pic.jpg
    548.3 KB · Views: 28
As a matter of interest Mark, what year and mileage is yours? 2 CMs is only a small area, so you should be successful with your repair, and will be able to nip it in the bud !!! :) I wish you Good Luck with it ( and maybe you should get a sewing thimble too, while you are at it?? LOL :) )
I attach a pic of the seat in my car....
That's dreadful. How many miles?
 
its an 02 CLK CAB, 130k
 

Attachments

  • 20180718_201427.jpg
    20180718_201427.jpg
    782.7 KB · Views: 22
  • 20180718_201435.jpg
    20180718_201435.jpg
    286.4 KB · Views: 22
That's a great shame Mark, I'd guess it's caused by the shape of the side bolster, as you exit the seat it's taking your entire body weight, not a good design at all.
 
That's dreadful. How many miles?
Presently, there is 130'000 Miles on it. I don't know at what miles the stitching started to come apart as I'm not the first owner...but it's a very common fault in the seats in the E200 W212 Mercs from 2009 onwards up to about 2012-13 I think. There are post's about on the various forums. What I think happens is that in the particular seam that is splitting, the "Margin" is far too narrow, less than 1/8". You can see this in the pic, how far away the edge is from the stitching holes. Should be at least 1/4" and double stitched. For any hope of success in my case, I will have to remove the seat cushion completely, and take off the cover.. as it will need to be reinforced and double stitched. Most likely, a new section will have to be inserted.
 
Well I have so far had two attempts at doing this but all I have really achieved is to stop it getting any worse.
The difficult part about this stitching is the way the two parts have to come together, making it almost impossible to fix from the outside.
Look at this image, the blue represents the Lower trim, Red the upper and Yellow the thread.
upload_2018-9-17_10-9-14.png
 
Yes Mark, you are right. Same job as I will have to do,,,remove the cover completely ( will be the most difficult part of the job) the actual stitching will be simple enough plus plenty of upholstery fabricator / repairers around. Good Luck with it, and keep us informed of the progress, OK?
 
Hiya Mark, just wondering if you've had any luck ? I'd really like to know how you're getting on.
 

Users who are viewing this thread

Back
Top Bottom