• The Forums are now open to new registrations, adverts are also being de-tuned.

Dash cam prep and queries

"Use the knitting needle. It comes out above to accelerator pedal"

Really?

It feels a lot higher than that unless I go through the bulkhead at quite a down angle....
Bruce , have you done similar to be absolutely certain of that entry point into the cabin?
 
I did this on my W203 C55 AMG.

1) Locate the main wiring loom inside the engine bay fusebox/SAM. This "normally" enters the SAM at the rear (firewall end) or underneath).
2) Feel along this loom to the firewall and the grommet where it passes through the firewall. (this is just to give you your bearings)
3) Use a rod, knitting needle, plant cane or similar and feed down > thru the SAM > Through the grommet > into the cockpit. You may want to drop the kick panel above the pedals.
4) Tape your camera wire "piggy back" ends to the rod, inside the car then gently pull it back through into the SAM.

On the W203 you have the bonnet cable release cable and the main wiring loom that both go through the bulkhead behind and sightly under the front SAM. Bot enter the cockpit above the accelerator pedal. Once you get your rod through into the cabin, it is an easy job. The quality of the rod is the key. The thinner the better bit it needs rigidity to be able to push through any wiring. You can buy specialist rods in Maplins (I think). Or you can try some heavy duty 'industrial tie wraps' they only have to penetrate that grommet.

Shout if you get stuck (no pun intended)
 
John
All the fuse diagrams I have looked at show that that fuse box (the cabin or cockpit one is it is referred to as F34) is on the passenger side on RHD cars. I haven't pulled the dash apart to see if there is another, hidden one on the drivers side, yet.....

The passenger side one only holds Circuit 30, permanent live feeds. I want switched live, so circuit 15 is recommended and that is under the bonnet

I know that the Fuse Box in the LH Footwell has only Live feeds as I checked them before opting for another "Switched Source"

Do you have anything that confirms that RHD models DO have another one drivers side?


The C Class has one as I used it, and the Picture I posted was found be "Googling" E350 Fuse Box Locations, it is very difficult to open, you need either plastic utensils or trim tools to gain access as the Plastic Cover is easily marked using metal tools, but inside there is plenty of Fuse Points to choose from and any Chassis mounted Nut or Bolt will provide your Earth!

The Driver Side A Pillar Cover can be removed, carefully prise out the Air Bag Cover (Plastic Sign, halfway up the Pillar Cover), then using Long Nosed Pliers, pinch the Air Bag Cover Mounting Clip in the Centre and remove, the A Pillar Air Bag Cover can then be removed in total, your CAM Power Cable can then be fed up close to the Windscreen to the Roof Lining, then under that to where you want to position your CAM.

Best Tool for Feeding Cables through Bulkheads etc. A Wire Clothes Hanger! :rolleyes:
 
Not to be critical here (but I will be) ;^) be very careful using wire coat hangars. You do not want to 'nik' a wire on the way thru. Something soft is really ideal. The dedicated tools are always the best thing but are usually used just the once then tucked away. But they probably cost little. Trim tools are cheap as chips and very useful.
 
Bruce / John

thanks both
Its not a W203 C Class, but the C207 E Class coupe.
I will have a look for the other fuse box but I doubt that it is there.

Will look for a 'soft but strong' item to go through the grommet or foam and see where it comes though.
Just hope its dry tomorrow :wallbash:

PS I use a plastic spanner as a trim tool (from a fridge water filter kit)
Its been good so far as it has a sloped edge to the open end.


Good man. Get in there (as they say) FYI: Halfords are selling trim tool sets in a nice Bright Orange and they are a decent set for around £5.00. Always handy tools to have in the box. I find them much more preferable than using the skin on my fingers as a guide, or my knuckles to hold plastics apart, as I feed cables through. Blood stains do come out the headlining very easily.
 
They are £15.99 according to Halfords website, so will stick with my trusty (plastic) spanner.

Bugga - weather looks damp tomorrow!
 
So it stopped raining and drizzling today, but only at 4pm and I am not commencing an install with light disappearing:mad:

However, I did take the opportunity to have a quick nose around and the following....
1. I at least DO have the correct piggy back fuses for the MB (Qashqai were different size ones, so luckily the multi pack I bought a couple of weeks ago still has the size I need)

2. The knitting needle goes through the foam into the cockpit, but god only know where.
On my back in the foot well, head torch on, and I could not see the bugga. Removing trim seems the only way, but not happy about that...

3. There IS a fuse box on the drivers side of the RHD car..... well there are two 30 fuses in there looking very lonely so I wonder if they are spares?
I of course didn't think to bring my multi meter out to see if they were live, so that's a job for tomorrow (if it ever, ever stops bleedin' raining long enough).

I fear it may be done next weekend but I am in Devon with my BIL who is an electrical engineer and all round handy guy (i.e. better than me)

Mulling it over with Red Wine, a film and a another look in the manual (nothing there about this other fuse box though) and see what my friend Google brings up.

Anybody KNOW what these until today, undiscovered couple of fuses are (odd place to put spares....) ?

Whatever they are? You still want a meter to check that they switch as required.


Sent from my iPhone using Tapatalk
 
Morning

dash cam installed, and I will share some photos later and a short write up, but one item to check out is what the heck it is connected to.
It's piggy backed into fuse 25 on circuit 87m in the engine compartment fuse box N10 -1

Now I know this seems a little ''cavalier' tapping into an unknown circuit and fuse, but according the WIS derived charts on here

http://www.benzworld.org/forums/att...details-c207-n10-1-fuse-relay-assignments.pdf
given that I have the 276 engine, I cannot see what that does.

It's not Circuit 15 the switched live (as I couldn't get the piggy back fuse connector to fit within the fuse box on any of them), and it isn't circuit 30 which is permanent live, but seems to be the interior light, which is okay if not 100% ideal

Anyone able to shed light on what I have connected it up to?
 
Last edited:
I moved the power on my ML yesterday, its now on USB power, ebay for a 3.6M mini angle usb to standard.
Center consol out again and get the USB to fit inside the box next to the socket, job done and works a treat.
One thing i had to do, mask the power in the USB plug, i.e. the two middle pins in the plug covering the data so its charge only.
I gave up trying to find a power that stayed on a while and did not have power spikes.
 
Just a quick write up on the Dash cam install I finally undertook last weekend (with the added pair of hands and help of my Brother in Law)

Unlike the very simple installation in the Qashqai (J10 2011 model), I could not use the cabin fuses as they are circuit 30, which is permanent live.

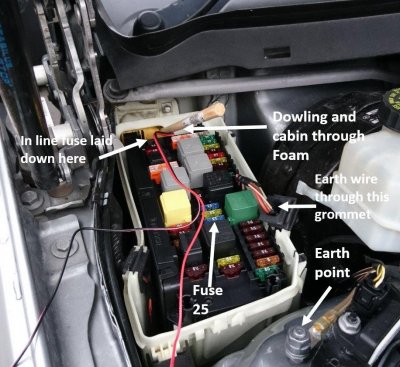
I also am not up to ripping out the 12V power socket in the cabin and going in behind that, so I opted to use the N10/1 fuse box – it is in the engine compartment, but is just in front of the steering wheel.

1. Undid the three screws that hold the plastic trim above the pedals.

2. Took the lid of the fuse box

3. Pushed a knitting needle through the (yellow) foam which protects the wires going into the cabin to locate where to go upwards from the inside (into the fuse box) – careful not to snag any wires

4. Attached the hardwire kit power wire and earth lead (insulation tape) to a small piece of dowling and pushed that up through the pulled back foam.
Dowling was used as I buy hardwire kits with an added inline fuse and that’s a few mm wide so I needed a decent gap. If I didn’t, I could attach the wires to the needle and pull back through.

5. Earth wire attached to a nearby earthing point after going through a rubber grommet on the side of the fuse box (useful old knitting needles!) and cabling tying it to the other earth wires from there

6. Stripped back, beefed up the dash cam power wire ‘depth’ and crimped it into the piggy back fuse connector

7. Picked out a fuse to use (voltmeter used to check switched live), removed the 15A fuse, added another to the piggy back fuse connector so that there are two on that circuit fuse.
I used another 15A spare I had as, to be honest, I don’t know which one feeds the original circuit and which was feeds the dash cam – the inline fuse is 3A so nothing major is getting through to the dash cam.

8. Navigated the relays and fuses, tucked it all away neatly. Lid on the fuse box and headed into the cabin (see attached image)

9. Fed the USB power cable through the foot well (above the trim which I screwed back above the pedals). All of it then fed past the side panel by the driver’s door under the door rubber vertical A pillar seal, across the top of the A pillar trim, then under the roof lining to the RVM. (see attached image)

10. Horizontally mounted the dash cam (3M mount direct onto cleaned glass), managed to get the final couple of inches of the USB power lead into the mirror housing and connected up.

Worth checking connections and all, before putting lids on and that power works etc, but that’s the essentials.
Pretty happy with the fit - it is pretty 'stealthy' -(see a few photos)

Now the questions I still have.....

I couldn’t get the piggy back connector on any of the circuit 15 fuses in that fuse box (physically), so identifying that circuit 87M is switched live, its on fuse 25.

I DO NOT KNOW what this feeds. It seems to be interior lights as it goes on as soon as I unlock the car and if I do not start the car within 30 -45 secs, the dash cam powers down. It also stays on for 60 or so secs after I lock the car. No enough to drain a battery, but if any one does know what I have wired into it would be helpful – or if you find a circuit 15 that is direct to ignition (I am told)

By the way – a little background as to the dash cam itself.
https://www.amazon.co.uk/dp/B0777J5Y6J/?tag=amazon0e9db-21

Chose this one after the reviews, feedback and seeing the manufacturer involvement on the dash cam forum

Blueskysea B1W | DashCamTalk

Yes it’s cheap (my budget) but quality is pretty good, despite the low bit rate. Key for me was a Capacitor cam and with no screen it is really low profile (or ‘stealthy’ as the da yoof say). The wifi to (easy to use) phone app is a simple and more convenient way to view footage. Or of course you can drop the card into the PC
 

Attachments

  • fuse box.jpg
    fuse box.jpg
    139.5 KB · Views: 148
  • trim.jpg
    trim.jpg
    52.3 KB · Views: 68
  • DSC_0405.jpg
    DSC_0405.jpg
    63.2 KB · Views: 66
  • DSC_0396.jpg
    DSC_0396.jpg
    210 KB · Views: 66
  • DSC_0407.jpg
    DSC_0407.jpg
    63 KB · Views: 64
Hello All,

I am attempting to do the same operation but I’m scratching my head over the fuse number for the cigar lighter. Google seems to be useless as far as I’m concerned and the manual doesn’t help either.

Does anyone know which one it is?

Many thanks in advance!

EDIT

The fuse I am looking for is 71 which is in the rear fuse box. Not much help when the cable for the dash cam is not long enough. Back to plan B and look for something in the front I can use.
 
Last edited:
Many thanks for the info

I have now completed the installation. I must thank the original poster of this thread as it was a great help in the method of installation.

In the end I used the “Central Display” fuse (# 11) found in the engine compartment. There were a number of eligible suitors for the fuse but the connector supplied with the FFC was difficult to fit due to the relays dotted about the fuse box!

In the end the trickiest job was connecting up the earth wire and trying to get the wire through the grommet was hard work to say the least! If I had known and gave it more thought I should have cut the wire at the connector end and simply fed it through the tiny hole. The connector was not required as I had to use a ring connector to fit an existing earthing point on the suspension strut area very close to the fuse box.

Getting the main cable into the pilar and roof trim areas was fairly easy as I had done it before. I have to say threading the cable into the fuse box from within the vehicle was extremely easy, easier than initially thought!
 

Users who are viewing this thread

Back
Top Bottom