• The Forums are now open to new registrations, adverts are also being de-tuned.

Finally worked on rear subframe

unclebuck

Active Member
Joined
Oct 19, 2016
Messages
338
Car
CLS 320 /08
Slowly I have been buying all the tools i would need to work on the car and sort out the rear subframe and control arms etc as planned.

I finally managed to get the rear subframe bushing removal kits i wanted and a few other tools and a press.

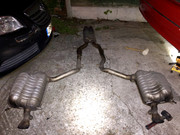
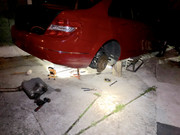
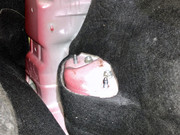
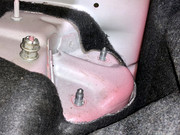
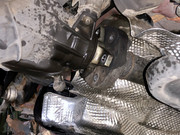
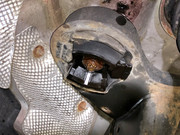
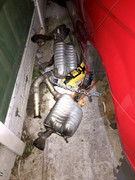
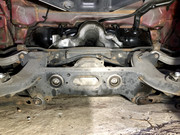
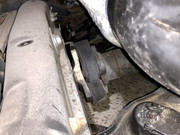
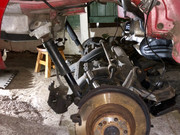
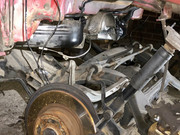
I managed to grab a few pictures of the subframe before it went for blasting and coating, here are a few photos of the subframe before and after. Corrosion was light and the media blasters and coaters did an amazing job for me, all the new control arms and suspension are being coated also.

I have also bought a pipe flaring kit and bender, along with a roll of pipe and a bender with various fittings to replace the brake pipes that have corroded.

Quick question though, i am ok with flaring the pipes and bending them to shape. However this is the first time I have had to replace any pipework I wanted to check a few things.

Before i disconnect anything with the brakes is this process correct.

1: Drain as much fluid from the brake fluid pot as possible ( will have new fluid)
2: I have watched many many videos showing how to disconnect the calipers from the pipes so i am ok there, i have service kits for all calipers so i will be servicing them while off.
3: Make a little temporary bung to go over the cut ends of pipes to prevent any crud getting into them.
4: Remember to put the fitting over the pipe end that's been cut before flaring!!
5: flare pipes
6: Connect and also fit new rubber pipes to calipers.
7: Refill brake fluid pot and bleed brakes.

Also what sequence should they be bled, ie: which side-front or rear first on a clk 220 cdi 2005.

Thanks again!

IMG_20180916_130042.jpg IMG_20180916_130047.jpg IMG_20180920_180815.jpg IMG_20180920_180739.jpg
 
I'm doing a similar resto on 2002 slk. I took off the brake fluid reservoir lid then put some cling film over the opening and screwed the lid back on. Change the rubber hoses for stainless braided they last longer. Bleed the caliper furthest from the reservoir, first on mine its n/s rear.
Good job so far by the look of it.
Cheers
 
Don't forget to test for leaks at the earliest opportunity you can get. If this means test drive then do it as a test and try to inspect every joint you messed with with tourch and mirror afterwards, take the wheels off and check those calipers too...:):)

Try and brake what you have done by forcing it to leak should be the mantra at least once on this project.
 
Your point number 4 is so easy to miss and a right pain to correct if you've cut to exact length! Always double check fitting is there (and the correct way round) before flaring!
 
Good job Sir, well done..:thumb:

Is that Chrome??

N.B MancMike Take note..


No Sir , its a stock silver powder coat with powder lacquer over the top. I wish the blaster had told me about the weld splatter first as i could have taken that off before coating.

The lower spring control arms are being coated Wednesday as well, the hub carriers are being vapour blasted, then i can grind back the mold lines and clean them up before coating.

The plan is to have all the rear subfram, control arms , springs etc all blasted and coated to protect them, the underside of the car has a little surface rust so I am brushing that back and coating it with POR15 then POR sterling silver over that to protect it, and the wheel arches.

There is a little rust on the rear arches outside so they are being done also.

Once the rear end is done, the front end will get the same treatment.

So far i have done the following:

Had its first B service since i had the car
new bearings on the front hub carriers
front control arms replaced
full set of brembo pads and discs all around
brake calipers serviced and new guards fitted.
new pirelli P7 all round recently

to be done.

replace corroded sections of brake pipes, i have new pipe and fittings for that

had second hand subframe blasted and coated, i have all new bushings to fit
box of febi-bilstein control arms for the rear to fit
rear caliper rebuild kits for both calipers
new rear wheel hub carrier bearings to press in
new shock absorbers for rear and front

I bought enough tools to fill a van but at least i can do it right with the correct tools.

Worst thing is.... after all of this is done... i still want to get hold of a cls 350, so by doing all of this work its a great bargaining tool for me when i goto look for one.

i need more room than the coupe gives me because of the kids.

Will do more photos as i go along though.
new brake guards for rear

My God! You have done a great job.. well done.:thumb:


I've just completed derusting my Jeep ready for the winter. I used mainly Dinitrol products, expensive but the results are amazing. On rust parts use Dinitrol RC900 it seals it making the area devoid of oxygen and also converts the area to a black. I Then used Expoxy 121 Rust Buster. Similar to POR15 but to finish I sealed the areas using Auto Tek Sealant, sprays on like factory, leaving a nice smooth finish, and again an inhibitor and finally Dinitrol Underfloor Black Wax.. all ready for a hard Scottish winter... :thumb:
 
"I had a little surface rust too ;("


That will need cut out and replaced. I had similar to my Jeep. Whilst a gaping hole I fed Dinitrol Cavity Wax down the chamber to prevent any further rust occurring.
I used Jenolite On surface rust like this, as it turns back the metal to a milky metal colour, then sealed it with RC900 before completing the above steps.. Trust mey, its not going to rust in my lifetime Lols !;);)

I've been trying to get a welder to come out but it's not easy. Might have a bash myself after some practice.
Don't want to hijack OPs post so will say no more. I'll start a thread when I get done.
Cheers
 
"Might have a bash myself after some practice".

Oh No! Don't do that... I had a mate came out when I had my Caddy, blasted feck out the floor so badly that it ended up being scrapped...

I have no issues here with a related Hijack.. it helps others see how "Rust Conversion" is done, I hope the OP feels the same. I also think this should be a Sticky as it gives sound advice on rustproofing...
 
I wasn't having a go at you Mike, merely trying to help. Have a look, get ideas from the above on how to tackle your frame problem as it is similar (Note, said "similar" not exact).. so holster yer pistol, its help you need not insults, barbs and goading..
 
I just didn't know what you wanted me to take note of. When my new subframe arrives, I'll be doing similar paint and protection to it. :)
 
I just didn't know what you wanted me to take note of. When my new subframe arrives, I'll be doing similar paint and protection to it. :)

Are you having your's media blasted and powder coated as well Mike?

I bought a spare set of the lower spring control arms too Mike, had the bushes removed and they are being blasted and coated Wednesday.
The shocks have been re-coated and the springs cleaned up also, the control arms are stripped, primed and painted with a couple of coats of lacquer on.

I will be fitting braided hoses at a later date instead of the rubber ones.

I don't know if this helps Mike, but once i have finished working on mine I will be selling all the tools i bought as I wont need them afterwards. some may be of use to you possibly.

I am going to pick up the new hoses tomorrow and a pump pressure brake bleeder and replace my corroded sections of pipe, and putting the new bushes into my sub-frame tomorrow also. Will take a few photo's as i go, the job will be made all the more simple using the rear sub-frame bushing tool kit i bought.

I find it weird that there is no definitive guide or posting showing a rear sub-frame being removed and worked on for this model merc.

First things first though the brakes pipes need doing so that's my first job tomorrow

MOT is on the 2nd October so i need to crack the whip on this.!!!

Once all of this is done at least when i trade it in or sell it to get the CLS whoever gets it won't have to worry about anything for quite some time!!
 
I'm spending as little money on it as possible. I've zero interest in the car. It's just a thing to travel to work in. I'm spending no more time or money than is absolutely necessary. I won't be upgrading anything as I'm happy with it's ride and handling as is.

My days of uprating things, fitting purple bushes, strut braces, etc are long gone.

I've more tools than I know where to put, but thanks for the offer. :thumb:
 
I got ya, I am not doing the poly bush things either original bushes and parts etc, however I am just doing preventative maintenance by re-coating the parts before fitting. its not about looks just making sure its all clean and good. This way come MOT time if its all cleaned the day before the inspector's job is easier to see any leaks etc.
 
Yeah if anything has obviously perished, it'll be replaced, but I'm not trying to "uprate" anything. I'll clean everything now the arch liners are off and throw a couple cans of some spray paint, etc around anywhere that looks like it needs it, but I'm not trying keep the car with me the next decade or anything.

I've gotten the rear subframe down tonight. Took several hours, both exhausts off, top shock mounts removed, arch liners off, brakes off, handbrake cable decoupled, loads of sensor cables detached, prop shaft unbolted from the diff, unbolted subframe from the car, lowered the entire rear end to the ground.

Now I can get a new subframe ordered, put them side by side and slowly move all the arms etc over to the new one, then reverse the whole process.


I don't have a garage to work on mine so has to be out the front of the house, but i may be able to find a unit to hire for a few days to work on it. I was going to do the rear this weekend as my mot is next week, but i am putting it off as i need to grab some rear brake guard plates, i thought i had a pair here but they were the fronts. Also i dont want to rush it so it can wait a few days.
 
No garage in this house either. This is the sloping!!!! Front driveway.

I don’t think brake heat shields are required for the MOT. I’ve had cars without.

When I’m done for the evening I just put all tools and parts in the boot and lock it.
 

Users who are viewing this thread

Back
Top Bottom