• The Forums are now open to new registrations, adverts are also being de-tuned.

M156 Cam Adjuster plates

Cheers C63Mike, sorry to hear you ran into some difficulties with the rebuild yourself but great to hear you now have a sorted engine, I’ve found Murder63 contact details, and know of AJS, will give them a call!
 
Murder63 on instagram or AJS performance in Hitchin. I ended up having to get AJS to basically do a full top half engine rebuild after trying to do it myself. I’m putting it down to the engine timing had been messed with and I should have probably checked for TDC on the pistons to make sure the crankshaft matched but hey ho you live and learn.

But I now have pretty much a reconditioned m156 with a full pulley rebuild using the 63 motorsport adjuster back plates, skeleton front plates with the titanium bolt package, all gaskets changed, new valves, machined pistons etc etc so she will last a while 👌🏼
Cheers C63Mike, sorry to hear you ran into some difficulties with the rebuild yourself but great to hear you now have a sorted engine, I’ve found Murder63 contact details, and know of AJS, will give them a call!
 
Cheers C63Mike, sorry to hear you ran into some difficulties with the rebuild yourself but great to hear you now have a sorted engine, I’ve found Murder63 contact details, and know of AJS, will give them a call!
Cool yeah no worries mate, let us know how you get on.
 
Apologies for the thread hijack! About to tackle this job as well, this thread (and your others and input on my thread @badgx ) have been very useful so far. Just one question at this stage - does the orientation of the actual adjusters on the camshafts matter, e.g. when removing them from the shafts should they be market to ensure they go back on the same way?
 
The orientation of the aviators ie locked or unlock position doesn't matter but what is important is to ensure the correct plates are used ie for intakes use only intake plates and the plates for exhaust, use only for exhaust only.

Once the car starts, the aviators will self adjust with oil pressure accordingly etc

Please take care with timing. I purchased two m156 tools and locked both banks, although it's an overkill, you can do with 1 tool only 👍
 
Apologies for the thread hijack! About to tackle this job as well, this thread (and your others and input on my thread @badgx ) have been very useful so far. Just one question at this stage - does the orientation of the actual adjusters on the camshafts matter, e.g. when removing them from the shafts should they be market to ensure they go back on the same way?
In hindsight I would say to myself have someone on the phone who knows what they are talking about as soon as you get to the part where your valve covers and your solenoid covers are off because if you lock the camshafts in place correctly it’s pretty straightforward and as badgx says I’d spend the extra few quid and just get two sets of timing tools so absolutely nothing moves either side and it just makes it easier. If you mess your timing up and send it to a garage you’re looking at a few K for them to potentially fix your mistake especially if you damage piston heads or valves etc so what’s another 40 quid.

Badgx only started helping me after I already made a bit of a mess and if I had him from that part I mentioned it would have been plane sailing.

In the end I bought everything from 63 motorsports I didn’t just upgrade the aviators I bought titanium bolts and skeleton covers for all 4 camshafts. Solid now and is built to last for a long time.
 
The orientation of the aviators ie locked or unlock position doesn't matter but what is important is to ensure the correct plates are used ie for intakes use only intake plates and the plates for exhaust, use only for exhaust only.

Once the car starts, the aviators will self adjust with oil pressure accordingly etc

Please take care with timing. I purchased two m156 tools and locked both banks, although it's an overkill, you can do with 1 tool only 👍
Cheers fella :thumb:

The big plate in the timing tool kit (the one that goes onto the front, that's used to correctly position the lobed sprockets that are held onto the fronts of the adjusters with the big bolts, is that correct? So that's the bit where the orientation mainly matters?
 
The camshaft sensors use the plate in front of the camshaft adjuster, there are gaps which it uses to read the positioning, so its really critical and must be aligned perfectly. You'll find the front facing timing tool will not mount unless it's perfectly aligned.

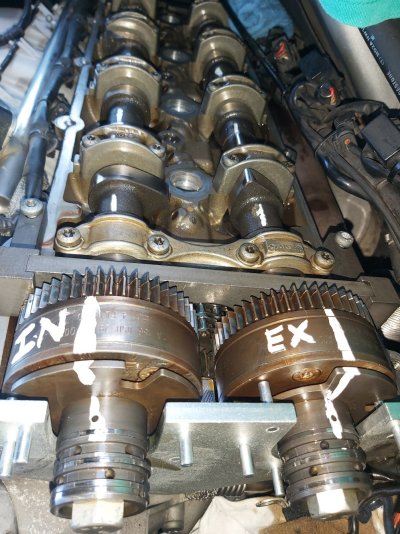
When you lock the tools, use tip-ex to mark up, i know it looks a bit messy, but will make life a lot more easier when reinstalling. The tip-ex mark will wipe off easily with a bit of wd40 on a cloth. I even marked the camshafts too.

20210824_191403.jpg
 
In hindsight I would say to myself have someone on the phone who knows what they are talking about as soon as you get to the part where your valve covers and your solenoid covers are off because if you lock the camshafts in place correctly it’s pretty straightforward and as badgx says I’d spend the extra few quid and just get two sets of timing tools so absolutely nothing moves either side and it just makes it easier. If you mess your timing up and send it to a garage you’re looking at a few K for them to potentially fix your mistake especially if you damage piston heads or valves etc so what’s another 40 quid.

Badgx only started helping me after I already made a bit of a mess and if I had him from that part I mentioned it would have been plane sailing.

In the end I bought everything from 63 motorsports I didn’t just upgrade the aviators I bought titanium bolts and skeleton covers for all 4 camshafts. Solid now and is built to last for a long time.

Glads to hear from you friend, how's the little one doing? She must be walking now 🙂
 
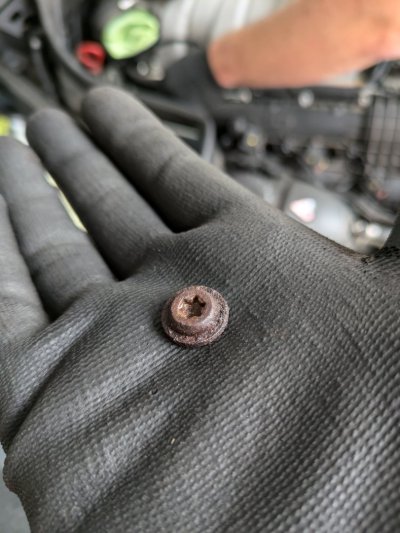
Today has not been a good day :) Got the cam covers and timing covers off (eventually) and now about ready to start removing the cam adjusters. However, on the bottom rear bolt on the driver's side, we hit a problem:

PXL_20240907_101833929.jpg

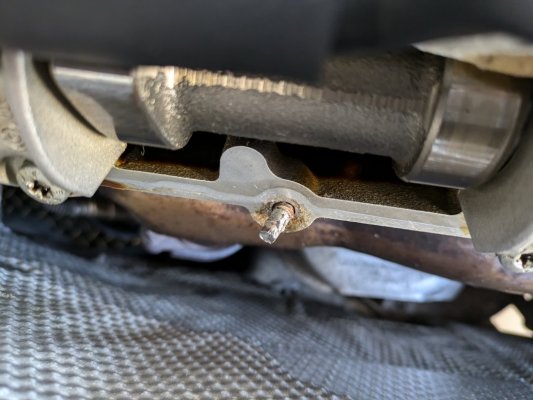
PXL_20240907_132241466.jpg

We tried heat but ultimately the bolt snapped leaving only a stud on the head. Going to have to find a welder to weld a nut on and try and get it out that way.

Back to the cam adjusters, we're having a hard time getting the lash gear locking tools into the adjusters - any tips? Seems like it's hard because the holes in the back plate and inner plates of the adjusters don't line up but not sure how to get around that.
 
Last edited:
Hi mate, try molex grips to open that stud. Hopefully wont need to weld? Given that your already struggling, I'm a little worried and don't want to see a mess.

Added some useful how to videos, hopefully should make sense 👍

To view this content we will need your consent to set third party cookies.
For more detailed information, see our cookies page.

To view this content we will need your consent to set third party cookies.
For more detailed information, see our cookies page.

To view this content we will need your consent to set third party cookies.
For more detailed information, see our cookies page.

To view this content we will need your consent to set third party cookies.
For more detailed information, see our cookies page.

To view this content we will need your consent to set third party cookies.
For more detailed information, see our cookies page.
 
Another good tutorial video, hope this helps 👍

To view this content we will need your consent to set third party cookies.
For more detailed information, see our cookies page.
 
Another video, 63motorsport actually have some great video 📹

To view this content we will need your consent to set third party cookies.
For more detailed information, see our cookies page.
 
Thank you sir, seen most of those. I think we need to tighten down the bolts on the lash gear locking tools whilst pulling them into place.

We did try mole grips and vise grips on what's left of the bolt but there's not enough of it left to get a good grip on. Unless someone who's a wizard with stud extraction can come round it's either welding on a nut or an engine out job.

I reckon that stud could be seized in, they don't require much force to open in the first place? I would try spray wd40 and see if it helps in the morning 🌄.
 
We sprayed proper penetrant fluid (e.g. Plusgas) multiple times throughout the day. The head snapped off first thing in the morning, we decided to leave it but keep spraying it and carry on with the rest of the job and come back to it later. Then it bent as per the photo, then got some heat on it later and it snapped. There are three choices now; weld a nut on, drill it out in-situ or lift or entirely remove the engine. I'm not seeing any other options at this stage unfortunately :(. As it stands there's no way to get any other sort of tool on as access is too tight. If I could have got directly onto it I'd have tried a Dremel on the top to cut a groove on it and got a screwdriver on but it's too tight.

ETA - it'll come out one way or another - it's personal now :D

If memory serves me correct, the bolts only require gentle hand tightening, around 10NM for the plastic valve cover. So was surprised to see it hadn't open even with molex vise grips, hence it must be seized in or something?

Hopefully might open first thing tomorrow morning.
 
That bolt and the other two or three along the bottom of that cam cover were heavily corroded - the one next to the broken one was very stiff and creaked like crazy when we got it out, but it did come out in one piece. The ones on the top and all round the cover on the other bank were no problem to move at all, but the other bank (passenger side) was replaced a year ago under warranty so if either side was going to be a pain it was the driver's side.

Again, unfortuately there isnt' enough bolt left to get any sort of tool onto, not that I know of anyway :(
 
Day 2 was more productive, we got all four cam adjusters rebuilt. That went fairly smoothly actually, got the passenger side done first and the front and top covers back on, everything reattached and connected etc. The lash gear locking tools in the timing kits I bought turned out to be garbage though and both of them are broken. They also wouldn't go all the way into the adjusters, particularly the exhaust cam adjusters. We got there though.

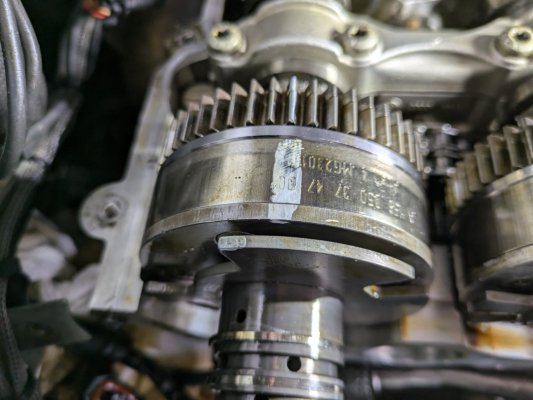
Something weird happened after we finished the driver's side - we had the rear locking bar in at all times, we had the front one on whilst undoing the old bolts and torquing up the new ones. I removed the front lock bar once that was done and my mate removed the rear lock bar - then the exhaust cam jumped round a few degrees. See below, I put the line of Tip-Ex in a straight line down the gear teeth, the adjuster and the lobe on the phaser in a straight line when I started but when the cam jumped it went out by that much. Obviously now the two cams can't be locked together at the rear or the front. Anyone know what's happened here? There's no oil pressure obviously so I don't see how one adjuster can have operated and moved?

PXL_20240908_154249817~2.jpg
 
Day 2 was more productive, we got all four cam adjusters rebuilt. That went fairly smoothly actually, got the passenger side done first and the front and top covers back on, everything reattached and connected etc. The lash gear locking tools in the timing kits I bought turned out to be garbage though and both of them are broken. They also wouldn't go all the way into the adjusters, particularly the exhaust cam adjusters. We got there though.

Something weird happened after we finished the driver's side - we had the rear locking bar in at all times, we had the front one on whilst undoing the old bolts and torquing up the new ones. I removed the front lock bar once that was done and my mate removed the rear lock bar - then the exhaust cam jumped round a few degrees. See below, I put the line of Tip-Ex in a straight line down the gear teeth, the adjuster and the lobe on the phaser in a straight line when I started but when the cam jumped it went out by that much. Obviously now the two cams can't be locked together at the rear or the front. Anyone know what's happened here? There's no oil pressure obviously so I don't see how one adjuster can have operated and moved?

View attachment 160948

Looks like you didn't torque it down, I'm very worried 😟

What you'll need to do now is to realign both camshafts to the tip ex mark and get the alignment tools back on. You can use an adjustable spanner or the old phaser bolt to adjust the camshaft to get the tool re installed.

Please see video below at around 33:30. The guy explains, do watch it a few times so you fully understand. As you can see, he uses the bolt to spin the camshaft to get the rear bar until it fits in the slots at the rear of the camshaft. It will only go in one way. Once you get the rear bar seated,
you need to put the top and the front timing tools in before to tighten the camshaft adjusters.

Please double check the torque setting for the camshaft phaser bolts, if memory serves me correctly its something like 40NM, and the you do a further final tight with an extension bar by a 90 degrees tightening.

Please see video below, its slightly more detailed, hopefully should make sense👍

To view this content we will need your consent to set third party cookies.
For more detailed information, see our cookies page.


Screenshot_20240908_235143_YouTube.jpg
 

Users who are viewing this thread

Back
Top Bottom