• The Forums are now open to new registrations, adverts are also being de-tuned.

M276 SLK 350 2011 Startup Rattle

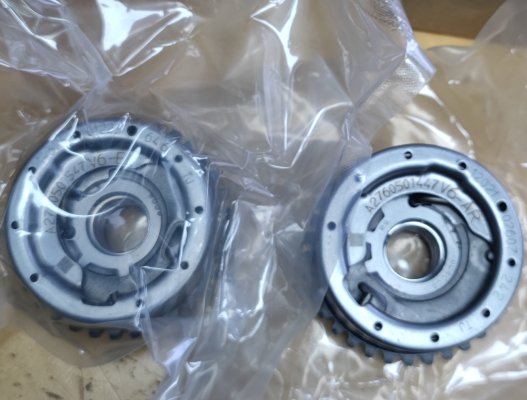
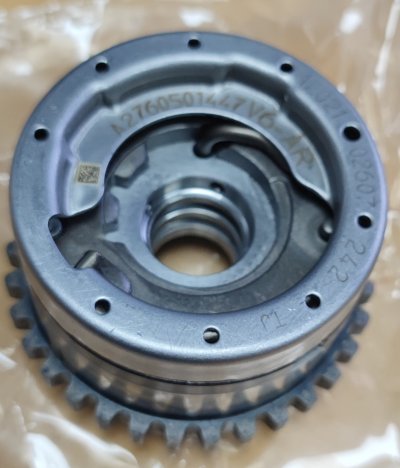
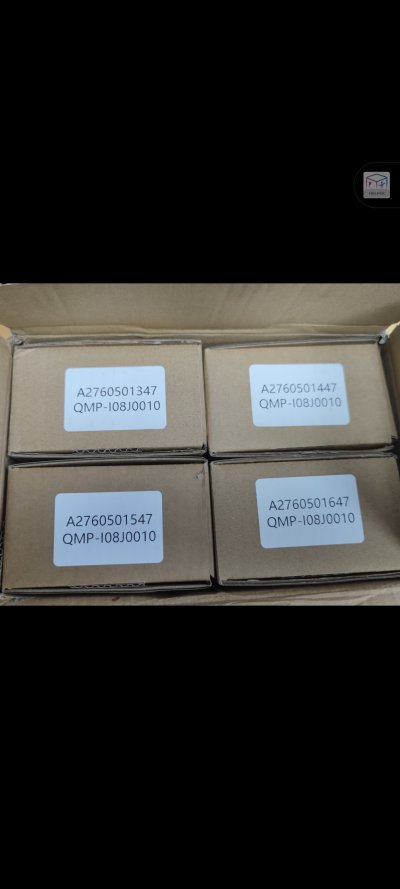
Well the cam adjusters arrived today... Just waiting for the check valves, tensioners and o ring. Can then crack on with all this end of week.
 

Attachments

  • IMG_20240108_114529.jpg
    IMG_20240108_114529.jpg
    454 KB · Views: 6
  • IMG_20240108_114545.jpg
    IMG_20240108_114545.jpg
    1.2 MB · Views: 6
  • Screenshot_2024-01-08-11-44-53-016_com.miui.gallery.jpg
    Screenshot_2024-01-08-11-44-53-016_com.miui.gallery.jpg
    951.2 KB · Views: 6
Did you time the engine up or did you just remove the tensioners. The reason I ask this is that I read somewhere that it didn't have to be timed up as the sprockets don't move when the tensioner is removed. Also if you google the problem there are a couple of vids on YouTube on how to do the job but they only show doing it on one head.
You are correct you don't need to time the engine up if you're just doing the tensioners.
 
Cracking on with this now done everything on the driver's side it's a right pain to be fair there's not a lot of room at the back.

I can definitely say that it was the inlet cam adjuster that was faulty as I've taken it apart and the damage and wear to the locking pin

So far I've replaced the o-ring on the high pressure fuel pump that was leaking oil down the back of the engine. Also the same o ring size fits the cam adjusters luckily and I ordered 12 !

One thing I have noticed is that the cam sensors, all four of them seem to be leaking oil back into the electrical connection pins. , I see this is a common issue. Not certain if I'm going to build 4 short wiring looms just to separate them. All I would need to do is buy the plug and socket and make an adapter lead that would stop the oil transfer. Think the sensors are 40 quid each unless someone knows s cheaper source

I've uploaded some more pictures in the Google Drive photos if anybody's interested.

Once it's all done and finished I'll put all the prices and part numbers on in case anybody else wants to do it. Hoping to do the passenger side in the week

What a fun Sunday !
 
I hope you haven’t bought cheap O-rings. Space Shuttle Challenger was built with O-rings that met the spec put out to tender but saved a couple of cents.
 
I hope you haven’t bought cheap O-rings. Space Shuttle Challenger was built with O-rings that met the spec put out to tender but saved a couple of cents.
Absolutely not . I found a UK supplier I've left the link here they were really good and you can pick which sort of compounds you want

 
Absolutely not . I found a UK supplier I've left the link here they were really good and you can pick which sort of compounds you want

Looks like a good company. I could have done with someone like that way back in the early 80s when I was designing and developing one of the first precision optical fibre cleavers for preparing quality fibre faces to use when splicing submarine cables. Finding the best materials for clamping the fibre and backing the scoring blade meant many long hours of arduous experimentation and detailed measurements for my team. But we got there in the end, even though I only had Yellow Pages to help me find material suppliers.
 
Cracking on with this now done everything on the driver's side it's a right pain to be fair there's not a lot of room at the back.

I can definitely say that it was the inlet cam adjuster that was faulty as I've taken it apart and the damage and wear to the locking pin

So far I've replaced the o-ring on the high pressure fuel pump that was leaking oil down the back of the engine. Also the same o ring size fits the cam adjusters luckily and I ordered 12 !

One thing I have noticed is that the cam sensors, all four of them seem to be leaking oil back into the electrical connection pins. , I see this is a common issue. Not certain if I'm going to build 4 short wiring looms just to separate them. All I would need to do is buy the plug and socket and make an adapter lead that would stop the oil transfer. Think the sensors are 40 quid each unless someone knows s cheaper source

I've uploaded some more pictures in the Google Drive photos if anybody's interested.

Once it's all done and finished I'll put all the prices and part numbers on in case anybody else wants to do it. Hoping to do the passenger side in the week

What a fun Sunday !
If you don't want to buy new cam sensors you can buy the wiring you're talking about from eBay their listed as pigtails.
 
Updated the photos again in the shared Google Drive.

I moved on to the other bank at today and found the inlet cam faulty on that side too.

If you take the vacuum pump out you can lock the cam in place with a t60.

I've put it all back together but can't start it up yet until the sealant on the cam covers has dried.

Fingers crossed.. I've double checked the timing and it seems spot on, on both Banks.

Got to admit it's not a pleasant job.
 
Waiting with crossed fingers and baited breath.
 
Sorry for the delay. No sorry I don't have a link. But you'll find them via a Google search.
 
I'll take some screenshots of the data coming off the ECU so people can check timing if they think it's out. Silent now when you start it up and the rattle is definitely gone.

I looked at both the inlet cams and they were both faulty. Both had the wear to the locking pins
 
4 Cam Adjusters £231.74

Upper Left Tensioner (SWAG) A2760502300 £50.50

Upper right Tensioner (SWAG) A2760502400 £49.00

Genuine check Valves A2780504000 £30.98

T60 Deep for Holding Cam £4.75

Gasket Sealant £7.98

Locking kit inc T100 cam socket £35.99

Press tool for Valves 276589003300 £13.68

O Rings for Leaking Solenoids. 55ID x2.5mm X12 Min order £12.12


TOTAL COST £442.74


The O-rings also fits to the back of the HP Fuel pump and Vacuum pump. These were weeping oil down back of engine. Polymax.co.uk is the supplier item code is 55x2.5VBR75. 6 required but have minimum order of 12.

I also bought a iCarsoft code reader V3 and confirmed there is no timing chain stretch and could also run a activation test on the cams to make sure they were functioning correctly and reaching the correct retardation / advancement.

Also, this is going to be controversial. I got the Cam adjusters directly off eBay and they look literally identical to the Mercedes ones. And let's be honest, the Mercedes ones are not particularly good anyway , If they were we would not be doing this !

Also didn’t replace the bolts, they were working out at £7 each. I used the originals but was super careful on torque settings!

Anyhow fully working car now and it quiet as a mouse now at start up.

Before

After


KEY TIPS

  • You don’t need to remove the top cam covers if replacing the intake cams.
  • When the front cover plates are removed make sure you put something in the bottom of the timing chain cavity like a towel or other lint free item so if you drop anything it can be retrieved when cover plates are removed. This saved me as the left hand timing chain tensioner piston sprung out of the assembly!! (this was a F&^% H^%& moment) Tensioner ready to fire into timing cavity
  • Remove the air intake and intake manifold all in one piece.
  • Work the o-ring into the groves in the solenoids. They will fit! O-RINGS
  • Add 17mm wide piece of masking tape next to the 40° mark to the left you give you 53° degrees for checking your timing when looking down into the 4 cam hall sensors. 53 timing mark
DRIVERS SIDE EXHAUST LOOKING FROM FRONT OF CAR AT 53 DEG MARKING
DRIVERS SIDE INTAKE LOOKING FROM FRONT OF CAR AT 53 DEG MARKING

PASSENGER SIDE INTAKE LOOKING FROM FRONT OF CAR AT 53 DEG MARKING
PASSENGER SIDE EXHAUST LOOKING FROM FRONT OF CAR AT 53 DEG MARKING
 
Last edited:
Great comprehensive write up. Better than any utube video's out there. So if I just wanted to change the secondary chain tensioners and fit oil check valves would I need to time up the engine for both banks.
 
Great comprehensive write up. Better than any utube video's out there. So if I just wanted to change the secondary chain tensioners and fit oil check valves would I need to time up the engine for both banks.
No you don't have to. Just remove the old ones ;)
 
Just thought I'd put an update seeing the cars been running for the last few months after the modification still silent is a mouse when I started up in the morning.

Also have been thrashing the ass off it and it's absolutely fine.

The only problem is I think I want the faster one now lol
 

Users who are viewing this thread

Back
Top Bottom