• The Forums are now open to new registrations, adverts are also being de-tuned.

Power steering valve/solenoid replacement

Shadgrind

Active Member
Joined
Jun 28, 2023
Messages
97
Location
Hungerford
Car
CLK350
Some of you may have seen my thread about power steering pump replacement. Well I finally got it in and working. Yaay, for about 5 miles, boo!

So from what I can tell either the rack is kaput or the magical sps valve, that changes power steering assistance with speed Lot’s of help when slow manoeuvring and none when you’re doing 90mph 80mph, sorry the legal limit officer 👮

I can see the solenoid/valve, taken off the plastic under tray, gone to take off the cover behind it, got to the large Torx bolt give it some welly with a cheap ALDI T-Bar Torx bit and surprise of surprises it snapped! The tool that is, ordered up a 1/2” impact drive set of bits, should be here today along with my sps valve.

My CLK has given me plenty of trouble over the four months I’ve had it, most of it not the common things, have had the skirts off it as they were scabby and bought used from fleabay, £95, matching colour obsidian black. I’ve had mirrors that g down when reversing but won’t go up, Machine gunning door lock, sorted with £6.99 spring kit from ebay. Dealer I bought from, actually put a new one in, along with greasy paw prints and a broken tweeter cover plus kinks in the window channel, oh and he managed to break all the clips.

Anyway, going to try an impact gun on the Torx bits and see if I can actually see more of the solenoid, already tried going in thru’ the wheel arch liner and found no rust, same as the sills. Just loads of spider webs. Going to clean all of the plastics and covers before re-assembly.

Watch this space. The missus hates me working under cars. But with a 3 tonne air jack and a compressor set to 8 Bar, plus six tonne jack stands. I think I’ll be fine if not, I’ll be crushed to death, ah well I’ve had a good innings👴
 
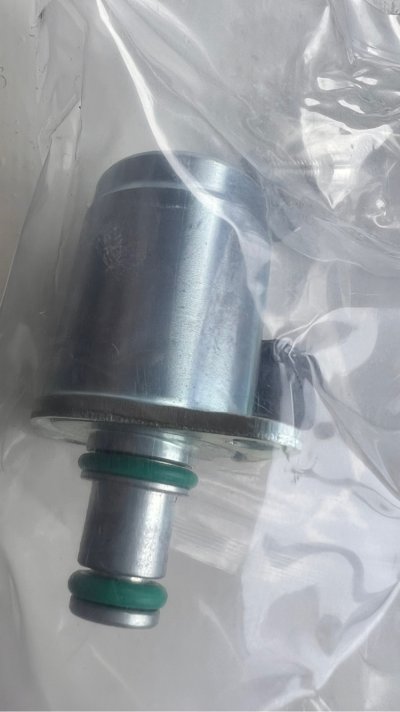
Valve is here :D


IMG_7389.jpeg
It’s not as big as it looks about three inches long and inch and a half across
 
Have been scouring YouTube to find how to fit this on an A209 CLK350, no videos show removing the lower cover plate that broke my Torx bit:(
 
Bit of an echo chamber here, any road up, got the impact torx bits and my ‘trusty’ (read cheap) Ugga Dugga cordless impact gun, got under the carpet it undo mode and gave it FULL SEND on a full battery, 1/2“ drive 420Nm. (On the box?!?). Five seconds and nothing apart from very loud noises. OK try the other one, five seconds, nothing put some penetrating oil on and left it for an hour.

Came back and gave it 10 seconds as per ‘torque test YouTube channel recommendation, zip, nada no bueno, zilch. Waited for the bit To cool down and gave it 20 seconds on each, then 30. Carried on until increasing time until I thought that’s all I can do and all the noisy machine can do.

OK, time for two foot long breaker bar, I got one to move although at first I thought I was stripping the torx head but, one down. Next one, gave it all I could and there is no way it’s gonna shift, I actually had it slip though I’m sure there is enough meat left in there to get a grip however due to the fact that it is virtually impossible not to put a side load on it.

New Ugga Dugga ordered, the saga continues, didn’t George Lucas say that once?
 
OK my journal entry for today. Got a new impact gun it says 600Nm on the box, we will see… Well it certainly feels more like it wants to break my wrist, after a while I have been hammering the living carp out of the bolt and nothing, time to escalate. Tried getting an air chisel to move it after cutting a groove into it with my angle grinder aaannnnddd, nothing. Penultimate escalation level, weld a nut and first a washer on it and get a two foot breaker bar on it, nut broke off.

Thinking about cutting the brace bar and using it to remove the bolt or cutting off the bolt head and drilling it out. I can then either put a helicoil in, if I drill the bolt or weld up the brace. Been using my stick welder so far, may have to mig the brace bar though, its coming out tomorrow, one way or another!
 
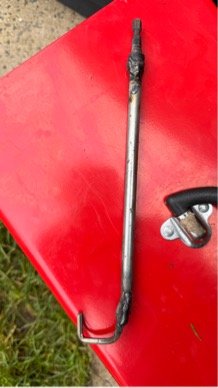
Today’s update, ground the bolt back flat, auto centre punch and get to drilling starting at 2mm, going up to 8.3 for helicoil drill. Took ages but I think I may have invented a way to make drilling up under a car easier… I was so pleased with it I uploaded it to YouTube here
 
Well, we have made some progress, I made a thing!IMG_7400.jpeg

And that managed to get one bolt loose. Made another to get the other bolt out by going around the plug but it was so curved and convoluted, I resolved to get the plug out squeezing and wobbling with Chanel lock pliers
IMG_7401.jpeg

And it came out, eventually.

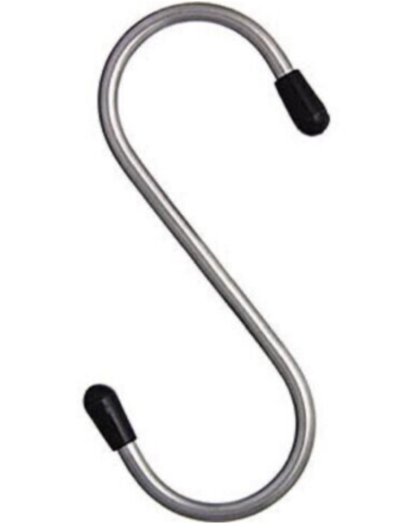
Went back to making the other tool, re-bent it with some heat, used a 4mm Allen bit one the end welded to the end of an ‘s’ hook, shaped to my design, this is what it used to look like
IMG_7403.jpeg


Back at it tomorrow…
 
We all know there would be no reason for it be be left handed ....but I bet for at least for one second after reading my post you thought FRUCK !! :p.

Sorry , couldnt resist.

Iv always said in workshop situations like you find yourself in . 'Heat & violence are your best friends. '
 
We all know there would be no reason for it be be left handed ....but I bet for at least for one second after reading my post you thought FRUCK !! :p.

Sorry , couldnt resist.

Iv always said in workshop situations like you find yourself in . 'Heat & violence are your best friends. '
Nah, I had got one of them out before, did have fun with a wheel bearing nut on a Mini once, only once mind. Getting the trackrod ball joint was already fun, air chisel and MAPP gas on that one after repeated blow with 5lb club hammer failed to do the trick, must invest in one of. Those ball joint splitters that you wind on, pickle fork, don’t cut it, my last on bit the dust when I tried to separate a top hub knuckle joint on an MX5, it broke right half in two!
 
Bought one of those about 25 years ago , used it twice , worked perfectly . Never used it since (15 years of company cars) then too busy to get involved with jobs like that for long years.

Might do ball joints on one of the cars soon , just so I can get my monies worth out of it ....if I can find it.
 
It was advised to wear eye protection when using, I thought, why, until it exploded violently, I thought, ah, that’s why, not big on H&S probably why I’ve cut myself twice in the last two weeks with an angle grinder with no guard on it as the blades are too big for it,I could weld one up I suppose but then I’d probably burn the shed down 🔥
 
Hopefully the final post, by me on this subject. Got the SPS in but it didn’t fix the problem. So at this point I have a car with, no power steering, not making unusual noises, with a fairly new PAS pump and an sps valve/solenoid.

Looking down into the reservoir I can’t make out any movement of the fluid, so am guessing the pump has just shat itself. Ordered a new pump from ebay after booking the old one in for return with a ‘no quibble guarantee’. Left the broken? pump on intending to use the packaging from the next pump to return it in.

Ah, we have a problem

IMG_0002.jpeg

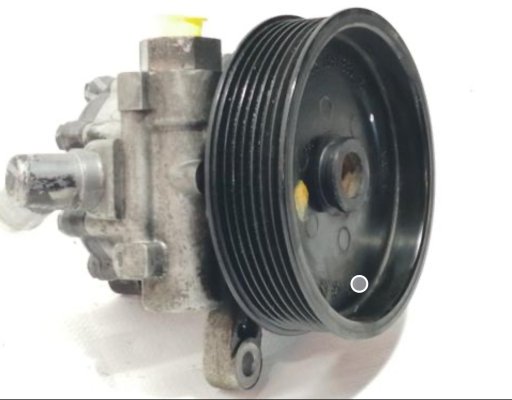
Looks nothing like my pump but, it may just fit, the reservoir is already attached but that looks noting like mine either. Mine should look like

IMG_0005.jpeg

And the reservoir should look like the pic below, attached by the spigot on the left of the pic above.

IMG_0006.jpeg

Not to be deterred, and to confirm my suspicions, I tore into the guts of the old pumps internals lots of bits of metal, not flakes but parts of the pump (vanes) came out and I noticed a rubber seal that appeared to be damaged. I thought to myself the reservoir on the new pump has to come off as it does not fit. When I took it off I found no spigot just a medium size hole,would the spigot screw in there? Into the vice with the old pump, leaving bits of pump on the bench. By the use of an adjustable spanner trying to unscrew the spigot it came ”unscrewed?’ Well it came out by twisting it, and by the magic of adding a hammer to the mix I got it into the new pump.

Trouble was, the mounting bracket on the new pump, even with the reservoir in the correct location did not line up with the mounting holes! To make matters worse, the pulley on the new pump had no holes in the by which you could get to the fasteners for it. I guess I’ll have to get a pulley puller? Nah, I’ll drill a hole in the pulley big enough to get the Allen head bolt out, after a slight hiccup, when I thought the hole was big enough,I wound it out and it got stuck behind the pulley, it was encouraged in with liberal amounts of swearring. After which I embiggened the hole with a step drill, and bracket swapped over.

To the car!!! All sort of seemed to line up except there weren’t any fixings on the back of the pump, so there was nowhere to put in that bolt that was so difficult to get out. Apart from that all looked good I did wonder, what was the electrical connector on the pump for, although, Idid find a plug on the end of a wire that was unused when I first removed the pump, found out that it is unused, anyway it won’t reach the connector on the solenoid looking thing, found out later it is a proportioning valve, similar to the SPS.

All good then apart from how do I get a ground to it there aren’t any convenient threaded holes on the back of the pump. There is a thread going into the side of the pump, ifI cut down one of the spare 6mm Allen headed bolts down a bit it should fit.

That would be just too easy before the Allen bolt got fully home it fouled on the high pressure output banjo, so I modified it, with my bench grinder, tapered it down and made it thinner walled, did the same to the eyelet on the ground wire. Degreased everything and took it for a spin, fully confident in my mastery of hydraulics, actually crapping myself but it was working.

And that, people, is how I came to get the Nobel Prize in mechanical bodgery
 
Bravo ! you win the Heath Robinson award . Sometimes you just gotta do what you gotta do 👍
 

Users who are viewing this thread

Back
Top Bottom