• The Forums are now open to new registrations, adverts are also being de-tuned.

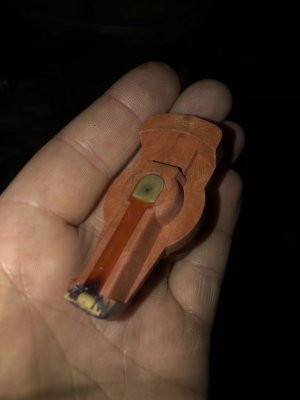
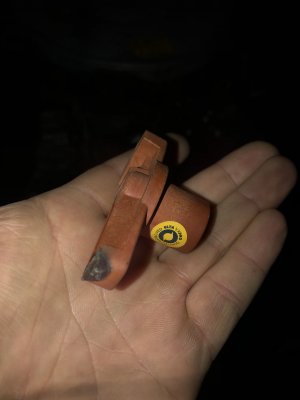
500SEC Bent rotor arm after 50 miles

Gear1275

Member
Joined
Aug 7, 2019
Messages
36
Location
Bristol
Car
500 sec
Evening gents.
Replaced rotor arm and dizzy cap along with plugs as part of a recommission on my 500 sec that had been off the road for 4 years.
Since then I have done 400 miles and burnt out 2 rotor arms!
I will try and attach a photo to show you. They burn out within 50 miles and then leave me with a slight miss at idle but the car still pulls really well at full and partial throttle.
Car has gone 75k.
Any ideas?
I would say dodgy arm but 2 in a row?!
They were supplied by my mate thru the trade who always gets me good quality parts but they weren’t Bosch or beru.
What do merc supply??
 

Attachments

  • C5E67060-800E-40AE-A3FE-35BC5551E14A.jpeg
    C5E67060-800E-40AE-A3FE-35BC5551E14A.jpeg
    644.4 KB · Views: 53
  • 7FD549F8-B96E-4970-BE1D-BA70D785D9CE.jpeg
    7FD549F8-B96E-4970-BE1D-BA70D785D9CE.jpeg
    626 KB · Views: 52
Could be many things -- wrong coil voltage if the system uses ballast resistors, wrong spark plug gap, wrong leads/spark plugs-most plug leads are copper cored with resistors built in to the plug connectors and run non resistor plugs, wrong rotor arm/distributor cap clearances height, faulty rotor arm built in resistor. etc etc
Some more suggestions here
Burning distrbutor rotor

Wow, lots to check then. Plugs are new and I can get a model number tomorrow. They are gapped correctly.
What voltage should I expect at the coil?
 
Always pays to compare new and old to compare technical specification and basic stuff like dimensions/clearances /orientation etc. Problem with older cars is that with age there is a tendancy for owners to use non factory spec replacement parts so this may no longer be an accurate guide. :( For example have you checked the old and new rotor arms side by side visually and check dimensions with some vernier calipers
Depending on the age of your car this might be useful?= same engine
Model 107
 
Last edited:
Valid point.
I haven’t got the old rotor arm any more to compare but the old one wasn’t burnt, just old and tired.
I changed the cap and arm and plugs at the same time and that makes me wonder about what you said regarding the plugs.
Have you got a particular go to plug brand and part number and gap that you use for the m117 engine?
I will pull a plug tomorrow to see what I’m running.
The ht leads all have 1k ohm resistance if that helps determine if they are the resistor type or not?
Or were they all resistor type and require non resistor type?
The plugs are gapped to 40 thou also
 
Worn distributor bearings?
I was thinking that but the car has barely done any miles in the scheme of what these cars do
Any ideas where to go to get replacement ones short of stripping mine to bits and then trying to source from there...
 
In the old days distributor shaft wear would often show up when measuring dwell angle but with contactless ignition that wouldn't necessarily apply. :( Like you mileage seems low for shaft wear but who knows .
An Article on m117 distributors.
Mercedes-Benz W126 Distributor Replacement | 1981-1991 S-Class | Pelican Parts DIY Maintenance Article
It mentions arching caused by a faulty vacuum advance[ diaphragm gone] ??? The comments section is also worth a read. While they mention marking the position of the distributor body before removing they should also mention marking the position of the rotor arm. Sometimes there's a notch on the distributor body to facilitate this.

how to test vacuum advance
How to Test the Vacuum Advance in Classic Cars
 
Last edited:
I will heck the vacuum advance tonight when I return gap and check the plugs.
Also, from a static timing point of view, I assume it’s number 1 piston at tdc on compression stroke and at that point rotor arm should point to number 1 plug lead on the dizzy cap?
Then with a timing light at idle with vacuum advance removed and plugged set to tdc at idle and 25 degrees at 3k rpm to check manual advance?
I have already set this but can re check it.
Also, I have 50.1 amg cams so would I need to modify my timing to suit??
 
I would have fitted part from one of two makers -- Distributor cap -Bosch along with Bosh rotor arm
,, ,, ,, Beru along with Beru rotor arm .These parts are made to work together .
Other makers of ht parts are out of the equation .
 
Thanks for that.
I’ve got workshop pdf manuals that have been very helpful.
One last thing, was it 12v to the coil?
The wiring diagram I’ve got implies that it is unless you know different?
 
Can't say for sure but may depend on whether you have a ballast resistor setup or not. POST UP your chassis no?
 
Go back to the beginning. You did not have this problem before; you have changed plugs, distributor cap and rotor arm; the problem appears. It is 99% probable (there's always that 1%; never say never...) that either therein lies the fault, or you have accidentally done something (disconnected a capacitor, say - that used to cause arcing across points) that has caused it. (For our younger viewers, points were an essential ignition component back when dinosaurs roamed the earth...).

Good luck; I'm sure you will get it sorted.
 
Last edited:
Your asking questions now. I will be home from work at 5:30. What do you want a specific picture of??
 
Gents,
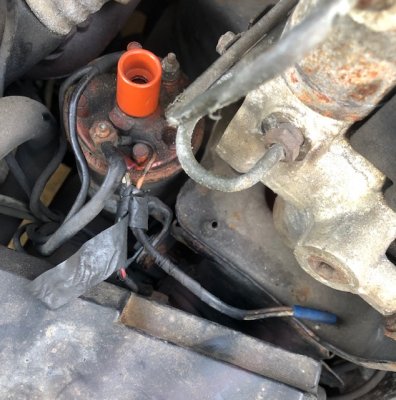
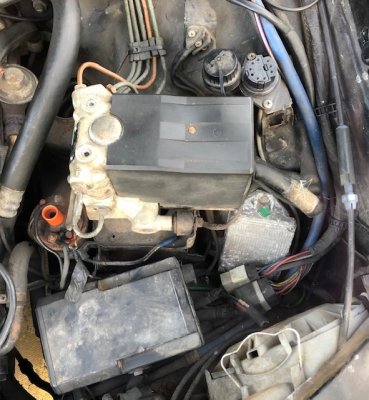
Some photos from tonight.
I have the correct BP6ES plugs and I have regapped them from 40 to 32 thou.
I have also found that my battery needs replacing.
I have no resistors at all so I assume I’m the later type?
If so, do I need a non resistor coil?
Also, this wiring looks far from factory with the crimp connectors. What’s people’s thoughts??
 

Attachments

  • 85D717F2-701A-4B72-BB90-46D70E45F571.jpeg
    85D717F2-701A-4B72-BB90-46D70E45F571.jpeg
    150.1 KB · Views: 27
  • 354F8607-1FB9-4F13-A78C-394616FD853E.jpeg
    354F8607-1FB9-4F13-A78C-394616FD853E.jpeg
    151.8 KB · Views: 27

Users who are viewing this thread

Back
Top Bottom