• The Forums are now open to new registrations, adverts are also being de-tuned.

CL500 W215 ‘Paid In Full’ Style

Another update:

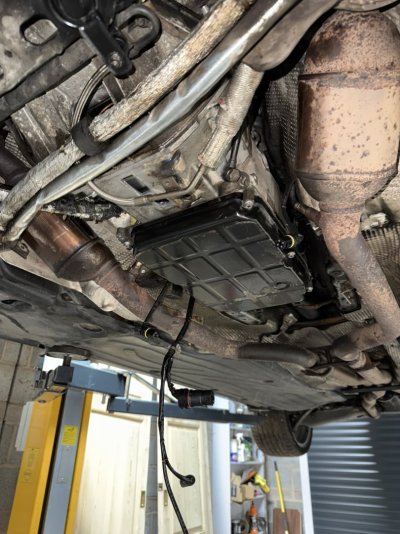
Took off the plastic under trays on the passenger side earlier today to investigate the ABC leak. It seems to be coming from one of the three rubber hoses that go into the valve block. As the gearbox is out of the car, I can’t start it to check this so, I’ve decided to replace all three as, they all look like they can do with a refresh. I’ve taken measurements and made an order for three custom hydraulic hoses that can withstand 4500PSI so, that gives a nice big cushion over the operating 3000PSI rating. Just to note, the internal pipe diameter is all the same so, this won’t change the operating PSI level.

While in this area, I’m going to replace a steel fuel line with a new custom one paired with a new rubber fuel hose that leads into the fuel filter - I had to change this a couple years ago as all the pipes broke when replacing the fuel filter and did this before I had any ramps so, not 100% happy with the job I had done then. There’s also another fuel line I’ll replace too but, will photograph this when all these pipes arrive.

I’ve also decided to buy some Stainless Steel Braided Brake Lines for the CL too - I got side tracked when looking at parts then got a little carried away🤣 I am looking at trying to find brake new heat shields for under the car but, they’re impossible find right now.
 
The new Hydraulic hoses have been made!

Two will screw right into the valve block and the one will screw into a compression joint as the angle is sharp to make it work.

The other ends of these will fit into compression joints which will be on the original steel pipes.

Gearbox should be ready for pick up tomorrow or Friday!

IMG_2114.jpeg
 
The Gearbox is back!

The new oil pump has been fitted along with new seals as well and the T/C has been rebuilt and balanced ready to go.

I’m excited to have this put back in.

Really got to shout out RMD Automatic gearbox specialists over in Stafford - When dealing with them you can see why they’re 5* on Google.
IMG_2133.jpegIMG_2134.jpegIMG_2131.jpegIMG_2130.jpeg
 
Gear box is back in😎

Got back from work this afternoon and got it in!

Got a few lines to left to bolt in but, 95% done.

However, note to myself and anyone else, don’t leave the gear selector rod hanging down… I walked straight into mine, got a bruise and bent it🤣 I’ve got one ordered with new clips on the way.
IMG_2138.jpeg
 

Attachments

  • IMG_2137.jpeg
    IMG_2137.jpeg
    193.2 KB · Views: 4
IMG_2855.jpegHey guys, another update on the project:

The gearbox is 100% sorted! I got a shifter rod delivered.. well, actually two of them and they were all the wrong lengths. However, I managed to remove the holding bolt and adjust the torx head which then allowed me to get the correct length. I also faced the common shifter lock fault so, I ordered the aluminium replacement piece and got that sorted.

Since then, I’ve drained the oil in the gearbox, put a new filter on, new gasket and conductor plug and really shifters like butter.

Now the main headache is over and done with, I can now start tackling the fun stuff so, I ordered the following:

  • Brakes discs front and rear
  • Brake Pads front and rear
  • Complete Suspension arm set front and rear
  • Braided brake lines front and rear
  • MAF Sensor
  • Tie Rod Ends
  • Alternator Pulley
  • Tensioner Pulley
  • Idler Pulley
  • Drive Belt
  • Crankshaft pulley seal
  • Crank shaft harmonic balancer
  • Bolts for both cam covers and inspection covers
  • Gasket seal for the cam covers
  • Slider pins front and rear (to replace the old corroded ones)
  • Lug nuts
  • ABC Fluid
I’ll look what else I’ll need but, for the moment, this is it! I’m still waiting on the suspension stuff to arrive but, should come today or tomorrow.
 
Bloody good effort!

Matt :thumb:
 
Amazing effort!
This car just keeps getting better and better
 
Getting prepared to strip the front end suspension arms this weekend and I’m thinking, whilst I have all the arms taken off and the ball joint popped out, I’ll sand down the wheel hub bracket and give this a new coat of paint to tie in all the new parts.

I did try searching for brand new hub brackets but, looks like they’re discontinued so, oh well.

I’ll grab some pictures over the weekend and get some good updates going.
 
Well, I just had a look at the suspension and I realised, I have to remove both struts in order to get to the upper wishbones.

With knowing this, I thought, why not get new plastic covers for the struts which are super cheap but, I realised, I have to take apart the top mount to get to it.

Knowing this, I thought, why not just get new struts and make everything brand new on the front end? Which is what I have done😁.

I can’t wait to drive this once all done. New bushings, arms, struts, gearbox refresh, T/C etc… It will drive like brand new😎.
 
Hello guys, another update!

I’ve just got back from holiday earlier this week and been catching up on some work. As end of July is usually a quiet time for work, I have a bit more time on my hands so, earlier today I started on the ABC lines on the rear left valve block.

I started off by labelling the lines to keep things in order. IMG_2978.jpeg

I did a quick test fit with one line to mark up the spot to cut the pipe and fit the compression joints on.

On line 2, I realised this would put me in a tougher spot due to the 75 degree bend the pipe has so, I played it safe and did a cut just in front of the bend about 10mm - It worked but, I’m going to head back to the machine shop tomorrow and get another made and add 75mm to the length and make a cut behind where the bend would be as I’ll have a nice long section to use and also, it will keep me so nice clearance away from the pivot point of the lower control arm.

For the pipe that goes into the side of the valve block with a sharp angle, I had reused this piece and attached a compression fitting - This was due to the bend needed being too much for the hydraulic line to comfortable work. Came out great and ended up spraying some rust protector over the bare metal areas of the pipe (from sanding).
IMG_2980.jpeg


IMG_2982.jpeg


IMG_2984.jpeg

At the moment this is how it is - One pipe fully fitted and the other loosely in place as I’m going to extended this one. The last pipe is the easiest and I’ll do that tomorrow.

Due to using new pipes etc.. I’ve got to figure out a new way to hold the pipes in place as, the original bracket had a rubber bushing which would fit 10mm pipe but, this is now much bigger. I am thinking of enlarging the current holes to retrofit the new pipes as this would be the easiest and cleanest option.

Once this is all done, I’ll get to removing the surface rust in this area and spraying over with satin black rust convertor.


Here’s a pic of the old pipes that got taken out.IMG_2985.jpeg

I’ll be back with more tomorrow.
 
Two hoses fully on!

I just need to get one shortened and this job is all done and dusted.

As I couldn’t reuse the ends of the pipe for hose 1 and 2, the hydraulic guys said, if there’s a flat surface around the the point of entry, a copper washer can be used to seal the joint 100%. As the operating pressure is way below what these joints are capable of, they said I should have no issue so, this is what we went for!

IMG_2987.jpeg

If this doesn’t work, I’ll pinch the ends off of some other pipes and make another join.

Here we are as of now.
IMG_2995.jpeg

You can see the silver mark I’ve made on the top hose; this will be where the hose is reduced to.

Tomorrow morning, I’ll have this all wrapped up fingers crossed!
 
Oh also, for those wondering, the joints I used to go into the valve block were imperial to metric.

image.jpg
 
I can happily say, the ABC leak has been fixed!

IMG_3003.jpeg
IMG_3001.jpeg

I ran it for 30 minutes, going up and down, checking the fluids and to see if there’s any leaks and I can happily say, it’s working 99%! I say 99% as, I just need to let a little air out through the bleed nipple as fitting the new pipes trapped some air but, very minor and 5 min job.

I also replaced the return fuel line with a brand new hose.

All that’s left in this area is, a new hardline fuel pipe + flexi hose to replace what is there now. The original one as you can probably see, rusted through and fuel apart so a quick fix was done - This time round, I’ve got coated aluminium hardline from Demon Tweeks which I’ll route through the original passage and get this buttoned up neatly.

Once this is done, I’ll get the rust taken care of and give it a new lick of paint.
 
Not too big of an update but, took the MAF unit out, replaced the sensor, gave the whole area a clean and got it put back in - It’s now running perfectly.

I also checked the new ABC lines and 0 leaks👍.

I’m just waiting on the new struts to arrive so I can tackle the front end suspension and then get onto the brakes.
 

Users who are viewing this thread

Back
Top Bottom