• The Forums are now open to new registrations, adverts are also being de-tuned.

OM642 Green O-Ring replacement instructions?

TeddyRuxpin

MB Enthusiast
SUPPORTER
Joined
Jan 10, 2019
Messages
2,377
Location
Cardiff / London
Car
2x E350 CDI Sport W212s... for a bit
Hi,

Does anyone have clear instructions on how to replace this?

My dad's 2010 E350 (265bhp / 7G+) went for a service and this came up as needing changing.

Anyone have clear instructions on how to swap this out?

I assume it's relatively easy, but was just wanting to find some instructions before I go ripping things apart.

Cheers!

Ed
 
If that is the green o-ring on the pipe from the turbo to the intercooler then I used a small wipe of silicone grease to ease the fitment - nothing difficult or special. Just un-bolt the pipe and ease off. If you are changing the green o-ring I would advise you do the black o-ring at the other end. Mine was worn and leaking a slight oil mist and you might as well whilst you have it apart.
 
Hiya,

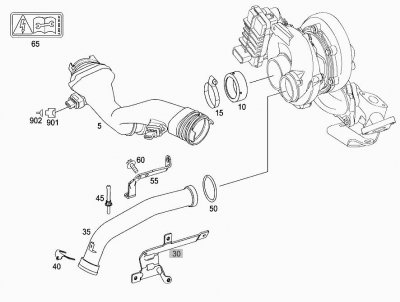
I think it's number 50 in this diagram. Changing both sounds like a good idea - but I don't think I see a black o-ring seal?

I wasn't sure exactly which bolts to undo to get the pip off, but I haven't actually poked around just yet.

Cheers!

Ed
 

Attachments

  • s-l1600.jpg
    s-l1600.jpg
    60.4 KB · Views: 245
I've got a leak front the black seal end too. Haven't been able to find it in a diagram either.
 
The part number for that black seal is A0179973545/64 - that was what MB of Newcastle put on the order. They did say they never sell any but mine was leaking and is not leaking now it has been replaced. Its rubber and after 150K miles and 11 years it will have degraded.
 
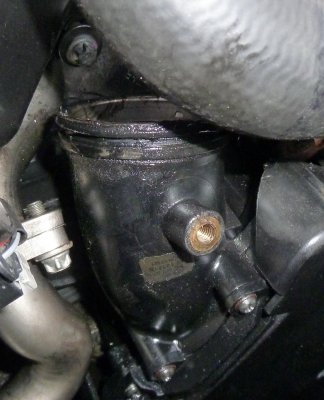
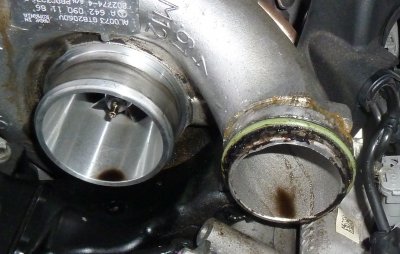
Last weekend I pulled off the metal air pipe running from the turbo to the plastic "resonator" at the front of the engine.
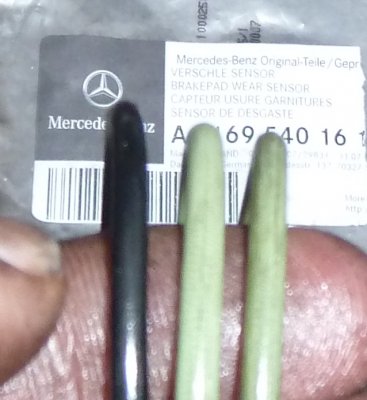
The turbo end had a green seal which I replace with a new green seal. The new one having a slightly thinker cross section.
The other end at first I thought the seal was missing. There's a big recess in the plastic where a seal would go. But on closed inspection
there was a little black seal in there. At the time I didn't have a new black seal, but did have a second spare green seal, when was significantly thicker, so put that on.

A week later, I think the oil from that area has stopped. I now have a new black seal, thinker than the old one, but about the same as the green, so I may just leave the green in place.
I didn't like pulling the plastic resonator forward in able to remove the metal pipe, I felt it may have snapped. If has a cover with tiny screws, and the resonator itself I think has one or two
larger bolts securing it to the front of the engine.

The next non sub zero weekend I'll put it on the ramps again, remove the covers and give it a good clean, then keep an eye on it.
I also bought some halfords electrical cleaner to spray on the MAF sensors. It's so dark in there I see any dirt or tell if it was doing any good.
But following the MAF clean and air pipe seal replacement the car does feel better. Or maybe it's psychological?
 

Attachments

  • air_pipe_resonator_end.jpg
    air_pipe_resonator_end.jpg
    436.7 KB · Views: 182
  • air_pipe_turbo_end.jpg
    air_pipe_turbo_end.jpg
    445.3 KB · Views: 167
  • old_black_new_green_old_green.jpg
    old_black_new_green_old_green.jpg
    274.5 KB · Views: 161
If there was any loss of pressure because the seals had compressed over the years then this would have caused a loss of performance. After changing the same two seals on mine it was definitely better, especially on pickup, it reduced some of the 'lag'.
 
I'm trying to do this right now and having a bit of a nightmare. I've removed the tall hex bolt and the small torx that connects it to the 'resonator', but I can't get the damn pipe off - there isn't enough 'play' to get it out.

What do I have to do, take off those tiny torx screws on the resonator and remove that?

I thought this would be much easier, unfortunately, and now it's dark (and cold) and I have to shoot off (in another car) in a few hours!

May have to bail out and put everything back together if I can't get it off in the next hour or so, so I came here for an SOS. Help!
 
Does it help to remove the aluminium pipe that leads to it first. That's how I did mine, you then have room to pull the resonator off. Guessing as mine is a CLS not an E so may be a different.
 
I'm trying to do this right now and having a bit of a nightmare. I've removed the tall hex bolt and the small torx that connects it to the 'resonator', but I can't get the damn pipe off - there isn't enough 'play' to get it out.

What do I have to do, take off those tiny torx screws on the resonator and remove that?

I thought this would be much easier, unfortunately, and now it's dark (and cold) and I have to shoot off (in another car) in a few hours!

May have to bail out and put everything back together if I can't get it off in the next hour or so, so I came here for an SOS. Help!

As I recall doing this on my ML I did need to remove the bolts holding the resonator on the engine. The lower end of the resonator connects to a hose so there’s room there.
I found that putting things back together was the challenging part. The O-rings, when new, make for a tight fit. The pipe to the turbo was somewhat easy, but the pipe to resonator was not. Need to be certain it’s fully seated before sliding the C clamp in place (this is the one with the torx screw).


Sent from my iPad using Tapatalk
 
The replacement 'black' seal between the outlet end of the metal turbo pipe under the batwing and the inlet for the resonator for the 265bhp OM642 engine (E350) is I believe A0279974745. (this is the other end of the pipe to where the green seal goes).

See here for a parts catalogue:
CHARGE AIR INTERCOOLING MERCEDES E-KLASSE [Car] [CHASSIS] (EUROPA)

All the intercooler pipes, resonator and seals are shown.
 
For the air charging system for the 265bhp CDI engine, I thought it would be useful to list all the sealing o-rings in the direction of air travel. Taken me ages to compile this, so I hope it helps someone.
Small smear of silicone grease to ease fitment of seals is recommended apparently.

A6420940180 - Red/Orange seal between the Batwing body and the turbo inlet. No updated seal showing in the online parts catalogue.
A0009959710 - Replacement official Mercedes jubiliee style clip to secure the above red/orange seal (I'd suggest inspect the existing one and see if you can reuse).
A0149976445 - Green o-ring seal between the turbo outlet and the long metal pipe under the batwing (the original topic of this thread).
A0279974745 - Black o-ring seal between the end of the long metal pipe under the batwing and connection to the inlet of the resonator.
A0219976545 - Black o-ring seal between the exit of the resonator and the inlet of the first intercooler pipe.
A0219976645 - Black o-ring seal between the exit of the first intercooler pipe and the inlet to the intercooler.
A0219976645 - Black o-ring seal between the intercooler exit and the inlet of the second intercooler pipe (same seal as above).
A0289974548 - Green o-ring seal between the exit of the second intercooler pipe and... where ever it connects to. I haven't got that figured out yet.

I'll be changing some or all of these due to oil generally being present on the top of the engine and probably update this or the following thread on the results of fixing a slight air/oil leak.
2011 E350 oil / air leak?

Very good information.

Thank you

Joseph~
 
Bought all these from MB Grangemouth to change all the turbo-intercooler o-rings.
A0149976445
A0279974745
A0219976545
A0219976645 x2
A0289974548

Really helpful bunch.
Came in at just over £30, and sent to a local Arnold Clark for free delivery. Best price for these parts by a mile.
If you need some Merc bits, I recommend you see what their prices are; I've been pleasantly surprised!
 
Hi guys, I've been wanting to ask - how do you free the plastic 'shield' behind the fan, that is in front of the resonator, the EGR pipe, and the glow plug relay?

There are two bolts at the top that you can remove easily and that loosens it, but it's attached in the middle somewhere, but I can't figure out how it comes out. You don't have to remove the grill do you?!

My problem was that I cannot really get to the little torx screws to get the resonator loose, just no room to manoeuvre.

I'd planned to clean those EGR pipes near there too in the future, so I do need to figure that bit out. Perhaps watching some videos on removing/replacing the cooling fan itself will show that part of the disassembly.

Cheers for any tips you can give,

Ed
 
I've obviously just ordered the bits, but my expectation was a bumper off job to gain access to all these seals...?

If anyone wants to recommend a workshop manual to give this sort of instruction, there's a thread running here:
W212 Eclass Service Manuals
 
Anyone? I'm sure plenty of people have done this :-)

Otherwise, the MOT is coming up soon, so I might just take the seals to the indie and get them to do that before the MOT. I'm hoping it would be an hour (or less) of labour.
 
I've been unable to get WIS to work on my Windows XP machine. I'm in the process of building a Windows 10 machine, so hopefully I'll be able to get it to work on that, at which point we will be golden on understanding correct maintenance procedures ;)
 

Users who are viewing this thread

Back
Top Bottom