paulblincoln
New Member
Replacing W202 Front interior dome light
This is to share the removal and installation process of the W202 interior light that dropped down on me recently.
The light unit was replaced with a new piece bearing part number A2028202301 I have a suspicion this is a RHD part number whilst others may be A2028202201
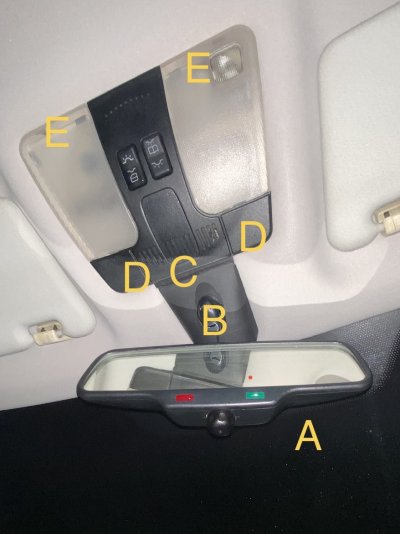
1. Some basics... the lamp unit should only be removed after mirror (A) is removed as Mirror A overlaps the lamp unit. For info on mirror removal go here. Generally the black plastics are more flexible than the grey plastics. The tropical heat of my country has made all grey plastic brittle.
How to Dismantle a Rear view Mirror. (W202 C class) | Interior
2. The lamp unit has 2 spring clips (D) and is tucked under the mirror (B) at location (C)
3. The lamp unit has 2 hooks at location (E) and are not movable. attempts to remove the lamp unit from this end will result in breakage of the hooks ( YOU DIE!)
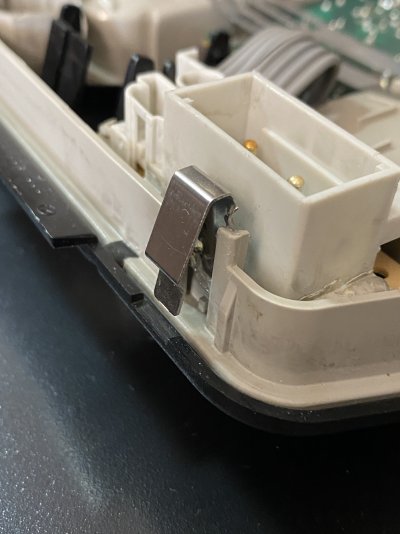
4. The hooks at (D) look like this and there is a notch just below the metal clip to help you press the clip in for removal.
5. To remove the lamp.. remove the mirror first. this can be done by gripping the neck of the mirror (near B) and firmly pulling downwards, there is an electrical connector but it has no clip and should come apart.. ideally don't pull too far. Generally all parts concerned here are metal
6. then attempt to release the lamp unit from the side nearest the windscreen. this is secured by spring clips and you may need to use a flat screwdriver to depress the spring clips
7. with the windscreen side released, you should be able to remove the whole light unit.
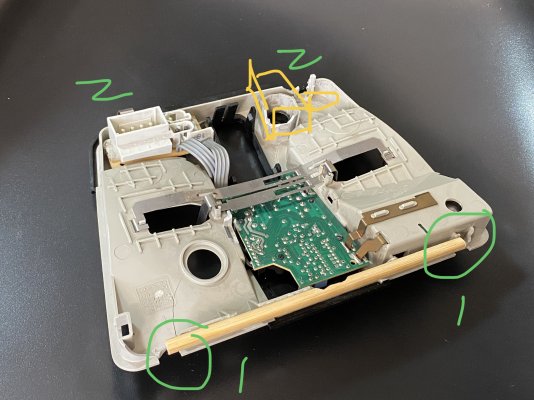
8. Below is what a messed up light unit looks like. (please excuse the chopstick i was using in an attempt to rebuild my clips)
9. The Fixed clips (now broken) used to reside in position 1. The spring clips are at position 2.
8.
10. For my car there are 3 wire connectors attached to the lamp. All remove somewhat easily, they pull straight out and only go in one way.
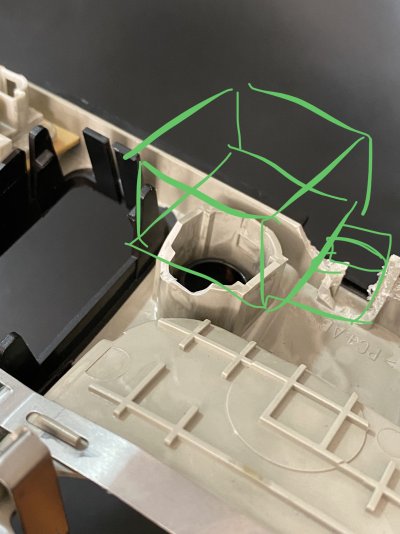
11. the area in yellow will have your air sensor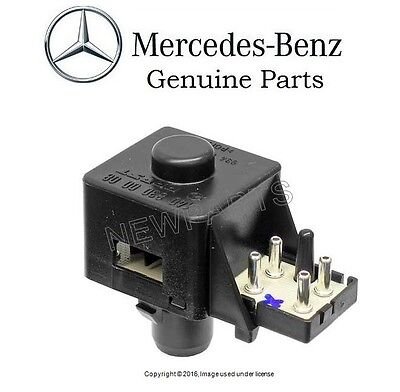 . the sensor is made of a cover and a body and it clicks right into place. You'll notice on my image below, when i popped it off, the grey plastic has broken off.
11a. at area (C) there is a cover for non sunroof cars. this can be removed from your old lamp unit as it is secured by 4 clips. Brand new lamps units do not come with this
12. Putting everything back is somewhat easy for the lamp. (E) hooks the headliner and (D) will clip into place. Recommend to test your lamp functionality before hooking it back
13. The fun bit is putting the rear view mirror back.. (lots of swearing for me) my eventual way was to lube the tips of the spring clip of the mirror
14. lie on my back across the front seats, position the mirror, put my palm on (B) and press firmly upwards like i was trying to push it through the roof.
and you're done.
This is to share the removal and installation process of the W202 interior light that dropped down on me recently.
The light unit was replaced with a new piece bearing part number A2028202301 I have a suspicion this is a RHD part number whilst others may be A2028202201

1. Some basics... the lamp unit should only be removed after mirror (A) is removed as Mirror A overlaps the lamp unit. For info on mirror removal go here. Generally the black plastics are more flexible than the grey plastics. The tropical heat of my country has made all grey plastic brittle.
How to Dismantle a Rear view Mirror. (W202 C class) | Interior
2. The lamp unit has 2 spring clips (D) and is tucked under the mirror (B) at location (C)
3. The lamp unit has 2 hooks at location (E) and are not movable. attempts to remove the lamp unit from this end will result in breakage of the hooks ( YOU DIE!)
4. The hooks at (D) look like this and there is a notch just below the metal clip to help you press the clip in for removal.

5. To remove the lamp.. remove the mirror first. this can be done by gripping the neck of the mirror (near B) and firmly pulling downwards, there is an electrical connector but it has no clip and should come apart.. ideally don't pull too far. Generally all parts concerned here are metal
6. then attempt to release the lamp unit from the side nearest the windscreen. this is secured by spring clips and you may need to use a flat screwdriver to depress the spring clips
7. with the windscreen side released, you should be able to remove the whole light unit.
8. Below is what a messed up light unit looks like. (please excuse the chopstick i was using in an attempt to rebuild my clips)
9. The Fixed clips (now broken) used to reside in position 1. The spring clips are at position 2.
8.

10. For my car there are 3 wire connectors attached to the lamp. All remove somewhat easily, they pull straight out and only go in one way.
11. the area in yellow will have your air sensor
 . the sensor is made of a cover and a body and it clicks right into place. You'll notice on my image below, when i popped it off, the grey plastic has broken off.
11a. at area (C) there is a cover for non sunroof cars. this can be removed from your old lamp unit as it is secured by 4 clips. Brand new lamps units do not come with this

12. Putting everything back is somewhat easy for the lamp. (E) hooks the headliner and (D) will clip into place. Recommend to test your lamp functionality before hooking it back
13. The fun bit is putting the rear view mirror back.. (lots of swearing for me) my eventual way was to lube the tips of the spring clip of the mirror
14. lie on my back across the front seats, position the mirror, put my palm on (B) and press firmly upwards like i was trying to push it through the roof.
and you're done.
