• The Forums are now open to new registrations, adverts are also being de-tuned.

A207 Rear mesh screen headrest motor removal

Keekeemonkme

New Member
Joined
Jul 27, 2020
Messages
3
Location
plymouth
Car
e350 convertible
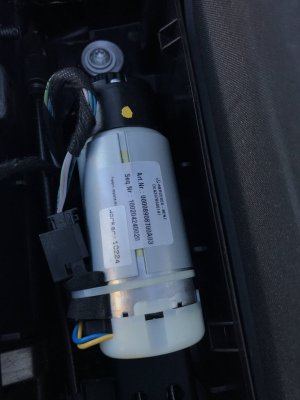
Help to locate procedure? - Just got my first Mercedes, an E350 3.0 V6 convertible (A207). It's fitted with the air cap system with a mesh screen between the two rear headrests. Delighted with the car in every way, however there is an issue with the vertical drive mechanism of the rear headrest/central mesh screen. During operation there is a high pitched whirring sound, which eventually times out (about 20 secs) as it assume didn't reach raise/lower switch?! Occasionally the function is perfect and the rear headrests/central mesh screen raise and lower as expected. By removal of the rear parking distance LED indicators I can hear that the central mesh screen motor (p/n: A2078600141) is struggling to operate 100% of the time. This makes its operation intermittent. I've found a couple of 2nd hand replacement units online, but cannot find a procedure to show the steps to remove the unit totally. I'm hoping it's straight forwards but am really struggling to location a procedure to replace this unit for the A207 (picture attached of motor). Hoping that someone can help me locate a procedure, or YouTube video, to assist? Thanks in advance for any support you can offer.
 

Attachments

  • A2078600141.JPG
    A2078600141.JPG
    846.1 KB · Views: 10
Well I have not much idea about this other than in order for the motor in the picture to work raising and lowering the mesh screen,it must drive a cog that meshes with another to complete the task,as you can quiet easily see the motor I would cut that white once only and lift the motor out and see if the cogs have all their teeth,I only offer this advice because you have said that the mesh sometimes works and makes a noise,which suggests the motor is ok it is what it drives that is going wrong.
I hope we have a cenvertable owner on here who can help you further
 
  • Like
Reactions: 219
Well I have not much idea about this other than in order for the motor in the picture to work raising and lowering the mesh screen,it must drive a cog that meshes with another to complete the task,as you can quiet easily see the motor I would cut that white once only and lift the motor out and see if the cogs have all their teeth,I only offer this advice because you have said that the mesh sometimes works and makes a noise,which suggests the motor is ok it is what it drives that is going wrong.
I hope we have a cenvertable owner on here who can help you further
Zipdip, thanks for your message. I'll certainly take a look under the white cover and report back my findings.
 
  • Like
Reactions: 219
Success! Just thought I'd update explaining how I replaced the rear headrest/mesh wind deflector motor. After being unsuccessful in finding a work instruction/procedure explaining how to replace the headrest motor, and the sun was shining! I thought I'd give it a go myself. Thankfully it was a lot easier than I'd expected! As follows...
- Obtain replacement motor (p/n: A2078600141) from eBay (£40-£50)
- Fully open roof, then begin close process so that rear cover raises vertically so you can see the folded roof.
- Remove the plastic trim which holds the rear parking distance LED indicators, between the headrests. Simply insert a 4mm hex key into the two holes in the rear of this trim. This will disengage the plastic tags releasing the plastic trim and lift upwards.
- No need to electrically disconnect the LED indicators. Simply place it onto the folded roof.
- Disconnect the central mesh assembly from the headrests by rotating the left and right 4mm hex (plastic) screws. This is not essential but I found made lifting the headrests individually more easily.
- From its lowest position lift each headrest one-a-a-time by about 20mm. This should be enough to take the tension off the single control wire from each headrest. Support in this partially raised position with a trim tool inserted in the gap which appears, at the rear, beneath each headrest.
- You should now be able to manually remove each control wire from the motors leadscrew 'follower'. It's the white plastic piece which moves along the leadscrew! You may need to adjust the position of the leadscrew, with the thumbwheel at the far end of the motor, to help fiddle out the wires.
- You will have noticed the motor assembly is mounted on 3 rubber tube mounts (about 20mm long). Take a trim tool and gently lever the motor assembly upwards until the rubber mounts release from their mounting points.
- The installation process is simply the reverse of the removal process.
- Functional test shows the motion of the headrests to be smooth and repeatable.
- Good luck!

P.S. Further investigation of the 'failed' motor showed the drive belt had damaged teeth. No obvious damage to the teeth of the gears so maybe a replacement belt could have been all that was needed? Ah well it was a good learning exercise!
 
Useful post ... always good when you manage to sort something yourself with out spending a fortune on it.
 
Good work Keekee and a very handy bit of info.
 

Users who are viewing this thread

Back
Top Bottom