• The Forums are now open to new registrations, adverts are also being de-tuned.

CL203 front wheel hub

TucksMirror

Member
Joined
Oct 17, 2022
Messages
58
Location
West Midlands
Car
CLC C180k 2009
Hi all,

Quick query that I was hoping for some help with.

I have been redoing some items on the front suspension relating to an MOT fail and advisory items. I am in the process of installing new control arms and brake discs. (The discs are rusted to the hubs, nightmare).

The whole front area has been a bit of a challenge, and there is now a small pile of rust growing under the front hub on the floor :)

In the process of disassembling everything the brake disc dust shield disintegrated due to being extremely rusty, so I pulled the rest of it away intending to replace as well, and I now have the part.

I have come to the realisation that I need the wheel hubs off to replace the dust shield.

The Haynes manual states that you should not refit a hub and bearing assembly with the same bearings. Can anyone confirm if this is true in practice, or if I can get away with using the same parts? I am not looking forward to refitting the hubs as getting the right play in the bearing, within those small tolerances seems tedious.

I was hoping to avoid more spending, but will do so if necessary.

One more query! I am going to replace the rear springs, and am intending to lower the rear control arm down with a jack rather than use a spring compressor. Is there anyone with experience of this who knows how far the down the arm needs to swing to let the spring come free? I ask as I plan to do this job on the drive, with the car on axle stands and not too high in the air.

Thanks in advance.
 
Last edited:
Hi all,

Quick query that I was hoping for some help with.

I have been redoing some items on the front suspension relating to an MOT fail and advisory items. I am in the process of installing new control arms and brake discs. (The discs are rusted to the hubs, nightmare).

The whole front area has been a bit of a challenge, and there is now a small pile of rust growing under the front hub on the floor :)

In the process of disassembling everything the brake discs dust shield disintegrated to being extremely rusty, so I pulled the rest of it away intending to replace as well, and I now have the part.

I have come to the realisation that I need the wheel hubs off to replace the dust shield.

The Haynes manual states that you should not refit a hub and bearing assembly with the same bearings. Can anyone confirm if this is true in practice, or if I can get away with using the same parts? I am not looking forward to refitting the hubs as getting the right play in the bearing, within those small tolerances seems tedious.

I was hoping to avoid more spending, but will do so if necessary.

One more query! I am going to replace the rear springs, and am intending to lower the rear control arm down with a jack rather than use a spring compressor. Is there anyone with experience of this who knows how far the down the arm needs to swing to let the spring come free? I ask as I plan to do this job on the drive, with the car on axle stands and not too high in the air.

Thanks in advance.
I’m not familiar with your car but most rear wheel drive Mercs have taper bearings on the front which can be undone to remove the hub then reused, preferably after repacking with grease. If it’s not this type of bearing it is easier to cut the new backplate and ‘wind it on’ over the hub. There are videos on YouTube showing it. Worst case is it’s like my B Class where the backplate is part of the hub assembly which needs replaced in its entirety.
 
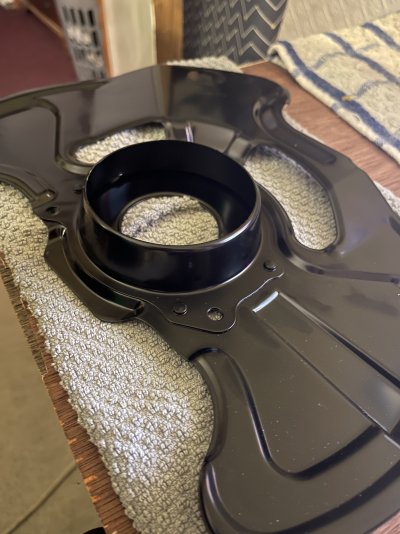
Thanks Colin, I did think about cutting the back plate in, which I am not fussy about, but it doesn't look suited to that. image below.

IMG_2654.JPG
 
To view this content we will need your consent to set third party cookies.
For more detailed information, see our cookies page.


Just found this which I didn't see earlier. This guy just reuses the same hub-bearing assembly. He also has a good tip for refitting, by putting a mark on the nut and spindle to refit to the same alignment.
 
203 rear spring replacement is easy DIY for the home mechanic , using a jack is probably easier than trying to get a spring compressor in there , iv done it and am about to do it again (when the weather clears up) on my own 203.

If working on stands you must (obviously) make sure the car is sable and safe when off the ground. Safety first

Trolley jack under the control arm pivot bolt , remove the shock absorber bottom bolt , remove the pivot bolt and slowly let the jack down . The spring will virtually just drop out.

Do not forget to replace the shim beneath the new springs (dirt cheap) , they are often missing. Might be worth buying new top rubber 'shims' from MB as well , they are about £20 for the pair . Just make sure you get the correct thickness (5 , 10 or 15 mm) , also make sure you get the correct spring rate as well , there are so many different variations , hopefully the colour code is still visible on your original springs. :thumb:
 
When I replaced the brake dust plates on mine I managed to cut it so it can be slightly bent to go over the hub...can't remember
where the cut was actually made but there are some videos online showing how it's done
 
I did it on the rears for mine . No point dismantling a whole hub assembly to replace a £25 piece of pressed tin.

Search my content , I posted a few photos of that job.
 
Thanks the responses. I have gone ahead and removed the hub. I had some rust patches building up on the hub which had fused to the back of the previous brake disc. After some sanding the hub looks much better.

I managed to press out the brake disc with a bolt through the back of the steering knuckle, and a nut that I picked up from Mercedes this morning. Nice trick if anyone gets stuck, possibly easier than waving a lump hammer about.

I marked the alignment of the hub nut and spindle with a centre punch, and will refit to those marks. The grease in the hub and outer bearing looks fine and is still a clean bright green. I don't think I'll mess with this. I'll re-grease the spindle instead.

So, now to fit the new parts. Dust shield, disc, control arms and drop link.

Then spin the car around on the drive and do the other side!
 
Have retired for the day as the lower control arm just will not go in on the ball joint end. Looks to be rubbing against the steering knuckle, not allowing the chamfered section of the ball joint to line up.

I'll have another round tomorrow.
 
Tucks , Im a bit confused , did you actually try the lump hammer method of removing the old brake disc ?
Yes the lump hammer was not doing the job. I would imagine as the whole assembly was pretty much hanging freely this reduced the impact.

A bolt through the back of the hub carrier, with a nut on the other side, with the bolt pushing the brake disc outwards did the trick.

I really had to the tighten the bolt up, after which the brake disc cracked free.

The face of the wheel hub had several rusty spots that had fused with the back of the disc, I was shocked. I’ve not come across that before. I can only imagine they were original or very old discs.
 
Have retired for the day as the lower control arm just will not go in on the ball joint end. Looks to be rubbing against the steering knuckle, not allowing the chamfered section of the ball joint to line up.
Funny, I've changed mine a couple of times over the years and never had this problem. What *has* caused me agro is lifting one wheel at a time - the tension in the ARB and drop links makes any alignment very difficult (front suspension or rear). The solution (obviously!!) is to lift and remove both wheels at the same time.
Ian.

Turns out I was trying to install it the wrong way up. Wouldn’t be the first time! Never mind, all sorted now.

I did wonder about jacking up one side at a time but it has caused minimal issues so far.

All I have remaining is the front n/s lower arm, which has a nut that is stuck on the thread, and the hex section in the middle of the ball joint thread is rounded. It’s never easy. I’ll chop the bolt of this weekend and have done with it.

I’ll be able to start the springs and rear discs/pads next week. Looking forward to driving it after all this rolling around on the floor!
 
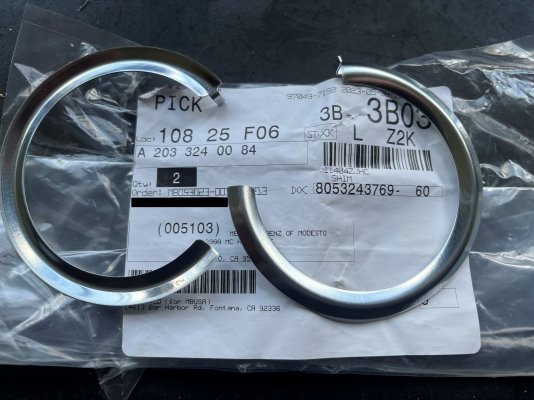
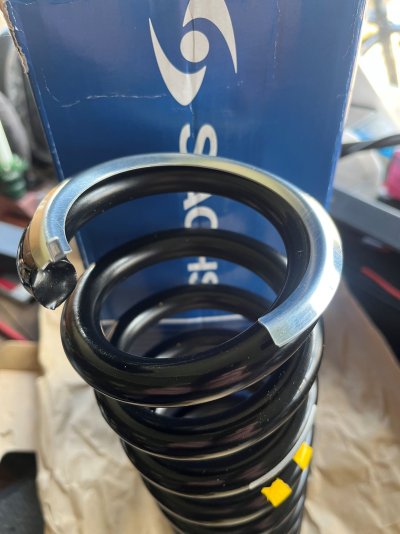
OP , I know you are not here yet but further to my comments in post #5 here are the bottom shims that are often left out , thin stainless steel between the bottom of the spring and the control arm.

shim spring.jpg

spring shim 2.jpg
 
Thanks Pete, I’ll pick some up before starting the springs. MB is a 10 minute walk for me.

I had a question about this - “Trolley jack under the control arm pivot bolt , remove the shock absorber bottom bolt , remove the pivot bolt and slowly let the jack down . The spring will virtually just drop out.”

Is the pivot bolt you are referring to at side of the differential or the wheel?
 

Users who are viewing this thread

Back
Top Bottom