BigDusty
Active Member
Hi All,
I decided to write this up to show and explain how a Kompressor (supercharger) from a C230 K W202 can be repaired after the bearings from the clutch failed. The total cost of repairs were only £120, other options were to replace the whole of the kompressor with clutch costing about £500 - £700 for a second hand one or a £1000 for a new one.
If the actual Kompressor had failed then I would of had no option but to replace the whole unit but for the sake of the bearings failing and in the process damaging the aluminium shaft that they slide onto then repairing it was my best option for cost purposes.
The first hurdle was getting a replacement double row bearing (measuring DIM ID:30mm x OD:47mm x W:22mm) and the only one I could find was in the USA. If you are prepared to wait the postage time then this is the best option.
http://bearingsdirect.com/products/...id=5110&prevaction=search&previd=&prevstart=0
I did find a company that sold a single row bearing
http://www.kellysearch.co.uk/gb-company-80012295.html
Same inner and outer dimensions as the original but was only 9mm wide. I purchased two of these at a total cost of £30, but I had to make a 4mm spacer to go in-between them. For this I used the outer shell of the original bearing and managed to slice off 4mm using a lathe.
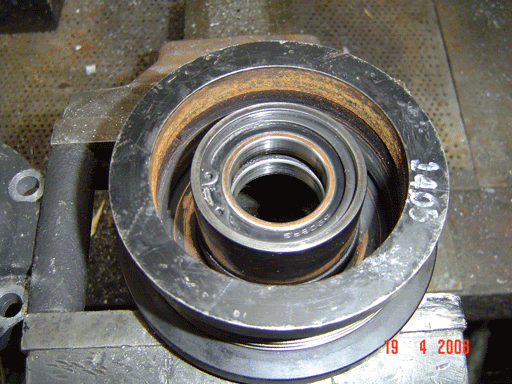
I assembled both bearings with spacer into the clutch pulley and then refitted the cir-clip that held them all in place and it fitted perfectly, so far so good.

Now for the aluminium shaft. This is part of the casing of the Kompressor and replacing it was not an option. I dismantled the Kompressor which wasn’t difficult. Here are some tips for dismantling the kompressor.
Very important, clean any lose dirt or grit from the outside of the kompressor, the last thing we need is for dirt to get inside when dismantling.
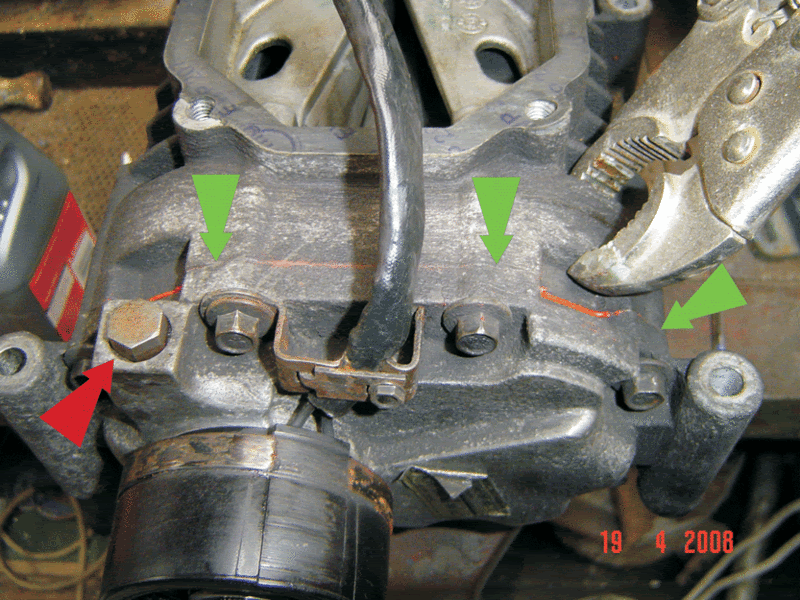
In the picture below you will notice a red arrow pointing to a bolt, remove this to gain access to the gear oil. Pour out the oil into a clean container and put aside, this will come in use for later. You will also notice that I have used a pair of mole grips, when loosening the kompressor bolts two sections will start to separate, I only wanted to separate and remove the front section (note green arrows), the mole grips kept the second section in place. Once all bolts were removed the front of the kompressor will easily slide away with the help of a few gentle taps using a hammer but take care as there is an oil seal on the drive shaft and if damaged then a replacement seal would be in order and getting one might be very difficult or even impossible.

Pictures of the kompressor with the front casing removed exposing the gears.


From here I decided to send the front section away to be repaired by a qualified engineer, I used a company in Cardiff “Stephen Kearney” details as follows
http://www.applegate.co.uk/engineering/company/co_1328272.htm
I was thinking of the idea of having the shaft “Metal sprayed” but being aluminium I couldn’t find anywhere local to do this if it were possible in the first place.
The second option was to cut back the shaft by a mm and sleeve with a steel sleeve, refer to both pictures. This worked perfectly, cost, £80.


Now to reassemble.
Again, make sure no dirt gets into the kompressor, using a scraper (not emery cloth) clean up the areas of the casing that meet and join back together and use some gasket sealant (picture below).

Put some gear oil on the shaft to aid the oil seal and carefully slide the front casing back on to the kompressor. As the kompressor is not covered in the Haynes Manual I decided to torque the bolts to 20lbf.ft.
Replacing the gear oil I used automatic transmission oil but again because the kompressor is not covered in the Haynes manual I didn’t know how much I needed to fill it up by as there is no markings for a guide. This is where you use the old oil that you poured out and hopefully saved. Measure how much that came out and replace with the same quantity adding a little more to compensate for any losses.
Reassemble the remaining components, put the car back together and you should now have one repaired kompressor. Mine is working flawlessly.
OK, a bit of work on my behalf, £30 for bearings and £80 for the sleeve plus a few other bits and bobs to me £120 and having achieved to repair rather than replace for a whopping £1000 was and is very satisfying. There is nothing wrong with the actual kompressor and I couldn't get my head around the thought of paying £1000 for the failure of some simple bearings and an aluminium shaft.
Cheers
BigD.
[edited for picture clarity]
I decided to write this up to show and explain how a Kompressor (supercharger) from a C230 K W202 can be repaired after the bearings from the clutch failed. The total cost of repairs were only £120, other options were to replace the whole of the kompressor with clutch costing about £500 - £700 for a second hand one or a £1000 for a new one.
If the actual Kompressor had failed then I would of had no option but to replace the whole unit but for the sake of the bearings failing and in the process damaging the aluminium shaft that they slide onto then repairing it was my best option for cost purposes.
The first hurdle was getting a replacement double row bearing (measuring DIM ID:30mm x OD:47mm x W:22mm) and the only one I could find was in the USA. If you are prepared to wait the postage time then this is the best option.
http://bearingsdirect.com/products/...id=5110&prevaction=search&previd=&prevstart=0
I did find a company that sold a single row bearing
http://www.kellysearch.co.uk/gb-company-80012295.html
Same inner and outer dimensions as the original but was only 9mm wide. I purchased two of these at a total cost of £30, but I had to make a 4mm spacer to go in-between them. For this I used the outer shell of the original bearing and managed to slice off 4mm using a lathe.
I assembled both bearings with spacer into the clutch pulley and then refitted the cir-clip that held them all in place and it fitted perfectly, so far so good.

Now for the aluminium shaft. This is part of the casing of the Kompressor and replacing it was not an option. I dismantled the Kompressor which wasn’t difficult. Here are some tips for dismantling the kompressor.
Very important, clean any lose dirt or grit from the outside of the kompressor, the last thing we need is for dirt to get inside when dismantling.
In the picture below you will notice a red arrow pointing to a bolt, remove this to gain access to the gear oil. Pour out the oil into a clean container and put aside, this will come in use for later. You will also notice that I have used a pair of mole grips, when loosening the kompressor bolts two sections will start to separate, I only wanted to separate and remove the front section (note green arrows), the mole grips kept the second section in place. Once all bolts were removed the front of the kompressor will easily slide away with the help of a few gentle taps using a hammer but take care as there is an oil seal on the drive shaft and if damaged then a replacement seal would be in order and getting one might be very difficult or even impossible.

Pictures of the kompressor with the front casing removed exposing the gears.


From here I decided to send the front section away to be repaired by a qualified engineer, I used a company in Cardiff “Stephen Kearney” details as follows
http://www.applegate.co.uk/engineering/company/co_1328272.htm
I was thinking of the idea of having the shaft “Metal sprayed” but being aluminium I couldn’t find anywhere local to do this if it were possible in the first place.
The second option was to cut back the shaft by a mm and sleeve with a steel sleeve, refer to both pictures. This worked perfectly, cost, £80.


Now to reassemble.
Again, make sure no dirt gets into the kompressor, using a scraper (not emery cloth) clean up the areas of the casing that meet and join back together and use some gasket sealant (picture below).

Put some gear oil on the shaft to aid the oil seal and carefully slide the front casing back on to the kompressor. As the kompressor is not covered in the Haynes Manual I decided to torque the bolts to 20lbf.ft.
Replacing the gear oil I used automatic transmission oil but again because the kompressor is not covered in the Haynes manual I didn’t know how much I needed to fill it up by as there is no markings for a guide. This is where you use the old oil that you poured out and hopefully saved. Measure how much that came out and replace with the same quantity adding a little more to compensate for any losses.
Reassemble the remaining components, put the car back together and you should now have one repaired kompressor. Mine is working flawlessly.
OK, a bit of work on my behalf, £30 for bearings and £80 for the sleeve plus a few other bits and bobs to me £120 and having achieved to repair rather than replace for a whopping £1000 was and is very satisfying. There is nothing wrong with the actual kompressor and I couldn't get my head around the thought of paying £1000 for the failure of some simple bearings and an aluminium shaft.
Cheers
BigD.
[edited for picture clarity]
