SilverSaloon
MB Enthusiast
- Joined
- Mar 16, 2004
- Messages
- 7,758
- Car
- 1994 W124 E300D Estate, 1985 R107 280SL
Hi
Tools Needed:
- phillips screwdriver
- flat bladed screwdriver
- 10mm socket
I worked on the Driver's side, however the passenger side will be the same. This is for W124 saloon and estate only. I believe coupe/cabrio is similar but they are rivitted on and also have additional runners?
The Problem
My window started to make a very loud clicking noise and then eventually stopped about half an inch from the top of the door. The teeth on the regulator were worn/broken. Some people say they can weld these back on, but I opted for a replacement. In my case my motor seems fine, but I guess the same job applies to replacing a broken motor.
Obtaining the part
I bought a Taiwan regulator from eBay. Very cheap but I cant fault it - yet.
This is the seller:
http://shop.ebay.co.uk/merchant/quickshop168
this is the thread on here regarding purchase:
http://www.mbclub.co.uk/forums/showthread.php?t=61395
Genuine MB ones are very expensive and even 2nd hand MB ones are a lot, and could be on their way out same as my old one, so I opted for this Taiwan part - seems very good actually and I would recommend it.
Preparing
Disconnect the battery 1st. However i found it was easier to have the aid of the motor when removing and installing the regulators. You should disconnect it whilst fitting it in though and only reconnect the battery when your hands are away from the scissor mechanism!!
Removing the Door Card:
I wont go into detail regarding the door card as its pretty much all covered HERE but here is a rough guide aswell:
Firstly you need to remove the door card. To do this, use the flat bladed screwdriver to lever off the black trim around the interor handle. If you have electric seats, then you also need to pull off the button switches and carefully prise the trim away.
Next, undo the 10mm bolt at the top of the door grab handle. Its probably behind a little bit of foam. Use the flat bladed screwdriver to push the metal rod up from the door handle catch, and then slide this towards the front of the car and it will come away.
Use a phillips screwdriver on the black door catch trim at the side of the door and remove it.
Carefully unclip the door mirror trim at the top of the door. unclips and pulls upwards and away.
if you have door puddle lights - undo the bulb holder from the wiring.
Pull the whole door upwards to remove it from the car. Put somewhere safe!
Remove the plastic protector sheet fully. You may need to renew this or you can restick it back on, depending on its condition.
Removing the Regulator
Wind the window completely down the the bottom as far as it will go.
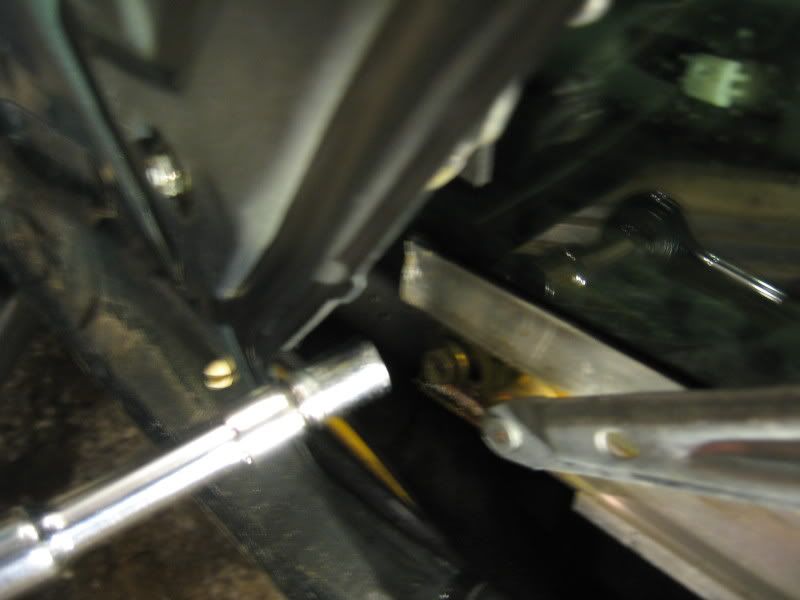
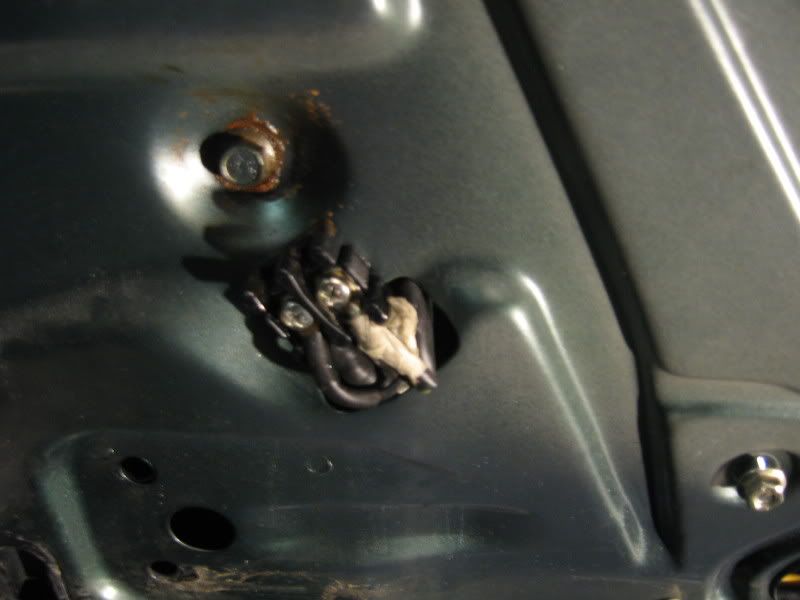
Use your 10mm socket on the nut as shown in the pic below:
Next unbolt all 5 nuts on the door frame visible in the pic below (circled in red)
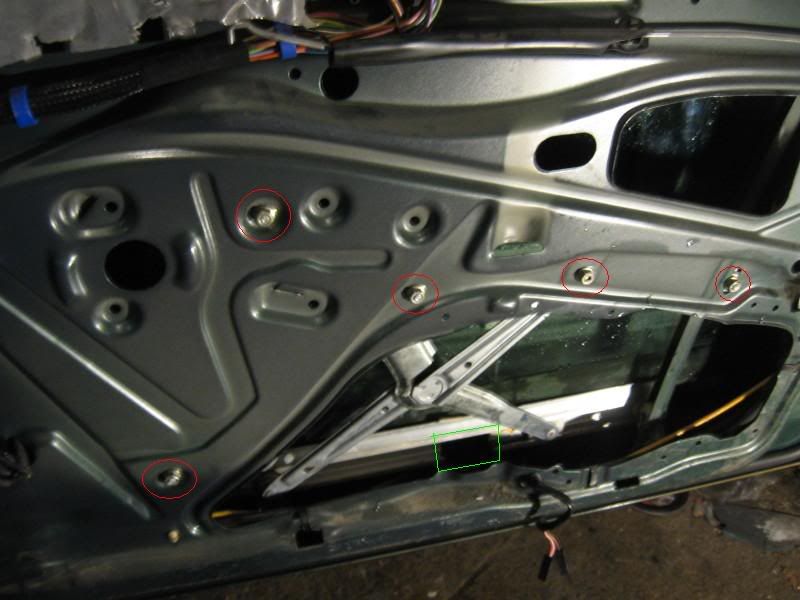
Then, pull the window upwards towards the rear of the car, tilting it - you need to remove the white part of the regulator from the runner via the cut out provided in the middle. This cut out is obvious, but identified in green in the pic above. This is quite fiddily, and will probably require you to move the window up a little bit with the electric motor. Caution advised here of course. Disconnect battery again afterwards!
Once it is free, the window will be able to be manually lifted to the closed position. You could hold it with tape to ensure it doesnt fall back down.
Next, remove the wiring for the electric motor. You should make a note of what wires go where. I taped some masking tape around the lower wires to distinguish between them. Undo them with the phillips screwdriver and poke them through the hole into the door:

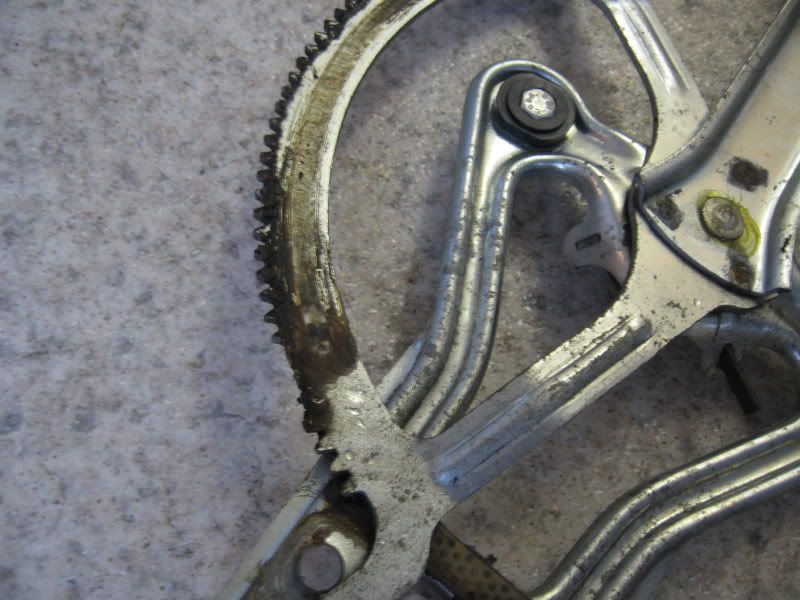
Now the fun it - pull out the old regulator and motor best way you can. Once it is out you can see the extent of the damage on the old regualtor's teeth:
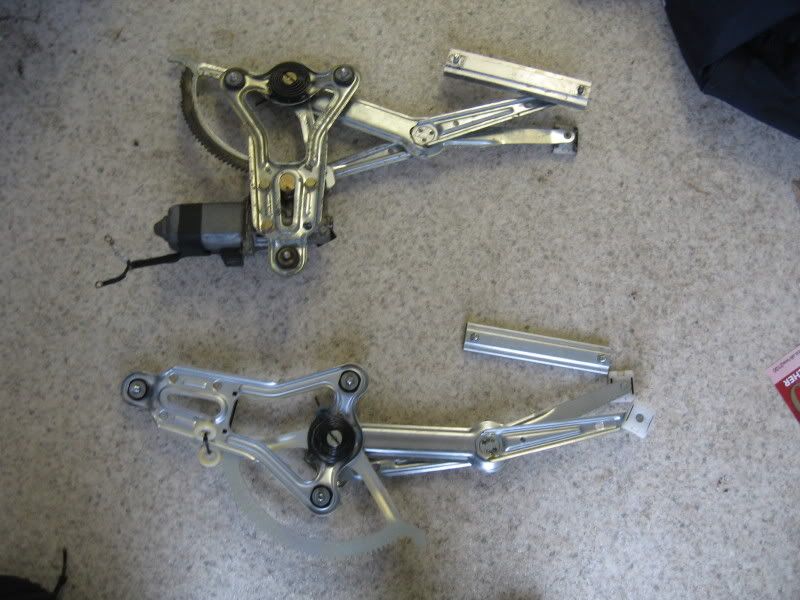
Comparing the new part and the old part. The new Taiwan part I fitted does look as good as the OEM MB part, however the springy coil part of it did seem to bend outwards when taught - the MB one didnt do this but i dont think it is a big issue:
Now, we need to remove the motor from the old regulator and fit it to the new one. Use your 10mm socket here again on the 3 bolts that hold it on.
Once it off the old regulator, try to position the new regulator in the shape of the old one. You need to fit the motor when the new regulator is in a taught state. Put the motor against the teeth and refit the 3 bolts. Gives you this:

You now need to fit it back onto the car. Move it into the door in the same way as the old one came out. Hold it in rough position by inserting a thread though one or more of the mounting holes. At this point push the wires through the hole again and reconnect the electrics to the motor remembering what wires go where:
Now the next bit may be fiddily, depending on the quality of the part you purchased. You need all the threads in all the holes. Mine was tight so i put one thread in the bottom 1st and loosly put the nut on it, and then levered the rest through the holes. In the end, they all went in with minimal fuss and i tightened all the nuts. There is one nut at the rear of the door that can be mounted at varying hights. I used the mark the old bolt had made as a guide to where to tighten the new one:

Difficult bit now is to get the door back on the regulator horizontal runner and the verticle runner that sits inside the door at the front itself. The verticle runner runs along the front of the inside of the door and you need to ensure the window is slotted into here, otherwise it will only go half way up and then get stuck!
Pull the window down and towards the rear of the door. Tilt it so that the front is lower than the rear and try to get the front of the glass into the verticle runner. You may need a torch to see this through the top of the window gap looking down. When you are doing this, you also need to get the white part back into the horizontal runner. Again, use of the electric motor makes this easier.
Once these are both in, push the glass as far to the rear of the door as you can manually, then refit the 1st bolt you removed again to the regualtor's runner at the front of the door. Its important to move the glass as much to the rear as you can here, otherwise it will struggle to get all the way up and get stuck/struggle about 1/4 away from the top of the door.
Carefully, test the opening and closing of the window. It should go up and down smoothly and crunch/crackle free") You may need to adjust a few things to get it nice and smooth.
You may need to adjust a few things to get it nice and smooth.
Refit/renew the plastic protector sheet and refit the door card. There is a nack to this:
Refitting Door Card
The refitting of the door card is basically reversal of removal, but you need to make sure all the clips are in place.
Make sure the holes for the clips are not blocked with tape or the plastic sheet.
Line up the door card against the door. Push the puddle light wires through the gap before you start.
Make sure the lowest clips are in position, then push the middle clips into position ensuring the lower ones stay secure. Then push down on the door card. It may take several attempts until all clips are clipped in. Ensure they are as it makes a hudge difference to the feel of the door afterwards. Carefully push/punch down on the top of the card to engage the metal trim against the upper metal clips.
Reconnect the rest of the plastic trim as you removed it.
Have a beer
Tools Needed:
- phillips screwdriver
- flat bladed screwdriver
- 10mm socket
I worked on the Driver's side, however the passenger side will be the same. This is for W124 saloon and estate only. I believe coupe/cabrio is similar but they are rivitted on and also have additional runners?
The Problem
My window started to make a very loud clicking noise and then eventually stopped about half an inch from the top of the door. The teeth on the regulator were worn/broken. Some people say they can weld these back on, but I opted for a replacement. In my case my motor seems fine, but I guess the same job applies to replacing a broken motor.
Obtaining the part
I bought a Taiwan regulator from eBay. Very cheap but I cant fault it - yet.
This is the seller:
http://shop.ebay.co.uk/merchant/quickshop168
this is the thread on here regarding purchase:
http://www.mbclub.co.uk/forums/showthread.php?t=61395
Genuine MB ones are very expensive and even 2nd hand MB ones are a lot, and could be on their way out same as my old one, so I opted for this Taiwan part - seems very good actually and I would recommend it.
Preparing
Disconnect the battery 1st. However i found it was easier to have the aid of the motor when removing and installing the regulators. You should disconnect it whilst fitting it in though and only reconnect the battery when your hands are away from the scissor mechanism!!
Removing the Door Card:
I wont go into detail regarding the door card as its pretty much all covered HERE but here is a rough guide aswell:
Firstly you need to remove the door card. To do this, use the flat bladed screwdriver to lever off the black trim around the interor handle. If you have electric seats, then you also need to pull off the button switches and carefully prise the trim away.
Next, undo the 10mm bolt at the top of the door grab handle. Its probably behind a little bit of foam. Use the flat bladed screwdriver to push the metal rod up from the door handle catch, and then slide this towards the front of the car and it will come away.
Use a phillips screwdriver on the black door catch trim at the side of the door and remove it.
Carefully unclip the door mirror trim at the top of the door. unclips and pulls upwards and away.
if you have door puddle lights - undo the bulb holder from the wiring.
Pull the whole door upwards to remove it from the car. Put somewhere safe!
Remove the plastic protector sheet fully. You may need to renew this or you can restick it back on, depending on its condition.
Removing the Regulator
Wind the window completely down the the bottom as far as it will go.
Use your 10mm socket on the nut as shown in the pic below:
Next unbolt all 5 nuts on the door frame visible in the pic below (circled in red)
Then, pull the window upwards towards the rear of the car, tilting it - you need to remove the white part of the regulator from the runner via the cut out provided in the middle. This cut out is obvious, but identified in green in the pic above. This is quite fiddily, and will probably require you to move the window up a little bit with the electric motor. Caution advised here of course. Disconnect battery again afterwards!
Once it is free, the window will be able to be manually lifted to the closed position. You could hold it with tape to ensure it doesnt fall back down.
Next, remove the wiring for the electric motor. You should make a note of what wires go where. I taped some masking tape around the lower wires to distinguish between them. Undo them with the phillips screwdriver and poke them through the hole into the door:
Now the fun it - pull out the old regulator and motor best way you can. Once it is out you can see the extent of the damage on the old regualtor's teeth:
Comparing the new part and the old part. The new Taiwan part I fitted does look as good as the OEM MB part, however the springy coil part of it did seem to bend outwards when taught - the MB one didnt do this but i dont think it is a big issue:
Now, we need to remove the motor from the old regulator and fit it to the new one. Use your 10mm socket here again on the 3 bolts that hold it on.
Once it off the old regulator, try to position the new regulator in the shape of the old one. You need to fit the motor when the new regulator is in a taught state. Put the motor against the teeth and refit the 3 bolts. Gives you this:
You now need to fit it back onto the car. Move it into the door in the same way as the old one came out. Hold it in rough position by inserting a thread though one or more of the mounting holes. At this point push the wires through the hole again and reconnect the electrics to the motor remembering what wires go where:
Now the next bit may be fiddily, depending on the quality of the part you purchased. You need all the threads in all the holes. Mine was tight so i put one thread in the bottom 1st and loosly put the nut on it, and then levered the rest through the holes. In the end, they all went in with minimal fuss and i tightened all the nuts. There is one nut at the rear of the door that can be mounted at varying hights. I used the mark the old bolt had made as a guide to where to tighten the new one:
Difficult bit now is to get the door back on the regulator horizontal runner and the verticle runner that sits inside the door at the front itself. The verticle runner runs along the front of the inside of the door and you need to ensure the window is slotted into here, otherwise it will only go half way up and then get stuck!
Pull the window down and towards the rear of the door. Tilt it so that the front is lower than the rear and try to get the front of the glass into the verticle runner. You may need a torch to see this through the top of the window gap looking down. When you are doing this, you also need to get the white part back into the horizontal runner. Again, use of the electric motor makes this easier.
Once these are both in, push the glass as far to the rear of the door as you can manually, then refit the 1st bolt you removed again to the regualtor's runner at the front of the door. Its important to move the glass as much to the rear as you can here, otherwise it will struggle to get all the way up and get stuck/struggle about 1/4 away from the top of the door.
Carefully, test the opening and closing of the window. It should go up and down smoothly and crunch/crackle free
You may need to adjust a few things to get it nice and smooth.Refit/renew the plastic protector sheet and refit the door card. There is a nack to this:
Refitting Door Card
The refitting of the door card is basically reversal of removal, but you need to make sure all the clips are in place.
Make sure the holes for the clips are not blocked with tape or the plastic sheet.
Line up the door card against the door. Push the puddle light wires through the gap before you start.
Make sure the lowest clips are in position, then push the middle clips into position ensuring the lower ones stay secure. Then push down on the door card. It may take several attempts until all clips are clipped in. Ensure they are as it makes a hudge difference to the feel of the door afterwards. Carefully push/punch down on the top of the card to engage the metal trim against the upper metal clips.
Reconnect the rest of the plastic trim as you removed it.
Have a beer