right, finally got around to having a look today. My plan was to remove osf wheel and then liners and go from there. I did read somewhere that you can access from under the bumper, so I thought it would save me having to remove the wheel.
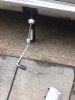
However, once i used the MB jack, (which was very good btw), i could not find anywhere to put my axle stand?
After a good look underneath, I found the jacking/stand point at the front of the car - a rubber block which i had seen in various photo's, so placed my axle stand there.
I could not remove the lower mudguard under the DRL completely, as this seemed to be attached to part of the arch liner, and i did not have enough room to work with.
I had a choice to either: - Lower the car and remove wheel and liners or remove the undertrays and go from there.
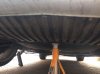
I chose to remove the undertray - the main one and the smaller one behind it, which was easier than I thought, although I did manage to get my face covered in the crap that had collected on it whilst I removed it!
I had good access to the DRL and managed to unclip the old unit out and clip the new one in, tested working before I refitted the undertrays.
I had a good look underneath and no signs of any leaks/fluid as far as my untrained hypermetropic eyes could see!
So I am feeling pretty pleased that I managed to get the undertrays back on and completed the job in around 2hrs, but I have learned a few things now about removing the and refitting the undertrays!
Next time will be quicker!
I did intend to take more pics, but it was bit awkward when on your back!