• The Forums are now open to new registrations, adverts are also being de-tuned.

Climate issue - air to footwell

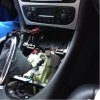
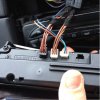
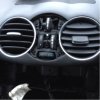
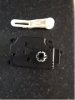
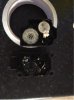
I took the stepper motor out again, thats a mission in itself, and took it apart to see if there was anything obvious, as I could move the footwell flap easily with 1 finger and it seems to move through the range no problem. There was nothing obvious in the casing and the cogs other than 1 very small piece of plastic which may have already been there or have come off when I opened the casing. I forced the movement and could make it click so decided to opt for another motor - I got one from Merc new and fitted it, and now it doesn't click, but it does seem to have got stuck and not cycle through the movement any more - is it stuck, have i got a power problem, who knows! I have air to the footwell and its not clicking so that will have to do, else its the entire dash out, and given my spare car has just blown up I can't keep the merc off the road anymore.
 
Ah I see thank you I didn't realise that - so I suppose there's every possibility it could be normalised and start clicking again
 
If the clicking is from a broken/faulty cog (or whatever) then it could start clicking again once the motor is normalised and working.

I guess your other option, as you're getting air to the footwell now, is to leave it as it is - assuming you're also getting air to the other vents as normal.
 
Its nice to have heat around your feet again.
 
You can say that again especially in this weather !
 
I am pleased to report all is good - I have adjustable air to my feet - hoorah!
I have completed the guide but can seem to upload it due to its size - its in the MB instead of the KB. As I'm at work our Wi Fi won't let me do a DropBox or similar, so the guide will follow shortly :D
 
Mercedes W209 CLK dash removal – for clicking dash – M2/11 faullt

You will need at least:
Flat Head screwdriver
Lots of ratchet extensions, bits, elbows etc. Get as many tools as you can in T20 size.
T40 socket
T20 socket/screwdriver bit
A torch
A good selection of dash trim tools (small handled tools with various hooks etc on the end)
Magnetic trays
Masking tape & pen
Lots of patience, time to take the car off the road and prepared to go without for a week or so ( to take the time to remove the dash and order the parts required) depending on your plans

I found some great How To guides from Pelican Parts


1. Remove gear gator, pull up then forward, disconnect roof switch distronic and gear selector switch


cont
 

Attachments

  • merc sash 1.jpg
    merc sash 1.jpg
    52.2 KB · Views: 9
Last edited:
2. Unclip chrome surround from silver facia underneath
3. Press black tab at bottom of gear stick and pull back into drive or neutral with park break on
4. Lift black flaps on ashtray forwards towards you and start to pull out ashtray. A bit of jigging and it comes out
5. Disconnect wires from back of ashtray
6. Underneath where the ashtray sat there is a small black cover with a hump shape on either side, these can be pulled off with fingers or a small prying tool.
7. Use a T40 to start to undo – loosen approx. 90 degrees then stop when you feel the resistance
8. Using a T20 screwdriver, under the screw either side at the bottom of the centre silver facia, they are quite far back in under the air con unit. It’s a good idea to put the screws from certain areas together in some masking tape and label where they’re from.
9. Gently pry centre console loose – remove wires and remove surround (picture shows behind rown of buttons at top of console.)
 

Attachments

  • Centre console buttons.jpg
    Centre console buttons.jpg
    51 KB · Views: 9
10. Remove 4 T20s holding radio in
11. Prise off the centre facia between the air vents gently
 

Attachments

  • centre air vents.jpg
    centre air vents.jpg
    36.4 KB · Views: 8
12. Remove 4 T20’s behind the facia
13. Now start work under the steering wheel (assuming your flap fault is on the drivers side)
14. Remove tray on upper side of drivers footwell by removing screws
15. Unplug the connections and then start to disconnect the ignition module. Most of the plugs are self explanatory except the connection on the top, which appears to be a cable in a black sheeth. You will need to squeeze in the connections at the end and pull it towards you and up at the same time, it is an L shape connector bar and is locked into the module. You will need to connect this outside of the trim if you want to continue to be able locking the car and having the windows auto close when you close the door. If you disconnect it the rear window will not close up and the central locking will not work

Pictures shows the rear of the light switch cluster. You may find on refit these clips need returning to shape to keep the cluster in fully.
 

Attachments

  • rear of light switch module.jpg
    rear of light switch module.jpg
    32 KB · Views: 9
16. Remove 2 screws behind parking break handle, then remove screw buried up above which holds headlight switch block in
 

Attachments

  • handbrake .jpg
    handbrake .jpg
    29.9 KB · Views: 9
17. Now to remove instrument cluster, as there are screws holding the lower facia in from the instrument cluster opening. A special tool is required, available from Merc or ebay or similar, these are thin metal sticks with a slight L shape on the end.
 

Attachments

  • instrument cluster removal tools.jpg
    instrument cluster removal tools.jpg
    20.8 KB · Views: 11
Your car may now look something like this (pre instrument cluster)
 

Attachments

  • pre instrument cluster.jpg
    pre instrument cluster.jpg
    24.5 KB · Views: 18
  • pre instrument cluster 2.jpg
    pre instrument cluster 2.jpg
    26.2 KB · Views: 21
18. To remove the M2/11 Stepper motor is a sod! There are two structural metal bars in the way and getting to the 3 screws is hard work. It took me around 2 hours with a multitude of tools to get these screws out. You can do it without cutting through or into the metal bar. You can access the two on the left diagonally through the radio cage, the one on the right can be done either from being in the footwell upside down or through the dash, but be prepared to use ratchet elbows and all sorts.

You will note the blue arrow on the picture, it points to the non arm in situ on the motor, this picture was taken looking towards the top of the dash in the footwell.
 

Attachments

  • Screen Shot 2015-01-30 at 18.37.43.jpg
    Screen Shot 2015-01-30 at 18.37.43.jpg
    18.4 KB · Views: 20
Last edited:
20. When you finally remove the motor you are likely to find that either the nylon arm has cracked or the motor needs replacing. If clicking continues its likely to be another motor or further into the dash. I didn’t figure out how to remove the central air box which contains all the cogs but it seems it would need the top 1 piece of the dash removing and then being got at from above, there seems to be too much in the way

I found that because I had disconnected my centre console where my passenger airbag light did its check, my SRS light stayed on once all was reassembled. You will need to visit a STAR machine to have this removed.

I hope this helps someone if they've hit a stalling point - it can be done - you just need time, determination and patience - don't be beaten by a German manufactured car! I adopt the same policy for Microsoft! :crazy:
 

Attachments

  • stepper motor 1.jpg
    stepper motor 1.jpg
    20.6 KB · Views: 19
  • stepper motor 2.jpg
    stepper motor 2.jpg
    21.5 KB · Views: 15
  • stepper motor apart.jpg
    stepper motor apart.jpg
    17.4 KB · Views: 17
Brave man, but fair play
 

Users who are viewing this thread

Back
Top Bottom