Familiar E55 W211 Moved to New Home Further North

Page may contain affiliate links. Please see terms for details.
Alps you must be so happy your E55 has gone to such a good home! and not to some ‘boy racer’ :)

Thanks, I do feel a little guilty that I've not had the car out in the summer but on the other hand the car is going to be mint underneath when finished.
 
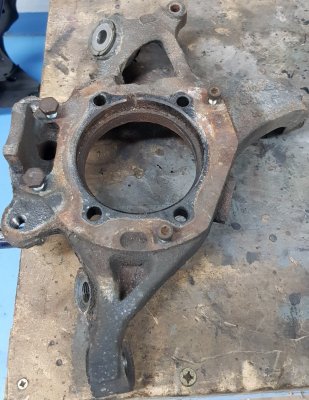
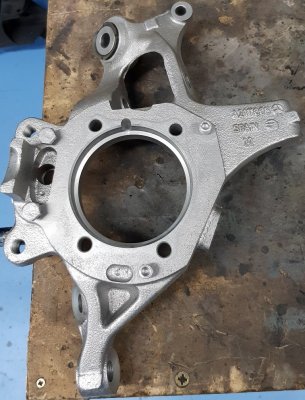
Got the other wheel carrier cleaned up today along with some of the bolts I'm going to use again, painting time soon.

BEFORE
20180905_131603.jpg


AFTER
20180905_170002.jpg

Gonna finish cleaning and degreasing the diff housing next then use metal prep and POR15 on it.
 
Looking good Pat.

What medium are you using in your cabinet? I was using a coarse aluminium oxide, now changed to a smoother mix, which is OK for castings etc, though a bit harsh on mild steel brackets and things. I tried glass beads but that was taking an age...
 
Looking good Pat.

What medium are you using in your cabinet? I was using a coarse aluminium oxide, now changed to a smoother mix, which is OK for castings etc, though a bit harsh on mild steel brackets and things. I tried glass beads but that was taking an age...

We used to use Aluminium Oxide 60/80, to coarse but and eats our nozzles.
A lot of the stuff we do is alloy though and it's a pain changing media.
Now we stick to Glass Bead 100~200 micron, like you say takes an age but good for polishing some items.
 
Yes, one bloody heavy diff. I lifted it myself on Monday and almost did my back in again.
I have recently done my rear main seal, that transmission box is a heavy boy lol.
 
Not much done today, got the main casing for the differential painted black.

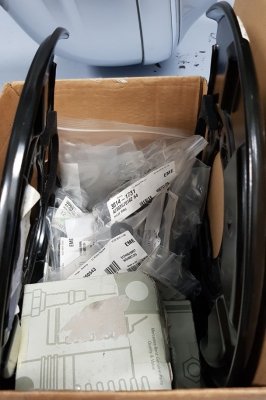
Cleaned up some arms and bolts, oh and ordered new brake back plates for the rear to match the fronts. ;)
 
All this talk of media in the cabinet jinxed me. :)

Went to do (clean & polish) the end of the diff. housing today and it had some black stuff on the bottom that was harder than highland toffee.
Glass bead etc. wouldn't budge it, switched to some aluminium oxide and after a bit (2 hours) of patience got it all off.

Will have to switch back to glass bead to polish a bit before the autosyl on it but may have to be next week as I've just been told I may be taking the other half for a meal and some social time tomorrow. ;)

Also started cleaning up all the area above the subframe just to make Gav jealous. :)

Usual (recently) delay on some parts from MB, waiting on nuts bolts etc. for getting the subframe/suspension back on.
 
Rotfl dam missing mine atm :( awesome work buddy wish I had the keys to the workshop where mine is lol
 
Not much to report today.

Got the wheel carriers painted (silver), the hub flanges cleaned then painted on rear (black) and the alloy diff. end cover polished.

Also used an M14 tap to clean out the holes (thread lock) for the subframe attaching to the chassis and cleaned up the bolts ready for new thread lock.
 
Spent a bit of time starting to clean up the back end to remove any excess oil and muck etc.

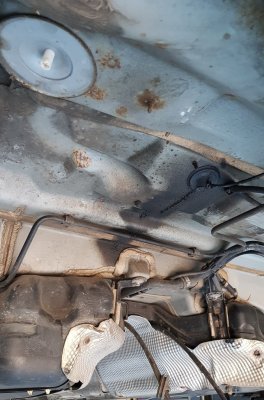
Quite surprising when you start clearing this away that you then start to notice a lot of small exposed areas, some starting to show signs of surface rust. Especially around the spot welds, very small though but still require attention.

As I was cleaning I then decided that I really need to get the rear heat shields off to get up inside everywhere all along the back end.

To get the heat shields off though the back bumper has to come off and surely this is just too much trouble. ;)
You guessed it, of course not lets get it off.
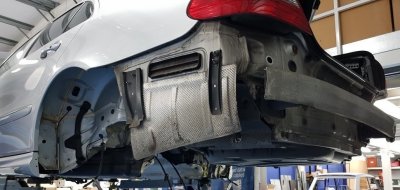
20180911_164100.jpg

The shields on the underneath (not the side ones shown above) are quite poor, they have the tell tale rot through some of the retaining holes meaning "big" washers would be needed to hold these on if removing and refitting.

I think I'll replace the underneath ones with new and clean up the side ones as well as when I'm doing the underneath.

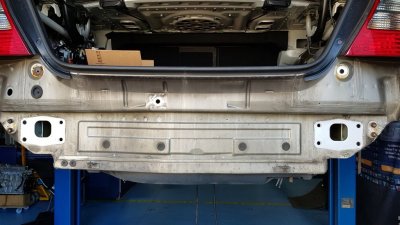
The brackets that hold the rear bumper on at either side though were way past their best.
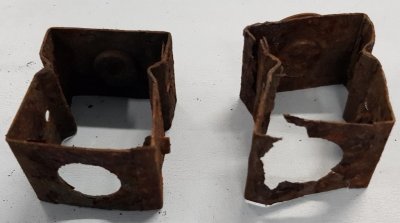
20180911_164016.jpg
New brackets now on order.

Also decided we are going to epoxy coat the new rear subframe to, will treat all the weld joints by hand 2 or 3 coats then spray the subframe, this should make it good for quite a while.
 
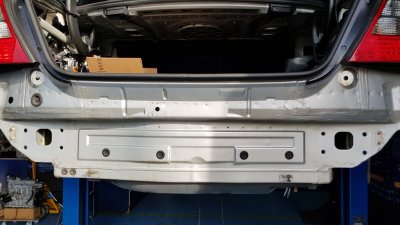
On having a look at the back end and rear cross member decided to remove this to get in and clean/treat all areas.

Quite dirty and got the odd spot of rust on some spot welds as well as a little on the rear exhaust hanger bolts.

20180912_132337.jpg


All cleaned up now but by the time it took the sun had moved hence the shadow.

20180912_170015.jpg


If you look at the row of spot welds just below the boot lip you will see a few of these need treated.

Still a little bit more cleaning around this area to do then will treat the small areas showing some some slight surface rust.
 
On looking closer at the rear cross member after stripping the 2 main brackets off there was a little bit of galvanic corrosion on the 2 bolt holes that hold the cross member onto the brackets.
This had actually corroded away the end of the holes both ends on one side so both holes were now C shaped.

Luckily it just so happens I had exactly the same bracket from the E220 where this had been swapped out for a Westfalia tow bar.

Checked this and it was good, quick clean of the original brackets and a coat of paint and the same to the new cross member ready for a second coat and install again.
 
A little bit more work done this afternoon.

Got the 2 rear side heat shields cleaned up very nice, looking like new, had to remove the black brackets you can see in my post 210 from the shields (riveted on) to blast and paint the brackets as they had a little corrosion.
Also got the cross member and brackets finished and ready to go back on, looking very nice too.

I'll try and take a picture the same as the one in post 210 if folks want to see the difference when it is back on?


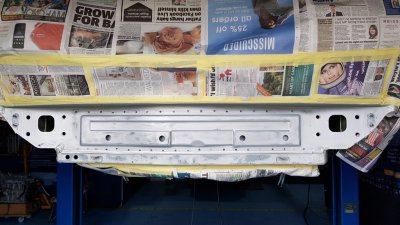
After consultation though with our resident restoration/metal expert the consensus was that there was quite a bit of rust blistering along the back end that would be better being addressed now rather than leaving.

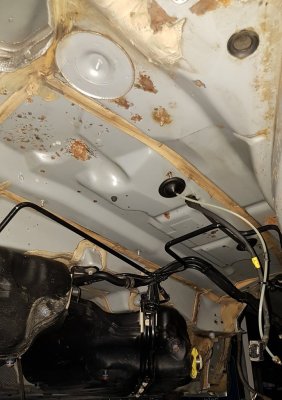
So we went around all the spot welds and offending areas on the back end, you can get an idea looking along the bottom where this has been rubbed down then treated with metal prep to etch the rust.

20180913_162224.jpg

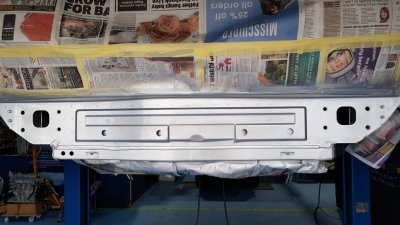
After treating and cleaning the entire area it was treated with a coat of etch primer, 744U silver then a coat of top coat.

20180913_171137.jpg

Looks much better now (shadow left of centre), I'd say just as good as the day it came out the factory but then I would say that. ;)

Also got the rear exhaust hanger brackets done, will get the heat shields put back together tomorrow to await the 2 new ones on order.
 
This really is Triggers broom.

LOL, at least I'm keeping some bits. ;)

For some parts though it's just not worth it to reuse old/part damaged parts.

Example is the 2 x bottom heat shields at the rear, 3 securing holes in each but each one corroded all the way so that maybe a 30~40mm washer would be needed to hold on, new parts are £16 & £17 each so an easy choice for me.

The side ones were £35 each so fixed (cleaned and small refurb) existing ones as they were not damaged.

Those little nuts that hold the heat shields on though are £1.80 each, now that is sore and there is 20 just for the shields.
Not all damaged but I've got 12 new ones here so can see another 8 on the horizon when I realise some look "different".
 
Did a stock take of parts today and noticed no bolts to hold the rear wheel bearings onto the wheel carrier.
Thought they would have come with the new bearings but no, have to be bought separate from MB, £4.50 each!

Got the cleaning and polishing of the diff. end and all it's bolts done today and got some flange sealer as well as threadlocker on order from a friend who sells Henkel stuff.

Done a general bit of tidying up around the workshop then refitted the rear cross member, plastic plugs and the exhaust brackets.

20180914_164126.jpg
 
Got another delivery today, rear heat shields (man they are shiny) and the new bumper brackets as well as a few plastic expanding rivets for the bumper brackets.

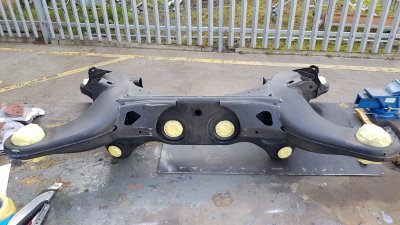
Subframe is now painted, looking rather smart, will get a pic. up when it's out of our "makeshift" spray booth.

Now getting the underside ready for some treatment so needs a good clean up.
Even before its cleaned up you can see the start of some corrosion in some places.

20180917_111417.jpg

All cleaned up and any bubbling under the paint/corrosion cleaned away.

20180917_170336.jpg

Will next get some rust treatment (POR 15 probably) onto the effected areas as its likely going to need at least 2, probably 3 coats in areas to put a stop to any further corrosion.
 
I'm hoping that I'm not doing the "teaching how to suck eggs" here Pat, but have you tried STRIP AND CLEAN PADS for those scabby areas under the subframe?

I've linked to one specific make as I found them to be the best though obviously others are available. I use the 75mm ones on a little air sander I acquired from somewhere and they really rip through it and leave a finish good enough to apply etch primer. A couple of coats of colour, then a protection of your choice. I used Bilt Hamber on mine.

Will next get some rust treatment (POR 15 probably) onto the effected areas as its likely going to need at least 2, probably 3 coats in areas to put a stop to any further corrosion.

You probably know but DON'T get POR on your skin or you'll end up like a Dalmatian for about a month. :D
 

Users who are viewing this thread

Back
Top Bottom